Tuck in, kiddies! I’m going to talk about cupcakes, and there’s just no way to accurately describe these babies and still be brief. So pull up a chair, it’s story time.
It all started with my sister sending me a link to a baking contest. Bravo and product placement company blah, blah, blah (the contest can be found here) - basically the contest is to make a dessert inspired by the flavors of key lime pie, strawberry shortcake, or mint chocolate chip. After voicing my disappointment that limes and strawberries were nowhere near in season anymore, I totally copped out and said I didn’t already have a good recipe to use and I wouldn’t be able to come up with anything decent in time. If I haven’t properly conveyed how completely awesome my sister is before, let me do so now. See, she knows me, so she was having none of my nonsense. She suggested something easy enough - take my strawberry margarita cupcake recipe and modify it to make a key lime cupcake instead. “You could even do a graham cracker crust on the bottom like those Martha Stewart ‘smores cupcakes I made that were awesome.” And it was like a light went off in my head - I was suddenly inspired! A lime-infused vanilla cupcake with a lime curd filling and lime-flavored meringue buttercream would be not only do-able, but delicious, and the graham cracker bottom might just nudge it into awesome territory.
My sister, ladies and gentlemen!
Unfortunately, this means that once again credit for the genius of the recipe must be given entirely elsewhere. And this is why fellow food lovers are integral to the home cook’s creative process. Sometimes they have all the good ideas and let you steal them. Plus, I’ll always have Husband’s birthday cake recipe. That one was all me.
So, per my sister’s most excellent suggestion, I made (and submitted!) these key lime pie cupcakes, or key lime vanilla cupcakes with a graham cracker crust bottom, key lime curd filling, and key lime Swiss meringue buttercream. And sprinklings of other fun touches here and there. These cupcakes were not nudged anywhere. They took a superman leap over awesome and landed somewhere in oh-my-goodness-what-are-these!?. Let’s go into it, shall we? Don’t worry, I’ll take it slow.

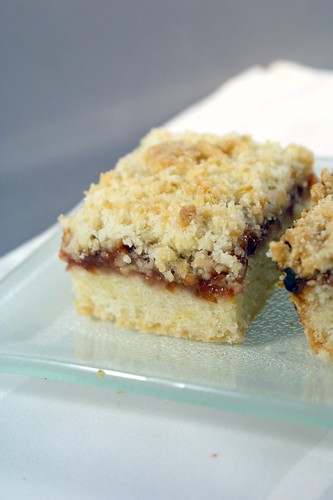
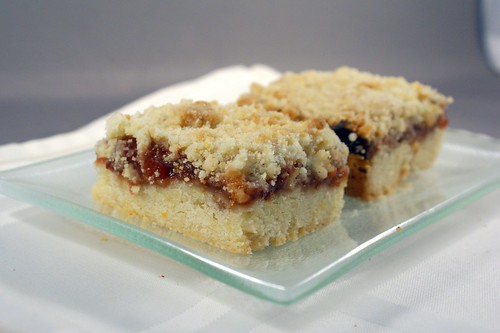
So this cupcake starts with the graham cracker crust. I added some key lime zest for good measure. I wanted to make sure the lime flavor really came through, and even though I added it everywhere, I’d say it stayed a subtle background flavor, in a good way. I blind baked the crust, like you do with a real key lime pie, and then added some white chocolate shavings before pouring in the cupcake batter. Martha Stewart’s ‘smores cupcakes recipe used chocolate shavings, and I thought it was probably needed to act as a binder between the crust and the cupcake. And either way, the richness from a little white chocolate would only make it tastier. I sprinkled the extra graham cracker/white chocolate mixture over the tops of the cupcakes before I put them in the oven to bake, so they had a slight crumb on top as well as the crust underneath. The cupcakes themselves were just a simple vanilla cupcake, infused with some key lime zest and juice. But what’s a key lime pie inspired cupcake without key lime curd? I holed out the tops of the cupcakes after they had cooled and poured in a dollop of curd, then topped them with the light as air frosting, reminiscent of the meringue that sometimes comes on key lime pies. And finally, I rubbed some graham cracker crumbs with a little key lime zest and dusted a pinch over each cupcake for garnish. Look at me, I’m fancy.
I have to say, this was my first time making a cupcake with a crust on the bottom, and it is flipping fantastic! Why don’t all cupcakes have one? It’s delicious - like a cupcake and pie had a love child. The sprinkling of the crumb/chocolate mixture on the top of the cupcake definitely united all the flavors. Unless you have a mouth the size of a grapefruit, it’s cumbersome to try and bite both the top and bottom of a cupcake at the same time. Usually you go in at an angle, right? Well having the crust flavor on top of the cupcake meant that each bite had some of that graham cracker flavor, so each bite kept the connection to its inspiration - key lime pie. Husband thinks this detail is key to the success of the cupcake, so don’t skip it!
Also crucial? The key lime curd. Sure, it’s just a small dollop in the middle of the cupcake, but it’s also where you get the burst of key lime flavor. I loved all the subtle hints of lime throughout the cupcake, but it wouldn’t have tasted like a key lime pie without the curd. Plus, it was so tart, and sweet and creamy, that a smidgen is all that was needed to capture the bright flavor without getting hit in the face with it.
The cupcake was so complete without the frosting that anything like a traditional buttercream or cream cheese frosting would have detracted and distracted from it. Thrown it off the balance. So the Swiss meringue buttercream was perfect. It was light as a cloud; just a delicate, sweet touch. And look how glossy it is! Gorgeous. A friend of mine gave a cupcake to her son, and his feedback was that at first bite he didn’t like the frosting because he was expecting a traditional buttercream. The texture of it, so light and airy, threw him off. But on the second and subsequent bites, after he knew what to expect, he loved it. Great feedback, huh?
The cupcake itself was very light and tender. I went with a simple vanilla cupcake as the base because there were so many other flavors and elements. The cake itself was not the star, but it was still a delightful, delectable bite that helped highlight the other flavors. All the elements of the cupcake really came together in a great way. I couldn’t believe how much it brought to mind a key lime pie! These may just be the best cupcakes I’ve ever made. Ok, the Irish car bomb cupcakes I made for St. Patrick’s Day this year were pretty great, but they didn’t have a graham cracker crust, so they just don’t measure up anymore.
Delicious as they are, these cupcakes are no picnic to make. They’re not difficult, per se. Far from it. But they are labor intensive; lots of steps. Zesting and juicing one pound of key limes to start was a bit of a pain. Then you make the graham cracker crust mixture, bake it, make the batter, bake that, make the key lime curd and buttercream, and finally wait for everything to cool so you can finish putting it all together. It’s not an all day undertaking by any means, but don’t leave these until an hour before your party starts or you’ll be the unwitting host of a baking demonstration. Also, the recipe makes a ton of cupcakes. It was supposed to make 2 dozen, but with the graham cracker bottom and the airy cupcake batter, it made more like 2 and a half. Thankfully, I have friends willing to eat my baking experiments!
These cupcakes may be a special occasion only treat, but boy are they ever special! Let’s hope the good folks at Bravo agree because I sure could use a $5,000 kitchen makeover.

Key Lime Pie Cupcakes
makes about 28 cupcakes
cupcakes partially adapted from Annie’s Eats and Martha Stewart
[Note: You’ll need 1lb bag of key limes, zested and juiced. Don’t have key limes? Regular limes will work fine too.)
For the graham cracker crust:
2 1/2 cups graham cracker crumbs
1/2 cup sugar
2 TB lime zest
1/2 cup (1 stick) unsalted butter, melted
7 ounces white chocolate, finely chopped
For the cupcakes:
3 cups cake flour
1 tbsp. baking powder
½ tsp. salt
16 tbsp. unsalted butter, at room temperature
2 cups sugar
5 large eggs, at room temperature
1¼ cups buttermilk, at room temperature
1 tsp vanilla extract
1 TB key lime juice
1 tsp key lime zest
- Preheat your oven to 350 degrees. Prepare 2 muffin tins with cupcake liners and set aside.
- In a small bowl, combine the ingredients for the graham cracker crust, minus the white chocolate. Place 1 TB of the mixture into the bottom of each prepared muffin cup, and use the bottom of a small glass to pack the crumbs, then sprinkle about 1 1/2 tsp of the white chocolate over the graham cracker crust. Add the remaining chocolate to the reserved graham cracker mixture and set aside.
- Bake the graham cracker crusts for about 5 minutes, or until the edges of the graham cracker mixture is golden.
- Add the butter and sugar to the bowl of an electric mixer fitted with the paddle attachment and beat on medium-high speed until light and fluffy. Add the eggs, one at a time, mixing until incorporated. Make sure to scrape down the sides of the bowl after each addition.
- In a medium mixing bowl, whisk together the cake flour, baking powder and salt. In a separate bowl, combine the buttermilk, vanilla extract, lime juice, and lime zest in a bowl. With the mixer on low speed, add the flour mixture to the butter mixture in 3 batches, alternating with the buttermilk mixture, ending with flour, beating until each addition is just combined. Scrape down the sides of the bowl and mix for 15 seconds longer.
- Pour the batter into the cupcake liners, filling each cup to about a quarter inch from the top. Sprinkle the remaining graham cracker/white chocolate mixture over each cup, concentrating around the edges (since you'll be cutting out the center for the filling). Bake the cupcakes, rotating pans halfway through, until the tops are firm and a cake tester inserted in the center comes out clean, 18 to 20 minutes. Transfer the tins to a wire rack and let the cupcakes cool in the pan for 10 minutes, then remove them and let cool completely.
3 large egg yolks
1 egg
1/2 cup sugar
1/2 cup fresh key lime juice
4 TB unsalted butter, melted
pinch of salt
(makes about 1 1/2 cups)
- In a small saucepan whisk together the egg yolks, egg, sugar, lime juice, and butter and cook over moderately low heat. Stir constantly until the mixture is thick enough to coat the back of a spoon, about 7-10 minutes, making sure not to let it boil or sit long enough to curdle. Strain the curd through a fine mesh strainer and set aside to cool.
- Once cooled, using a pairing knife inserted at an angle, cut out a small cone-shaped chunk, about a 1 inch circle from the top of each cupcake. Fill the hole with the lime curd, about 1 teaspoon worth. You can either replace the chunk you removed, or leave it off.
4 large egg whites
1 1/4 cup sugar
1 1/2 cups (3 sticks) unsalted butter, room temperature
2 1/2 tsp vanilla extract
pinch of salt
2 TB key lime juice
(makes about 4 cups)
For the garnish:
1 tsp key lime zest
1/4 cup graham cracker crumbs
- In the bowl for your electric mixer (or a medium heatproof bowl if you’re using a hand mixer), combine the egg whites and sugar, and place the bowl over a small pot of gently simmering water. Whisk the mixture constantly until the sugar has fully dissolved, about 2-3 minutes. Rub a little between your fingers, and if there is no hint of a grainy texture, it’s done (or when it reaches 160 degrees in temperature).
- Place the bowl in your mixer fitted with the whisk attachment, and at high speed, beat the egg mixture until stiff peaks form. Continue beating until the eggs are fluffy and the mixture has cooled, about 5-6 minutes. Make sure the stiff peaks don’t become dry, you want them to stay glossy.
- Switch to the paddle attachment and with the mixer on medium-low speed, add the butter 2 TB at a time, waiting until it is fully incorporated into the mixture before adding the next addition. If the buttercream begins in separate, turn the mixer up to medium-high speed and beat for a few minutes, until it is smooth again. Add the vanilla, salt, and lime juice, and beat until incorporated. Again, if the mixture separates or thins out too much, beat on medium-high speed until it is light and fluffy again. Reduce the mixer speed to low and beat for 2 minutes to eliminate any air bubbles.
- Using a pastry bag or a Ziploc with the corner cut off, frost each cupcake. In a small bowl, combine the graham cracker crumbs and lime zest, and lightly dust each cupcake with just a pinch of the mixture.