Tuesday, November 16, 2010

Lightened Up Green Bean Casserole


It will come as a surprise to no one when I tell you that I am a big fan of Thanksgiving. Besides being a holiday whose sole purpose is the celebrate food (let’s face it, that whole giving thanks concept is just an excuse to stuff our faces...and I’m okay with that), it’s one of only two holidays where my whole family generally congregates together - the other being our Passover seder, which I consider Thanksgiving for Jews (plus singing!). I love family congregation! Which is why I also never miss a wedding, graduation, or other fun family party.

Due to my current reduced circumstances, Husband and I decided to forgo travel this year and just stay at home. Thankfully our families are awesome - his parents (and their canine companion), my parents, and my sister, her husband and my nephew are all coming to town to celebrate with us. Yay! Also due to my reduced circumstances, I have a lot of alone time on my hands, and I spend a lot of it thinking about food. Okay, most of it.  As a result I’m not just excited for Turkey Day, I am Thanksgivingsessed! I had the menu all planned out a month ago. Actually, more like two. I have since also created an Excel spreadsheet that details ingredient totals, my shopping list, a to-do list for the week, and a full schedule for the day before and the day of. I may be crazy, but the first step is admitting you have a problem right? Anyway, I’m also playing it smart. I’m planning to tackle most of the cooking myself, so I have to make sure I have my game plan all worked out. How else would I have realized that while I'm baking two pies, I only have one pie plate?  No worries, the problem is already solved.  I do get flustered cooking on a schedule, but with everything planned to a T, how could anything go wrong? Yes, I know I just ensured that everything will go wrong. But between all the guests, there will be more than enough cooks in the kitchen to sort things out. I’m breezy!

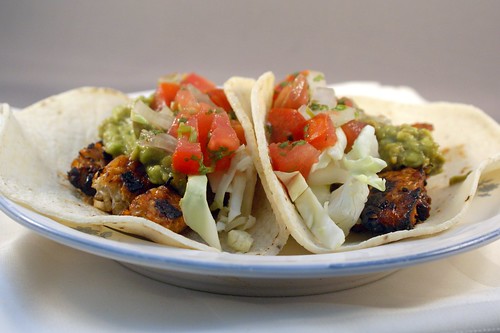
Besides being in need of a fun project, our families have been so awesome and supportive this year, we’d really like to treat them a nice dinner. It’s the least we could do. So we’re going all out! A 16lb heritage turkey, free-range and organic of course, brined and roasted, and with all the fixins around the table: gravy, cranberry applesauce, grilled mashed potatoes, sourdough apple pecan stuffing (technically dressing since Husband is squeamish about bird germs), beets with a balsamic reduction, hashed Brussels sprouts, sweet potato rolls, and - as I mentioned - two kinds of pie for dessert. Apple and buttermilk pumpkin pie, with vanilla ice cream on the side. I’m sure I’ll be posting all about it after next week. Of course, a lot of those recipes aren’t mine (some are!), so I’ll post links at the bottom of this post in case someone is in need of ideas.  I can vouch for them all except the stuffing, though I'm sure it'll be delicious. And if those don't entice, I may have developed my own Thanksgiving side last weekend. Read on!

This isn't my first time hosting my family for Thanksgiving, but it is the first time since my big transformation. I wanted to keep all the familiar flavors, but put the Julie spin on them, so last weekend I tried out some recipes - roasted one of those cheap $5 turkeys from Vons and made gravy from pan drippings for the first time (killed it!). I also used it as an excuse to make some dishes that didn’t quite fit into my Thanksgiving menu.


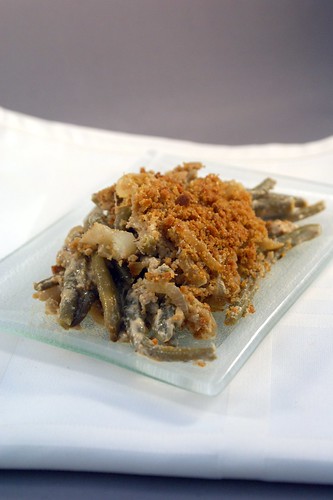
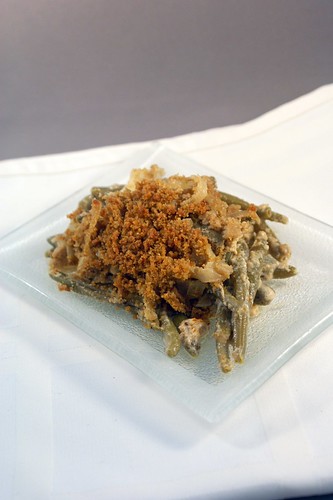
See, I had been toying with the idea of green bean casserole. Thanksgiving + Food Network = lots of mention of green bean casserole. I was thinking of the one traditionally made with condensed cream of mushroom soup and crispy fried onions on top. That dish doesn’t so much scream yummy deliciousness to me, more like heavy, preservative-induced stomachache. But the flavors of the casserole still appeal. Plump green beans in a creamy sauce with earthy mushrooms and fragrant herbs, topped with sweet onions and just a little crispy crunch for texture. Sounds good, right? Well I set about seeing if I could lighten the dish up and make it into something presentable. I don’t know if I accomplished presentable, but it sure was tasty. 

I started with frozen green beans - haricot verts from Trader Joe’s, actually. Then I created the mushroom cream sauce using evaporated milk. I hadn’t used evaporated milk before, and the stuff is just great. It’s just milk with some of the water evaporated out, so it’s already nice and thickened, but much lighter than using cream. I caramelized onions, since that’s my favorite way to eat them. But caramelized onions are soft and buttery, not crispy crunchy. No problem. After the onions caramelized, I added a little butter to the pan with some bread crumbs, and tossed everything together. I topped the green beans coated in the mushroom cream sauce with the onions and bread crumbs, and after it baked up, it came together juuuuust right. Plump green beans, creamy mushroom sauce, and sweet onions with a crunch. Mission accomplished!  Panko bread crumbs would probably  be even crunchier and better (I buy whole wheat panko), but I had some whole wheat bread to use up, so use whatever is easier for you.  Next time I might experiment with throwing some walnuts in as well, though I would probably catch flack from Husband, since he's really not a walnut fan.  It's terrible, I know.

I'm always fascinated by other families and their own traditions.  What are you doing for Thanksgiving?  Pot luck or solo hosting?  What's in the menu?  And finally, how delicious is Thanksgiving food?  Right?!


Green Bean Casserole

Makes about 18 servings

2 16oz bags of frozen green beans, thawed (or fresh and blanched)
16oz cremini mushrooms, sliced
1 12oz can evaporated milk
1 medium shallot, minced
5-6 garlic cloves, minced
2 tsp paprika
1 tsp ground black pepper
1/4 tsp cayenne pepper
1 TB dried thyme
1/2 tsp dried sage
1/2 tsp celery seeds (optional)
1 cup white wine
2 TB flour
4 TB unsalted butter, divided
2 medium onions, quartered and sliced
1 tsp white wine vinegar
1/2 to 3/4 cup whole wheat bread crumbs (~3 slices of bread) or panko bread crumbs
2TB olive oil
kosher salt to taste

  1. Preheat the oven to 375 degrees. You’ll also need a 9x13” baking dish. 
  2. In a medium skillet, heat 1TB olive oil over medium heat. Add the onions and a pinch of salt. Sweat the onions until their water is released, stirring often to prevent browning. Turn the heat down to medium-low and cook, stirring occasionally, until the onions turn golden brown and caramelize, about 45 minutes. 
  3. Meanwhile, in a large saute pan, heat 1TB olive oil over medium heat. Add the shallot and cook until soft, about 3 minutes. Add the garlic and cook for 1 minute. Add the mushrooms and a pinch of kosher salt, and cook until the mushrooms have given up their water and softened, about 7 minutes. Add the paprika, pepper, cayenne, thyme, sage, and celery seeds, mix everything together and cook for 1 minute. 
  4. Clear a space in the pan and add 2TB of butter. Once it melts, mix in the flour, and let the mixture cook for a minute or two to remove any raw flour flavor. Increase the heat to medium-high and add the wine to deglaze the pan, scraping up all the browned bits. Simmer the mixture until about half the wine has cooked out. Add the evaporated milk and stir to combine everything. Let the mixture simmer for about 3 minutes, until it has thickened a bit. 
  5. Turn off the heat and stir in the green beans, tossing until they are well coated in the mushroom mixture. Pour the green beans into your baking dish and set aside. 
  6. Once the onions have caramelized, add the white wine vinegar and toss to coat. Melt the remaining 2TB of butter, and when it has melted, add the bread crumbs and toss until the bread crumbs are well-coated with butter and evenly mixed with the onions. Spoon the bread crumb and onion mixture over the green beans in an even layer. Bake the casserole for about 45 minutes, or until the topping is a crunchy golden brown. 

Links for Thanksgiving dishes:
Cranberry applesauce
Sourdough apple pecan stuffing
Sweet potato rolls
Hashed Brussels sprouts

Wednesday, November 10, 2010

Pumpkin Spice Cake with Butterscotch Swiss Meringue Buttercream


One week before Halloween my adorable little nephew turned one year old. It was kind of a big deal for me. He is my only sister’s only child (thus far), and I absolutely love him to death. My sister threw a fun family party to celebrate, with a full compliment of party fixin’s - balloons, streamers, deviled eggs, and, of course, cake!

After we all met up in Reno a few months ago my sister gave me an assignment: come up with a recipe for my nephew’s first birthday cake. And I took it seriously. I didn’t want to let the little guy down! So I thought about flavors, researched recipes, and practiced a few test-runs to get things juuuuust right. And when I was confident in my creation, I handed the final, approved recipe over to my sis. Here are the results of her deft hand:


Way to decorate, sis!

Since the party was taking place so close to Halloween, my sister was thinking something with pumpkin. Pumpkin just so happens to be one of my favorite Fall flavors! I was looking forward to experimenting with recipes...just a tiny bit. There were just a few conditions. First, no chocolate. I guess the caffeine in cocoa isn’t great for the wee ones. Second, no lemon or banana cake. My sister isn’t a fan of lemon cake, and my mom is in the banana = ick camp. Such a shame on both counts, in my opinion. Finally, and most importantly, no cream cheese frosting. Sis doesn't do cream cheese frosting - it’s the tangy flavor. She hates it. She’s actually foregone eating cupcakes from her favorite local cupcakery because she unknowingly bought one with cream cheese frosting.

With these parameters in mind, I came up with a spiced-up pumpkin cake. Since the more traditional cream cheese frosting was off the table, I took inspiration from my favorite pumpkin cookies, and decided on a butterscotch buttercream. Pumpkin and butterscotch is a fantastic combination. Ever had it? You should. It’s yum. But butterscotch sauce is sweet. Super duper sweet. Husband says I’m just extra sensitive, but I thought my first butterscotch buttercream - a simple butter and powdered sugar mixture - was way too sweet. I didn’t see a way to reduce the sugar, so I just made some adjustments to help balance it. I added some acid. A little lemon juice really brightened up the flavor and gave the sweet somewhere to go. Also, I switched to a Swiss meringue buttercream. The light, fluffy texture did a good job of distributing the sweet on my palette, and was especially delicious paired with the warm spices of the cake.

The third and final test run I made a finished cake and brought it over to share with some lovely ladies I know. This cake here...

...was a big hit! Our host insisted on no leftovers, sent us home with every morsel of food, but when I asked her if she wanted the last slice of cake, she grinned sheepishly and nodded. With such approval I knew the recipe was ready for sisterly publication.

The day before the party my sister put her expert baking skills to action and whipped up my nephew’s birthday cake while I stood wringing my hands in the corner, prepared to die of shame should anything not turn out as expected. Even with a dozen other party provisions to prep, she made an awesome cake with an adorable smash cake of my nephew’s very own to match. She’s a rock star!


Whether for a special Fall occasion or just because cake is delicious, this cake is light and tender, very fragrant from the warm pumpkin spices, and so worth making! Sufficed to say I did not mind making - and subsequently eating - this cake three times.

Nephew's First Birthday Cake
(AKA: Pumpkin Spice Cake with Butterscotch Swiss Meringue Buttercream)

adapted from Martha Stewart

For the cake:
2 cups AP flour
1 tsp baking soda
1 tsp baking powder
1 tsp kosher salt
1 tsp ground cinnamon
1/2 tsp ground ginger
1/2 tsp ground nutmeg
1/4 tsp ground cloves
1/4 tsp ground allspice
1 cup sugar
1 cup dark brown sugar
1 cup (2 sticks) unsalted butter, melted and cooled
4 large eggs
1 can (15 ounces) pumpkin puree
1 tsp vanilla extract

  1. Preheat the oven to 350 degrees. Grease two 9-inch cake pans with baking spray, line the bottoms with parchment paper, then spray the parchment paper. 
  2. In a medium bowl, whisk together the flour, baking soda, baking powder, salt, cinnamon, ginger, nutmeg, cloves, and allspice. In a large bowl, whisk together the sugar, brown sugar, butter, eggs, pumpkin puree, and vanilla. Add the dry ingredients to the wet, and whisk until just incorporated and smooth. 
  3. Pour the batter evenly between the two prepared cake pans. Bake for 25-30 minutes, rotating the pans halfway through, until a cake tester (i.e. toothpick) inserted in the middle comes out clean. Transfer the cakes to a wire rack and cool completely. 

For the buttercream:
4 large egg whites
1 1/4 cup sugar
1 1/2 cups (3 sticks) unsalted butter, room temperature
2 tsp vanilla extract
pinch of sea salt
1TB lemon juice (or more to taste)
1/2 cup butterscotch sauce (see below)

(makes about 4 cups)

1/2 cup toasted pecans, chopped (to garnish the finished cake), optional

  1. In the bowl for your electric mixer (or a medium heatproof bowl if you’re using a hand mixer), combine the egg whites and sugar, and place the bowl over a small pot of gently simmering water. Whisking the mixture constantly until the sugar has fully dissolved, about 2-3 minutes. Rub a little between your fingers, and if there is no hint of a grainy texture, it’s done (or when it reaches 160 degrees in temperature). 
  2. Place the bowl in your mixer fitted with the whisk attachment, and set at high speed, beat the egg mixture until stiff peaks form. Continue beating until the eggs are fluffy and the mixture has cooled, about 5-6 minutes. Make sure the stiff peaks don’t become dry, you want them to stay glossy. 
  3. Switch to the paddle attachment and with the mixer on medium-low speed, add the butter 2 TB at a time, waiting until it is fully incorporated into the mixture before adding the next addition. If the buttercream begins in separate, turn the mixer up to medium-high speed and beat for a few minutes, until it is smooth again. Add the vanilla, salt, lemon juice, and butterscotch sauce (make sure it’s cool, you don’t want to melt your buttercream), and beat until incorporated. Again, if the mixture separates or thins out too much, beat on medium-high speed until it is light and fluffy again. Taste the buttercream and add more salt, lemon juice, or butterscotch if you think it’s needed. Reduce the mixer speed to low and beat for 2 minutes to eliminate any air bubbles. 
  4. Trim the tops of the cake layers so they are flat. Stack the first layer onto a cake plate and using a spatula, spread about 1/2 cup of buttercream in an even layer over the top. Place the second cake layer on top, making sure the two layers line up. Spread a very thin layer of the buttercream around the cake for a crumb layer. This will glue the crumbs to the cake, so they don't show through the light colored buttercream. Then apply a regular, thick layer of the buttercream, until the cake is evenly covered. Sprinkle the top with the toasted pecans and enjoy! 

For the butterscotch sauce:
1/2 cup (1 stick) unsalted butter
1/2 cup sugar
1/2 cup dark brown sugar
3/4 cup light corn syrup
1/2 tsp sea salt (or more to taste)
1/3 cup heavy cream
2 tsp vanilla

adapted from Martha Stewart
(makes about 1 1/2 cups)

  1. In a medium skillet, melt the butter over low heat. Add the sugar, brown sugar, corn syrup, and salt, and increase the heat to medium to bring the mixture to a boil. Let it cook for 2 minutes, then remove the pan from the heat and stir in the heavy cream and vanilla. Allow it to cool at room temperature. It will seem too thin at first, but don’t worry, it’ll thicken as it cools. 

Tuesday, November 2, 2010

Chipotle Maple Grilled Tempeh Tacos


I have a new love. It’s a bit controversial. I kept it quiet at first because people wouldn’t understand. See, me and tempeh? Yeah, we’re kind of a thing.

All joking aside, I am totally loving tempeh at the moment, and it is controversial...at least in my household. I’ve always counted my blessings that Husband likes everything when it comes to food. Everything. There are preparations he doesn’t prefer, but I’ve never come across an ingredient he just doesn't like. He’ll even do tofu if it’s prepared well. But he doesn’t like tempeh. I’ve done a few different cooking methods, vastly different flavor combos, and he hasn't liked any of them. He just won’t eat it. Tragic, right?!

I have a feeling that’s a common problem with tempeh. You either love it or...not so much. While not the case with Husband, I wonder how much of that not-liking is linked to ignorance of what tempeh is. It is not textured vegetable protein. It is not tofu. It is a soy-based vegetarian protein alternative, but you know what? So is edamame. Tempeh is made from soybeans that are fermented into a cake, and the tempeh I am familiar with also has other whole grains added, I believe for textural and flavor purposes - anything from millet, to brown rice, to barley. Yes, it’s true. This is total crunchy granola hippie food. But hippie food has been in forever now, so let’s give peace a chance, k? Anyway, when was the last time you heard about a tempeh recall due to contaminated soybeans?

Tempeh is also crazy kinds of good for you. It’s really high in protein and fiber, which fill you right up, but with much less calories and fat. Win win. It’s also made from fermented soybeans. There’s a lot of controversy out there right now about soy and whether it is ultimately beneficial or harmful to our health. Every study says something different, depending on which industry is behind the funding, but I recently read an article that was very interesting. It separated fermented soy products from non-fermented soy products, saying they most likely affect the body differently. Fermented soy products like tamari, miso, and tempeh are good for you and have all sorts of lovely health benefits having to do, I believe, with the bacteria used to ferment the products. Non-fermented soy products, like tofu and soy milk are actually the leftovers from fermented soy products - the result of an effort to avoid waste - and are supposedly more questionable upon regular consumption. I have no idea if it’s true, but it’s interesting, no?

And most importantly, tempeh is delicious! It has a lot more flavor and texture than tofu - like if a block of tofu and a veggie burger had a love child.  It has a nutty, meaty flavor, and a firm, chewy texture. Chewy like whole grains, not chewy like octopus, just to be clear. I've noticed that each brand of tempeh is a little different. I prefer the Trader Joe’s brand. It has millet and brown rice, and a nice mild flavor that takes on sauces very well. I’ve also seen other brands at Jimbo’s, Sprouts, and Henry's.  They're probably about the same, but I can't say for sure, since I've never tried them.  When it comes to prep, you can treat tempeh just like extra extra firm tofu.  Cut it into slices or cubes, or cut it in half and treat it like a veggie burger.  Marinate some flavor in before, or dunk it in sauce later.

Not helping its image, tempeh is generally sold with the questionable-looking fake meat products like tofurkey and fakin’ bacon. To make matter worse, I’ve actually seen tempeh that has been pre-seasoned to taste like various meat products. Bleck! Make sure what you’re picking up is just regular unflavored tempeh.


Tempeh is a very versatile food. I’ve seared it, drizzled orange-maple sauce, I’ve sauteed it in spicy peanut sauce, and now I’ve grilled it in chipotle maple sauce. It all works...deliciously! I used one of the famous Stonewall Kitchen sauces to add in flavor this time. Since it was a chipotle maple grille sauce, I figured grilling would be the appropriate cooking method. And, man oh man, is grilled tempeh delicious. That smoky charred flavor was totally addictive. I kept eating pieces off the grill, and these yummy tacos almost didn’t happen!

Speaking of yummy tacos, these tacos were...um...yummy! The fixin’s are, of course, optional and up to you, but I like my tacos with cabbage, guacamole, and some fresh pico de gallo. The sauce was a good compliment and the flavor came through really well.  It was sweet, though not cloying, and I actually did get a bit of heat from the chipotle.  I would definitely use this sauce again, I think it may even have been my fav.  With the fresh vegetables and acid from the lime, it ended up being even more delicious than the bits I ate off the grill.  I'm so glad I restrained myself.  Oh, and those tortillas?  Got them at Sprouts.  They contain 4 ingredients: masa, lime, salt, and water.  No icky preservatives or crazy additives.  I love 'em.

I hope whatever preparation you choose to employ, you will give tempeh a chance. It’s entirely possible you won’t like it, as Husband doesn't.  But on the other hand, you may discover a new food that is not only very tasty, but also seriously good for you and economical to boot! Have you ever tried tempeh? On which side do you fall?

Chipotle Maple Grilled Tempeh Tacos

Makes about 8-10 tacos

2 8oz packages of tempeh, cut into 1/2” strips
1 cup Stonewall Kitchen Maple Chipotle Grille Sauce
5-6 large tomatoes, chopped
1 medium yellow onion, finely chopped
1/2 cup cilantro, finely chopped
1-2 limes
1/2 head green cabbage, finely shredded
2 ripe avocados
salt and pepper to taste
corn tortillas
  1. In a bowl or tupperware, combine the tempeh and grille sauce, making sure the tempeh is well-covered. Cover the container and let it marinate for at least an hour. When you are ready to grill, let the tempeh come to room temperature. 
  2. Preheat your grill to medium-high heat and lube it up with some oil. Add the tempeh in an even layer, and let it cook undisturbed for 3-5 minutes, until it gets some good grill marks. Flip all the pieces over and grill for another 3-5 minutes. Brush some of the leftover marinade sauce on the cooked sides, and flip the pieces over again. Grill for a minute or two to caramelize the sauce a bit. Brush more sauce on the upturned side, and flip one last time to cook for, that’s right, one more minute. Remove the tempeh from the grill and let it cool down while you prepare the rest of your taco components. 
  3. To make the pico de gallo, mix the tomato, onion, and cilantro in a small bowl. Sprinkle with a pinch of kosher salt and pepper. Squeeze the juice from a lime over the mixture (if it’s a very juicy lime, you might want to start with just half), and stir to combine everything. Taste the salsa, and adjust the seasoning.  To make the guacamole, scoop the avocado flesh into a bowl, and add the juice from half a lime and a pinch of kosher salt and pepper. Mash the mixture and adjust the seasoning to taste. 
  4. To build the tacos, place a big pinch of cabbage on a tortilla. Add about 3 slices of tempeh, and top with guacamole, pico de gallo, and a healthy squeeze of lime juice. Enjoy!