Thursday, September 23, 2010

Vidalia Onion Fig Glazed Grilled Pork Loin with Caramelized Onions and Polenta


Remember my last giveaway? It was just last month, actually. Apparently it was such a success that a representative of CSN stores contacted me again, asking if I’d like to do another one. Naturally, I said I would love to! I mean, do you all have a problem with me trying to hook you up with free money to an online store that sells everything from cookware to cheap bedroom furniture? No, I thought not. And if you do...well you can just skip to the recipe at the bottom. Away with you!

So just like last time, one lucky winner will be awarded a one-time-use $35 gift certificate, good at any of CSN’s 200+ online stores. To enter leave a comment on this post telling me whether you’re scrounging for every last late summer recipe you can find, or if you’re over it and ready for fall. Please make sure you provide an email address if there isn’t one linked to your profile.

For additional entries, do one or all of the following, then come back and leave a separate comment for each, letting me know the deed is done.

  1. Become a fan of (“Like”) Bananas for Bourbon on Facebook, and if you already are, just say so!
  2. Subscribe to my blog via an RSS feed (just click that “Follow” button in the toolbar on the right), and if you already do, just say so!
  3. Post a link to this giveaway on your blog, and let me know about it.

The rules: open to US and Canada residents only, as that is where CSN store's products ship. The giveaway closes on Thursday, September 30th at 11:59pm PST. The winner will be selected by a random number generator and announced (and contacted!) sometime on Friday.

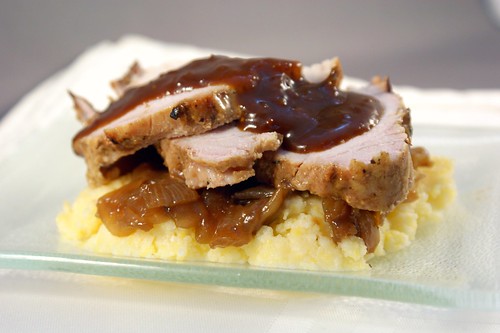
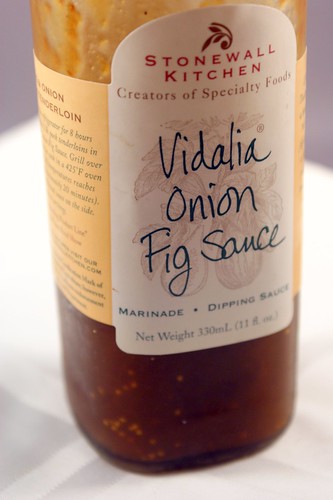
And by a total coincidence, just like the last giveaway was paired with a Stonewall Kitchen sauce recipe, it just happens that today’s recipe is also courtesy of my very giving friend who sent me that awesome care package all those weeks ago. The sauce I was most excited to try was the Vidalia Onion Fig sauce. I have a thing for figs, see. Can a fruit be meaty?  I think figs kinda are.  The minute I saw it, I thought of doing a glaze on a pork loin. Don’t ask me why. Then I thought caramelized onions would go awesome with pork glazed with an onion sauce. Then I thought it would all sit beautifully atop a soft, creamy bed of polenta. Then my mouth watered and I made it. A few weeks later...but nevermind that.


Let’s talk about the pork. First off, I brined it. Have you ever brined pork? Have you ever brined chicken? Maybe a turkey for Thanksgiving? It’s truly amazing what it does for the flavor and texture of meat and poultry. If you’re not hip to the lingo, brining is when you soak your meat in salt water for several hours before you cook it, which helps prevent it from drying out during cooking, so you end up with moist, tender deliciousness (Wikipedia explains it far better than I can). Brining is not the time to be timid with salt. You want a saturated solution, so it uses a lot. But don’t worry, you’ll rinse it off after the soak, so it won’t make your finished dish taste like the sea. Promise. Since I was grilling a rather large and lean piece of pork, a brine was the right way to go. For a more delicate cut of meat, like tenderloin, I wouldn’t say brining would be necessary, but I’m sure it would be delicious just the same. I chose to grill because I wanted a nice caramelized crust on the outside (I’m sure oven roasting would be tasty as well for the colder months), and I’m glad I did because, man oh man, was this pork ever delicious. Juicy, tender, and sweet thanks to the vidalia onion fig sauce.

I love to pair meat with caramelized onions. Their soft texture and sweet, mellowed onion flavor just go so nicely. I actually was experiencing some recipe-writing-block when trying to type this out, so I sent it to my editor sister for some tips. She came back with enough to help unstick my brain (thanks, Sheesh!), but also questioned the total cook time - “Did I read that right, that you cook the onions for 45 minutes? That seems crazy long. If that's right, you might want to say, ‘Yes, you read that right. 45 mins.’" I said something along the lines of, “OMG, seriously?! You’ve never caramelized onions!? They are so flipping tasty!” Then later that day I told Husband about it and he said something along the lines of, “Really? But they’re so flipping tasty!”, and I said, “I know, right!?” Sure, they’re a pain because they take so long, but they’re actually pretty easy and hands off. Just stir every few minutes, then forget about them. It’s just the clock that makes them problematic, but it’s a sound investment because caramelized onions make everything taste better. Ok, not chocolate cake. Savory things? Totally.

With the polenta, I thought the flavors came together so well. Everything had a sweet element to it, but surprisingly, I didn’t find it too sweet at all. Well the sauce was too sweet on it’s own, just like the ginger wasabi sauce (sugar was again the first ingredient), but with a dab on a piece of pork with the onions and polenta? Yum. It added a kick of flavor that was needed, and intended, and the onion flavor really came through.  Next time I might try mixing some fresh thyme into the polenta or with the onions, but I was totally out of fresh herbs. There are definitely ways to make this dish your own, but I thought my version was a winner.

Guess that’s two sauces down, and two to go! Stay tuned!


Vidalia Onion Fig Glazed Grilled Pork Loin

Makes about 8 servings

For the brine:
1/4 cup salt
1/4 cup honey
10 black peppercorns
1 TB dried rosemary
2 TB onion powder
1 bay leaf
~3 cups water
2lb pork loin

For the rub:
1/2 tsp salt
1/2 tsp ground pepper
1/2 tsp celery salt
1/2 tsp mustard powder

For the glaze:
1/2 cup Stonewall Kitchen Vidalia Onion Fig Sauce (plus more for the final dish)

To brine the pork:

In a gallon-sized ziplock bag, combine the salt and honey with about 3 cups of water. Scrunch the bag to agitate the water and dissolve the salt. Add the peppercorns, rosemary, onion powder, and bay leaf. Add the pork loin and enough water until it is fully submerged in the brine. Let the pork brine for at least 8 hours, overnight is even better.

Note: Don’t trim the layer of fat off the pork yet. You’re going to be using it later.

To grill the pork:

  1. A little before you plan to grill it, remove the pork from the brine and give it a good rinse to get the excess salt off. Pat it dry with paper towels and let it air dry for a few minutes.
  2. Cut the fat layer off the top of the loin, doing your best to keep it in one big piece. Set it aside.  Combine all the ingredients for the rub in a small bowl and rub it over the pork until it is evenly coated. Using butcher’s twine, tie the fat layer back onto the pork. This will keep it moist and add flavor while it cooks. But if it grosses you out or is too finicky for you, just skip that part.
  3. With the grill heated to medium-low, place the pork on the grill, fat-side down, and cover. After 3-5 minutes, turn the pork over and grill for another 3-5 minutes. Cut the butcher’s twine, and remove and discard the fat layer. Turn the pork over again so the side that was covered with fat can get some good grill marks, another 3 minutes or so. Now is the time to glaze. Brush the onion fig sauce generously over the pork and continue to grill, flipping every few minutes. I did a second coating of glaze once the first coat did a turn over the flames, but that’s optional.
  4. When the glaze is caramelized and the pork has reached an internal temperature of about about 140 degrees (this will vary based on the size your particular cut of loin), about 15-20 minutes, remove it from the grill and let it rest, covered loosely with some aluminum foil, for about 10 minutes.


Note: If you don’t have this fig sauce, fear not! There are plenty of other options. You could mix some fig jam, balsamic vinegar, and olive oil. If you don’t like figs, how about blackberry? Or a cranberry compote? You just need something a bit sweet (preferably with a hint of savory) that is going to bring a lot of flavor.

Caramelized Onions

Makes about 2 cups

4 medium yellow onions, sliced into 1/4 inch wide half moons
1 TB olive oil
1/4 tsp kosher salt
1 TB balsamic vinegar
1 TB Marsala wine

  1. Heat the olive oil in a large skillet over medium heat. Add the onions and salt. When the onions have given off their water but before they begin to brown, turn the heat down to medium-low (or all the way to low if it’s a hot burner). You want to make sure the onions are cooking, but not browning, so you may want to play around with the flame a bit to ensure they aren’t cooking too hot or too cold, and you’ll want to stir them up occasionally. The slow cooking will allow all the water to cook away and the sugars to caramelize until they are sweet and delicious.
  2. After about 45 minutes, (Yes, you read right. You can’t rush perfection!) the onions should be well caramelized. They’ll be considerably shrunken because all the water will have cooked out, and they’ll be golden brown to dark brown in color. Add the balsamic vinegar and Marsala wine and cook for another minute, just until they are incorporated. 


Creamy Polenta

Makes about 6 cups

4 1/2 cups water
1 1/2 cups polenta
1/4 cup heavy cream
1/4 cup Marsala wine
1/4 tsp kosher salt
1/2 tsp ground black pepper
1/2 cup Gruyere cheese, grated
1/2 cup Parmesan cheese, grated

  1. In a medium saucepan, bring the water to a boil. While stirring constantly, very slowly sprinkle in the polenta. The slower you add, supposedly, the creamier it will be. Reduce the heat to low and cook for about 5 minutes, stirring occasionally, until the polenta is thickened and the water is fully absorbed.
  2. Add the cream, wine, salt, and pepper, and cook for another 2-3 minutes, until everything is incorporated.
  3. Add the cheeses, stirring until they are fully melted. Adjust the seasonings to taste.


To assemble this dinner of deliciousness, spoon an appropriate amount of polenta on your plate. Top the polenta with a helping of caramelized onions, and then a few slices of pork. Pour an additional dab of the vidalia onion fig sauce over the pork and enjoy!

Wednesday, September 15, 2010

Grilled Corn Pesto


I have been remiss. I totally forgot all about this recipe until I was rifling through my “food pictures” folder and saw this right next to my grilled corn chowder folder - it’s alphabetized, ya know. Oh snap! How could I have forgotten such deliciousness? I was unconscionable of me, really. But the remedy is easy - sharing the recipe with you! Right now. Forthwith.

And by forthwith, I mean after I’m done talking my head off about it. Terse I am not, people.

I made this a few weeks ago when corn was on super sale at the store. Actually, I thought it was a super sale at the time, but I found out my naivety the next week when I was all corned out and it was even cheaper. The same thing happened to me last week with peaches. Don’t you hate that? Anyway, I had come across a pasta dish in the course of my interweb travels that was topped with a fresh corn pesto, which used corn instead of the more traditional greenery of basil or spinach. Intrigued, and laden with several ears of corn, I decided to do my own spin.

First off, I grilled the corn. Of course I did. Remember when I said that I’ll never cook corn another way? Ok, I don’t think I ever actually put it in those terms, but I figured the sweet, caramelized flavors of grilled corn would add a great flavor to the pesto. I was right - it was amazing. I’m too modest, I know. Other than the corn, this is a pretty traditional pesto. Or at least, traditional for me. I don’t usually have pine nuts in the pantry, so I like to use almonds. The silky, mellow nut flavor from the almonds went really well with the corn. All ground up, it’s like velvet. That’s a taste, right? I had a handful of basil thanks to an awesome friend who had sent me home with some from her garden the day before, so I threw it in. Along with the parsley, it did a great job of brightening the sauce with some needed herbaciousness, but the lesser amount kept it as a complimentary background flavor. The corn was the star of this pesto. It was creamy, sweet, and tasted distinctly of summer. Definitely a winner!

I know pasta is the traditional means of delivering sauces, like pesto, to your mouth. But corn is a very starchy vegetable*, and, well I admit it, I am totally neurotic about eating too many carbs. It has absolutely nothing to do with any kind of moronic low-carb diet. I just know my body, and super starchy meals result in a very unhappy Julie, hungry with low blood-sugar. It’s pretty much the worst thing ever because I love carbs. It’s pretty much all I ate for the first, um, 27 years of my life...or so. Sometimes feeling your best means sacrificing your wants for your needs. Also? I needed a vegetable for this particular meal. So I shredded up some zucchini (using my handy-dandy Cuisinart food processor with the shredding blade. (I’ve been using that shredding blade all summer to make all kinds of slaws. Yum! (I’m not trying to plug Cuisinart, but last week a friend asked what food processor I use, so I figured I’d share. (She’s getting married. Congrats! (I think all people getting married should register for a food processor. You might not use it right off that bat, but one day you’ll need it, and the love affair will begin...)))))**, and tossed it with the pesto to make a delightful side. Somewhere Husband is laughing at my use of the word “side,” saying that, in terms of proportions, vegetables are always my main. And he’s right, but nevermind that. I think the punch of flavor from the pesto and the fresh, crisp texture from the zucchini was a great combination, but of course, there are a million ways to have fun with how you eat this. Grilled corn pesto pizza? That’s a salivating idea, indeed! Want to go a healthier route, but not tickled by the idea of zucchini? Try roasted spaghetti squash. You’ll still get that fresh bite (even though it’s fully cooked, spaghetti squash, amazingly, still manages to maintain a crispness to it), but with a bit of a milder flavor. You could also serve it directly over some meat.  Since you're grilling anyway, maybe a few slices of grilled steak?  Heck, I went ahead and ate a few spoonfuls right out of the bowl. So, you know, that’s always an option too.

However you choose to eat this pesto, I highly recommend you make it. It’s sweet, it’s silky, and it tastes like summer.  In hindsight, I wish I had captured a shot of the sauce by itself.  But after spending hours thinking about the recipe, buying the ingredients, and putting it all together, I just wanted to eat it.  Can you blame me?

How would you serve this? I’m always looking for ideas.


*You know that Manwich commercial where the kid is dressed up like a Manwich for a school play and some kid in a corn costume chides her, saying she’s supposed to be a vegetable? I always yell at that kid that I don’t count him as a vegetable either. And really, that commercial is just a bunch of BS. When a food company tells you their product “counts” as a serving of something healthy, don’t buy it.
**You counted my parentheses to make sure I closed them all off, didn’t you? Admit it.


Grilled Corn Pesto

makes about 3 cups

4 ears of grilled corn (see instructions below)
1 cup Parmesan cheese, shredded
1/2 cup almonds, toasted
3 cloves garlic
juice of 1 lemon (about 2 TB)
1/4 cup parsley, chopped
1/2 cup basil, chopped
salt and pepper to taste
1/4 cup of olive oil, or more for desired taste and consistency

Blend all the ingredients in a food processor, minus the olive oil. When the ingredients are well blended, with the food processor running, stream in the olive oil until a thinned out sauce forms. Add enough olive oil until your desired consistency is reached. Serve over pasta, meat, or shredded vegetables.

Note: You can toast almonds in the oven at 350 degrees for a few minutes or in a dry pan over low heat. Just until you can smell their oils releasing. I use my toaster oven. It’s fastest. 


Grilled Corn (cut and pasted from this post)
  1. Over medium heat, place the corn (in their husks!) on the grill, directly over the flames. Turn the corn every 2-3 minutes, when the husks begin to blacken. The silk or ends of the husks might catch fire as they dry out. I think this adds an amazing smoky flavor to the corn, but if you’re scared (chicken!), just make sure to trim those bits off before you put them on the grill. [Practice proper safety! Always use long tongs when handling the corn, and keep your digits away from the flame.] 
  2. When the husks are good and charred and the kernels are mostly cooked, remove the corn from the grill and place it in a pan or bowl you have standing by until it cools down a bit. Carefully peel back and remove the husks, watching out for any trapped hot steam. Place the naked ears (teehee!) back on the grill and turn every 1-2 minutes, or until as many kernels as possible have browned and caramelized. Brown = sweet flavor! 
  3. Remove the corn from the grill, and when it is cool enough to handle, cut the kernels from the cob. Scrape the back of your knife along the cob to really get all the creamy corn bits out of there.

Tuesday, September 7, 2010

Cinnamon Spiked Blueberry Icebox Pie


Remember when I said you should buy up every clamshell of blueberries you can still find at the store? Well that’s partly because I have another blueberry pie up my sleeve. What a minx I am! But this pie couldn’t be more different than my previous azure berry exploit. That blueberry pie was a traditional pie. The kind of pie that comes to mind at the mention of pie. The kind with a tender, buttery crust and a warm, ooey gooey center. The kind that bakes forever in the oven and then cools mercilessly on the counter all afternoon. This blueberry pie is not that kind of pie. This is an icebox pie. Totally different! Ever had an icebox pie? I hadn’t until I made this one. I think I may need a do-over of the last 28 years, just so I can work this pie into my childhood food memories. When I was 5 - barbecue beef (it was my favorite kind of chicken!) and icebox pie. When I was 10 - blueberry pancakes and icebox pie (sounds like quite a combo to me!). When I was 16 - macaroni salad and icebox pie.  Annual Mother's Day picnic - Everett and Jones BBQ and icebox pie (*drool!*).

But what is it?

It’s a chilled pie (a correlation I'm sure you made on your own) with a graham cracker crust, a thick fruit jam filling, and a whipped cream topping. It’s a pie for those hot summer days when you don’t want your oven on for an hour. It’s a pie for when you’re craving something sweet and creamy, yet light and cool. It’s a pie for you, right now. Promise.

It all started a few weeks ago. I had an odd craving for graham crackers - odd because I don’t really ever eat graham crackers. Apart from this pie, the cheesecake squares, and the ‘smores in Reno, I haven’t eaten a graham cracker since I was maybe 14. No joke. (I used to think they ruined the 'smore.  The idiocy of youth, right?)  So when I saw graham crackers on sale that very week, I picked up a box. Why not, right? Then, the very next week, a giant 18oz container of blueberries was on sale for $2! Why,those little buggers hopped into my cart of their own accord. They know a good home when they see one. So there I was, craving graham crackers and mulling over blueberry recipes, and it just clicked. I searched around my Google reader for recipes, landed on a strawberry icebox pie I could modify for my own devilish purposes, and the rest, as they say, is history.


Now, let me tell you about this icebox pie. Because you know I gave it the Julie touch. I spiked it of course! I just love the combination of cinnamon and blueberry, so I gave the Goldschlager a second try, and I think it came through much more prominently this time. I used it in the crust and the whipped cream topping, and the cinnamon liqueur flavor that added that hint of something extra I looking for was definitely present. The blueberry jam filling for the pie also turned out great. I let half the blueberries break down into a syrup, and I left out the other half until the very end so they would stay intact. That way it felt like you were still eating a blueberry pie and not a blueberry syrup pie. I wanted some identifiable berry. And I needn’t mention yet again how well brandy goes with berries in baked goods. If you’ve tried it, you know. I kept the sugar in this recipe pretty low because I prefer to let the flavor of the fruit come through, and there’s enough sweetness that comes from the graham crackers (especially sugar-leaden store-bought ones), but you could always add more if you've got a sweet tooth.

Overall, this pie was amazingly good, satisfying my craving and then some! Don't you love it when you make something on a whim and it turns out far better than you expected? It makes it all that much more satisfying, I think.  The crust has that sweet, kind of comforting taste you get from graham crackers, the filling is really just a jam, but a jam you might eat straight out of the jar because it’s so tasty. It's light and summery, yet with the cinnamon and graham cracker crust, almost homey and comforting.  (As good desserts should be. Or maybe I’m just comforted by weird things...)  The whipped cream topping just turns everything to silk in your mouth, brings it all together. It's definitely the star, and I’m not even a whipped cream kind of person.  I think doctoring it up made all the difference. I also really like the proportions of the three components in this recipe. The crust to filling to topping ratio is right on.

Yes, the pie is good.  But really, it's dangerously good. I couldn’t stop eating it! I kid you not, I ate a third of this pie in one night. In my defense, it is a bit of a vertically challenged dessert.  But it's also a baked good of mass waistline destruction, people! Make at your own risk!

But really, make it.  It's yummy.

Cinnamon Spiked Blueberry Icebox Pie

adapted heavily from Shutterbean

For the crust:
10 graham crackers (standard 2 1/2 by 5 inches)
2 TB sugar
1 tsp cinnamon
5 TB melted unsalted butter
2 TB Goldschlager

For the filling:
18oz fresh blueberries
1/4 cup sugar (or more to taste)
1/2 cup fresh squeezed orange juice (about 1 1/2 oranges)
3 TB cornstarch
1 tsp cinnamon
1/4 tsp kosher salt
1/2 tsp vanilla
1/4 cup brandy

For the topping:
1/2 cup heavy whipping cream
2 TB powdered sugar
1 TB Goldshlager
1/2 tsp vanilla
pinch of cinnamon

  1. Preheat the oven to 350 degrees. 
  2. In a food processor, pulse the graham crackers, cinnamon, and sugar together until they are reduced to fine crumbs. With the machine running, stream in the melted butter and Goldschlager and process until the crumbs are moistened. 
  3. Press the crumb mixture into a 9” pie plate in an even layer. Bake the crust for 12-14 minutes until it is golden brown and when you poke it with your finger, it feels like a crust, rather than moistened crumbs. Let the crust cool completely. 
  4. In a medium saucepan over medium heat, combine the sugar and half of the blueberries, and bring the mixture to a simmer. Let the berries cook until they have started to break down and form a thickened syrup, about 5-10 minutes. 
  5. In a small bowl, whisk together the orange juice, cornstarch, cinnamon, salt, vanilla, and brandy until the cornstarch is fully incorporated. Stir this slurry into the blueberry mixture, and continue to simmer for a few more minutes, until it has thickened to the consistency of a jam. Stir in the rest of the blueberries, reserving a small handful for garnishing the top of the pie. Remove the blueberry mixture from the heat and let it cool for a few minutes. 
  6. Pour the blueberry mixture into the cooled pie crust and refrigerate for at least 4 hours. 
  7. To finish the pie, pour the heavy whipping cream into the bowl of a stand mixer set with the whisk attachment and beat on high until soft peaks form. Add the powdered sugar, Goldschlager, and vanilla, and continue to beat on high until soft peaks form again. Be careful not to overbeat! 
  8. Spread the whipped cream evenly over the chilled pie and sprinkle with cinnamon and the reserved blueberries. 

Wednesday, September 1, 2010

Blueberry Rhubarb Pie


I apologize for my lack of posting last week.  Took the husband and furkid up to Reno for a visit with the family and I was just having far too much fun to talk to you.  The highlight?  There was 'smores making by the firepit in my parents' backyard on a gorgeous, crystal clear night.  There was getting smashed together on cocktails and wine and then stumbling around the neighborhood, attempting to take my dog for a walk.  But the real highlight was definitely getting to hang with my 10 month old nephew, who is the perfect package of happy, hilarious, and adorable.  The kid has what my sister calls "his badass face" for goodness sakes!  It's badass.

Another highlight was a second go at Husband's Ultimate Birthday Cake.  You may recall I made this for Husband's birthday a few months ago with much success.  Too much success!  Husband had been bugging me to make it for him ever since, and this trip finally seemed like a good time to do it.  Something about having 4 other people in the house to help eat it quickly was certainly appealing.  This was actually the first time I've followed one of my own recipes.  Sure, I've written stuff down as I go, jotted down quick instructions to myself, or modified and adapted other people's recipes, but hearing my own voice come through as I followed this recipe step by step was kind of surreal.  And kind of awesome!  I kept thinking, "I know exactly what I mean!" 

And having made this cake twice now, I can safely boast that it is awesome!!!  Seriously.  Not to toot my own horn or anything, but both my sister and my dad declared their disdain of the chocolate/raspberry flavor combination before trying this cake.  [*GASP!*  Blasphemy!  Chocolate and raspberry are the ultimate!  ULTIMATE!  Ok, only my dad expressed disdain.  My sister merely said she had never tried a chocolate raspberry dessert to her liking before.  My sister - always the diplomat.]  After they each tried a piece, however, it was a whole other matter.  There was lots of raving.  And not polite raving.  Adamant, genuine, "I'm a believer!!!" raving.  They both said the flavors were perfectly balanced - not too sweet, not too tart.  And my mom, who was of the opinion that no cake could be worth that much effort, decided that this cake was worth that much effort, as long as someone else was making it.  Anyone know the onomatopoeia for a head inflating?  *Wooshooop!*  Because that's what's happening right now.  I just love cooking for my family.  Part of the reason I'm so neurotic about feeding other people is that I get so worried that they hate my food but they're too polite to say so, so I just tend to assume no one liked anything and I was just this crazy food-pusher they couldn't get away from.  But family is different.  You can tell when they're lying. Mwhahaha!

And one more highlight - my discovery of pumpkin seed oil!  Have you ever heard of it?  Apparently it's common in Europe, and there's a European market in Reno where my mom can buy it.  I'm, of course, kicking myself for not getting to that market to get my own bottle because it is some seriously nommy stuff.  For dinner one night my mom grilled some veggies simply tossed with a little olive and pumpkin seed oils, then threw it all together with some brown rice and shrimp.  I figured it would be tasty, but the pumpkin seed oil hit this meal out of the park.  It was that secret ingredient that made all the flavors come together perfectly. Yum!   Mom, if you are reading this, please bring me a bottle next time you visit! 

But enough about cake and plant oils.  I'm here to talk about pie.  I've been sitting on this recipe far longer than I wanted to.  It's still blueberry season, right?  Well I highly suggest you run out and buy every last clamshell of blueberries you can find because this pie is worth it.  I know, rhubarb usually goes with strawberries, in fact strawberry rhubarb is Husband's favorite pie, but one bite of this baby had him saying "Strawberry who?" No joke.

Pie crust.  Let's hash it out and get it out of the way.  Tender vs. flaky.  Shortening vs. butter.  Everyone has their own pie crusts tastes.  Some people like all of one or another, some people have different ratios of both.  I have by no means baked pie crusts extensively enough to give a definitive opinion on the matter, but I will say that of the crusts I've made so far, I am in the all butter camp.  First, shortening doesn't taste like anything.  People use it because it makes for a flakier crust.  But here's the thing.  I find butter crusts plenty flaky, and I actually prefer the more tender texture all butter crusts have.  Not to mention their amazingly buttery flavor.  You just have to incorporate the butter the right way, and maybe have a trick or two up your sleeve.  Like booze!  Have you heard of using vodka in pie dough?  It's wet enough to bring the dough together, but it doesn't gum up the flour like water does.  But vodka has no flavor, so I decided to try Goldshlager instead.  I thought the cinnamon liqueur might infuse a little extra flavor into the dough.  While it succeeded in keeping my dough light, I didn't get a lot of cinnamon flavor, so next time I might just stick with vodka.  I'm on a budget, after all, and they unfortunately don't sell Goldschlager at Costco.  The most important thing with a good pie dough is making sure everything is cold.  I actually stuck the butter in the freezer until it was just frozen, which worked perfectly.  I like to work the dough with my hands, but that always warms the butter too much.  This way the frozen butter actually needed the heat from my finger tips to become workable. 

To the novices out there who are completely intimidated at the thought of making pie: you can totally do this.  Pie crust can be a pain, and if you want it perfect, you do have to be somewhat of an artist, but I maintain that anyone can make a decent pie crust.  It'll probably be flawed, sure, but it'll be tasty, and isn't a tasty pie the real goal?  Start off by reading Deb's tips for the logistics of proper pie construction at Smitten Kitchen.  I always thought the hardest part was rolling it out.  I remember my mom's many failed attempts to get her pie crusts from the mat to the pie plate in one piece.  Turns out the secret is just lots of flour, and lots of turning.  Easy!

Now the filling.  I'm swooning just thinking about it.  I actually set out just to make a plain blueberry pie, but when I had all the berries in the bowl, I knew it was lacking in volume.  I had by chance bought some frozen rhubarb at Sprouts a few weeks ago because I was curious (also, it was on sale - impulse buy!). I had never seen frozen rhubarb before, and neither had the cashier who rang me up.  She asked if it was good, and I told her I'd have to let her know.  I figured, what the hell, and threw it in with the rest of the filling.  I guess it was fate because this is easily the best pie I've ever made - including strawberry rhubarb!  It was just the right balance of sweetness from the blueberries and that touch of sour tartness from the rhubarb.  I love the sweetness of blueberries, but find a little acid to break up their flavor really brings them up a notch. And the deeper sweet flavor of the brandy brought everything together perfectly.  But the real secret was the tapioca starch.  All purpose flour is normally used in pies to help thicken the filling, but tapioca starch does a much better job of making a glutenous mixture.  Got that trick from Alton Brown.  I buy tapioca starch at the Asian market, but I'm sure it can be found at other specialty markets.  If you don't have any, just use regular AP flour.

It may be an ugly pie, but it was darn delicious.  When Husband and I were ready for dessert all conversation would cease while consumption was happening. Unless it was one of us chiming in to say how good the pie tasted.  But usually it just came out as approving grunts and groans.

  
Blueberry Rhubarb Pie

crust adapted from Smitten Kitchen
filling adapted from Joy the Baker

For the crust (both top and bottom):

2 1/2 cups flour
1 tablespoon sugar
1 teaspoon salt
1 cup (2 sticks) unsalted butter
2 TB ice cold water
Goldshlager (or vodka)
For the filling:

18oz fresh blueberries
12oz bag frozen rhubarb, thawed (or about 2 cups fresh rhubarb, chopped)
1 cup sugar
1/2 cup tapioca starch (or substitute AP flour)
zest of half a lemon (about 1/2 tsp)
1 tsp lemon juice
1 tsp cinnamon
pinch of kosher salt
3 TB brandy
1 egg
1 TB milk
To make the dough:
  1. Cut the butter into small pieces and break them apart. [I like to cut the stick lengthwise, turn it 90 degrees, and then cut it lengthwise again, so I have 4 long sticks. Then I cut regular tablespoon-size pats, so I end up with a bunch of 1/4 TB pieces.] Put the well-separated pieces into a bowl and place it in the freezer for about 30-40 minutes, or until they are just barely frozen through.
  2. In a medium bowl, mix together the flour, sugar, and salt. Add the frozen butter and gently work it into the flour with your fingertips. Since it’s frozen, you’ll have to kind of smush it out. Use your finger muscles! The butter will be incorporated enough when you have small pea-sized bits of butter left.
  3. Add the very, very cold water and stir it into the mixture. This shouldn’t be enough moisture to bring the dough together, so add the Goldshlager 1 TB at a time until the dough will just form into a ball. Divide the dough evenly into two balls. Wrap each ball tightly in plastic wrap and squish it into the shape of a round disc, like a giant hockey puck.
  4. Chill the dough in the refrigerator for at least 2 hours, but overnight is okay too.
To make the pie:

  1. In a bowl, combine the blueberries, rhubarb, sugar, tapioca starch, lemon zest, lemon juice, cinnamon, salt, and brandy. Mix until everything is incorporated and the fruit is well coated. Set aside.
  2. Remove one hockey puck of dough from the refrigerator. On a very well floured surface, roll out the dough evenly until it is big enough to cover your pie plate, plus a 1/2 inch or so. This is best achieved by constantly turning and flipping your dough so it doesn’t stick to your surface. Don’t be afraid to add too much flour, you can’t. Transferring to the pie plate can be tricky. I like to fold the dough in half, and then in half again, and then transfer the quarter wedge to the plate and carefully unfold it. But use whatever method you like.
  3. Gently press the dough into the plate and trim off any dough overhanging more than a 1/2 inch over the plate. Using the excess bits to fill any holes or imperfections you have. Remember, you won’t see the bottom crust, but you’ll taste any spots where there’s missing dough. Pour the blueberry mixture over the bottom crust and set aside.
  4. Remove the second hockey puck of dough from the refrigerator, and roll it out the same way you did the first one. When it is big enough to cover the pie with at least a 1/2 inch overhang, figure out what’s going to be the center. You need to make vents in the top crust for the steam to escape. I cut a hole about the size of a shot glass in the very center, but it can be anywhere. You’ll want at least one. I also cut a few smaller holes around the edges. When the dough is properly ventilated, carefully cover the pie, and again trim any excess. Tuck the two crusts under so it is flush with the plate. Using your fingers or a fork, crimp all the way around the edge of the pie so it’s sealed. Cut a few more vents in the crust. Put the pie in the refrigerator to chill for about 20 minutes.
  5. While the pie chills, preheat your oven to 425 degrees and move the rack to the lower third of your oven. If you’re worried about filling bubbling over and making a mess you can put a cookie sheet under the rack to catch any drippings.
  6. Beat the egg and milk together and brush evenly over the top of the chilled pie, making sure none of it pools.When the oven is ready, bake for 30 minutes, then knock the heat down to 375 degrees and bake for another 30 minutes. If the pie starts to get too brown before it is finished baking, cover it loosely with foil (I did this about 45 minutes in). The pie is finished baking when the crust is golden brown and the filling is thick and bubbling.
  7. Let the pie sit and fully cool before cutting into it to give the filling time to come together, at least 4 hours.  Don't jump the gun, you'll regret it!