Showing posts with label frosting. Show all posts

Tuesday, December 13, 2011

Browned Butter Pumpkin Bundt Cake with Spiced Bourbon Pumpkin Glaze


Because everyone else is doing it. That's an acceptable reason to do something, right? All the predictions of what 2012 will bring got me thinking. It always does. I’m always wrong. Let’s move on.

Julie’s Grand Food Trend Predictions of 2012!
[Let’s be honest, this list is grand as in lofty. My lofty notions of what I wish 2012 would bring. One can dream, right?]

  • First off, I just need to say that macarons are not a new trend. They’re an old trend. They are not the new cupcake. Cupcakes are not out. Both are delicious, infinitely adaptable to many flavors, and portable - and thus will remain around until people decide they hate sugar. Cakepops, pies, donuts, and any obscure French pastry may join alongside them, but they will not replace them.
  • Already trendy vegetables will find new ways of staying on peoples' plates. Kale chips and roasted Brussels sprouts are so 2011. They’ve officially been introduced to the masses. Now that the initial shock has passed that these past-maligned veggies are as tasty as they are nutrient-dense, we’re ready for new ways to eat them. Less approachable ways. Like raw! Massaged kale salads and shredded sprouts slaws I’m looking forward to seeing you on a restaurant menu or two! One can dream...
  • Quick pickles. 2011 was the year of savory canning. We discovered we could mass-produce not only blackberry jams and dill pickles, but also our own tomato sauces, and pickles of the non-cucumber variety. And kimchi? That was a craze all its own. While acidic, fermented foods are fabulous in their funkiness, who has time for all that? Tossing crunchy raw veggies with a quick salt/vinegar/sugar solution produces quick and refreshing results to liven up richer dishes.

  • Approachable game. Game meats are nothing new, but I’ve traditionally seen them at nicer restaurants, setting their menu apart by offering something beyond just the same ol’ proteins. I’m all about fine dining on squab leg and venison loin, but I think we’ll see more rabbit burgers and wild boar meatloaf - more casual restaurants using game to reinvent the classics. Because, inextricably, the classics are always boring and need reinvention yet we are unwilling to let them stray too far from our forks.

  • Exotic spices are no longer very exotic. You know smoked paprika has arrived when you can buy it in the big bulk container at Costco. And that’s a great thing because smoked paprika makes a lot of dishes more yummy, and I go through it, well, in Costco quantities! Finding cardamom used to be such a treasure hunt, I would covet the lone jar I was able to locate, only breaking it out for the most appropriate of flavor pairings. Now each spice company not only sells garam masala right alongside the curry powder, but I’m thinking we’ll see ras el hanout and zaatar in the near future as well.
  • Food trucks and craft breweries are reaching critical mass, a girl can only get ripped off eat and drink so much, but they are another trend that’s not going anywhere. I foresee the not as well executed places falling on hard times while the real gems will be just fine. After all, both of these trended so hard in the first place because of crazy internet buzz. People will still buzz about the places that are worth while. And yes, sour beers are the new IPA. Glad I’ve finally started developing a taste for them.
  • I have no idea what the next diet fad will be, but vegan and gluten free have proven to be such a profitable marketing scheme for food companies, I’m sure something will pop up. Perhaps something as simple as sugar-free? Sugar is the latest evil, after all. But I just don’t see that happening. It’s also an addiction. While I might disagree, the world at large would argue that eggs (runny eggs!) are not habit forming. Nor is sourdough bread. Supposedly. If I had my way, the next fad would be “reasonably sweet”. I’m all for sugar, just not in the ridiculous quantities we use currently.


That’s it! My wishlist for 2012. Can we get on this, people? Take to the interwebs! #hashtag things! If we can get runny yolks on rabbit burgers at Applebee’s by September, I’ll learn to brew killer beer at home and give you all a bottle. Promise.


This whole exercise was really just to distract from the fact that I’m posting a recipe with nothing more than this grainy Instagram picture a couple of shoddy pics I shot on my iPhone. The holidays have really thrown me for a loop and come 8pm on a Tuesday night I am decidedly unwilling to break out the fancy camera to get the money shots while I drool all over the floor in anticipation of stuffing my face with the confection in question. Sorry.

The confection in question contains really amazing things that will make you drool everywhere too. Browned butter. It’s very 2011. It makes things buttery (obbbbviously), with a nuttier flavor. You know how I love the nutty flavor. … Please resist the dirty joke I just opened myself up for. We have cake to talk about. Pumpkin cake. Oh yes.  We’re not over the pumpkin yet are we? Good. Because it’s delicious. I know come December 1st, every fiber of my being screams for gingerbread flavored anything. But this cake is very heavy on the spice. Including ginger. Not pepper though. Good in gingerbread, but cardamom is best when it comes to pumpkin. And of course it has bourbon. The smokey flavor goes swimmingly with the browned butter. Bourbon, browned butter, and pumpkin. In a cake. You can forgive the picture now, right?

And let’s not forget the glaze. I love glaze on a bundt cake. The way it oozes over the cake when you first mix it. Watching it harden into a shiny shell, like it’s protecting something precious. Because it is protecting something precious. Unless you mixed up the salt and sugar. Then it's not so precious anymore. Then there's the panic that sets in when it slides right off the cake because you didn’t thicken it enough, as you hurry to scoop it up and re-pour it so you can get adequate glaze coverage. Oh yeah, that’s another reason I didn’t take any beauty shots. Thicken it right, people. You won’t want any paltry coating of this glaze. I used the remaining few tablespoons of the canned pumpkin puree in the glaze to boost the pumpkin oomph. And of course more bourbon. Oomph indeed! With the maple syrup and spices, I wanted to eat just a bowl of glaze. I might have licked a scoop or two off my finger, but you'll never know for sure.

So here’s to pumpkin, a food that will always be trendy. And delicious.  And remember to always brown your butter.


Please resist the dirty joke I just opened myself up for, and instead tell me what you'd like to see hit it big in 2012.


Browned Butter Pumpkin Bundt Cake with Spiced Bourbon Pumpkin Glaze

Cake adapted from Sprinkle Bakes

For the cake:
6 oz. (¾ cup) unsalted butter
8.5 oz. (2 cups) AP flour
1 ½ tsp baking soda
2 tsp ground cinnamon
2 tsp ground ginger
1 tsp ground nutmeg
½ tsp ground cloves
¼ tsp ground cardamom
1 tsp salt
7 oz. (1 cup) granulated sugar
7.5 oz. (1 cup) firmly packed brown sugar
1 ½ cups pumpkin puree
3 large eggs, room temperature
½ cup Greek yogurt, room temperature
3 TB bourbon
1 tsp vanilla extract

For the glaze:
2 cups powdered sugar
1 TB bourbon
1 TB maple syrup
2 TB pumpkin puree
½ tsp cinnamon
½ tsp ground ginger
½ tsp nutmeg (optional)
pinch of fine sea salt
1-2 TB milk, if needed


For the cake:
  1. Preheat oven to 350 degrees. Spray a bundt pan with baking spray.
  2. Melt the butter in a small saucepan over medium heat. Cook until the butter turns a rich, golden brown, swirling or stirring often so it doesn’t burn. Keep a watchful eye. It goes from brown to black very quickly. Pour the browned butter into a small bowl and let it stand until cool but not solidified.
  3. In a medium bowl, whisk the flour, baking soda, cinnamon, ginger, nutmeg, cloves, cardamom, and salt. Set aside.
  4. In a large bowl, whisk together the pumpkin puree, granulated sugar, brown sugar, eggs, Greek yogurt, vanilla, and bourbon until well combined. Whisk in the browned butter until it’s well blended. Stir in the flour mixture and mix until it is just combined.
  5. Pour the batter into the prepared bundt pan and bake for 45-55 minutes, until a toothpick inserted in the middle comes out clean. Allow it to rest for 10 minutes, then remove it from the pan and cool it completely on a cooling rack.

For the glaze:
  1. In a small bowl, whisk together the powdered sugar, bourbon, maple syrup, and pumpkin puree, until the mixture is smooth and there are no lumps. Add the spices and salt and whisk to combine. Add the milk (if needed), a small amount at a time, until the glaze is thin enough to pour and drip, but thick enough to stay mostly on the cake. Glaze too thin will pour right off the cake. If it’s too thin, add more powdered sugar until your desired consistency is reached.
  2. Drizzle the glaze over the completely cooled cake. Give it a few minutes to set up, then slice and enjoy.

Wednesday, October 20, 2010

Key Lime Pie Cupcakes


Tuck in, kiddies! I’m going to talk about cupcakes, and there’s just no way to accurately describe these babies and still be brief. So pull up a chair, it’s story time.

It all started with my sister sending me a link to a baking contest. Bravo and product placement company blah, blah, blah (the contest can be found here) - basically the contest is to make a dessert inspired by the flavors of key lime pie, strawberry shortcake, or mint chocolate chip. After voicing my disappointment that limes and strawberries were nowhere near in season anymore, I totally copped out and said I didn’t already have a good recipe to use and I wouldn’t be able to come up with anything decent in time. If I haven’t properly conveyed how completely awesome my sister is before, let me do so now. See, she knows me, so she was having none of my nonsense. She suggested something easy enough - take my strawberry margarita cupcake recipe and modify it to make a key lime cupcake instead. “You could even do a graham cracker crust on the bottom like those Martha Stewart ‘smores cupcakes I made that were awesome.” And it was like a light went off in my head - I was suddenly inspired! A lime-infused vanilla cupcake with a lime curd filling and lime-flavored meringue buttercream would be not only do-able, but delicious, and the graham cracker bottom might just nudge it into awesome territory.

My sister, ladies and gentlemen!

Unfortunately, this means that once again credit for the genius of the recipe must be given entirely elsewhere. And this is why fellow food lovers are integral to the home cook’s creative process. Sometimes they have all the good ideas and let you steal them. Plus, I’ll always have Husband’s birthday cake recipe. That one was all me.

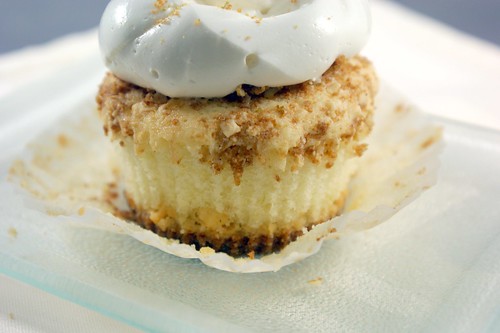
So, per my sister’s most excellent suggestion, I made (and submitted!) these key lime pie cupcakes, or key lime vanilla cupcakes with a graham cracker crust bottom, key lime curd filling, and key lime Swiss meringue buttercream. And sprinklings of other fun touches here and there. These cupcakes were not nudged anywhere. They took a superman leap over awesome and landed somewhere in oh-my-goodness-what-are-these!?. Let’s go into it, shall we? Don’t worry, I’ll take it slow.


So this cupcake starts with the graham cracker crust. I added some key lime zest for good measure. I wanted to make sure the lime flavor really came through, and even though I added it everywhere, I’d say it stayed a subtle background flavor, in a good way. I blind baked the crust, like you do with a real key lime pie, and then added some white chocolate shavings before pouring in the cupcake batter. Martha Stewart’s ‘smores cupcakes recipe used chocolate shavings, and I thought it was probably needed to act as a binder between the crust and the cupcake. And either way, the richness from a little white chocolate would only make it tastier. I sprinkled the extra graham cracker/white chocolate mixture over the tops of the cupcakes before I put them in the oven to bake, so they had a slight crumb on top as well as the crust underneath. The cupcakes themselves were just a simple vanilla cupcake, infused with some key lime zest and juice. But what’s a key lime pie inspired cupcake without key lime curd? I holed out the tops of the cupcakes after they had cooled and poured in a dollop of curd, then topped them with the light as air frosting, reminiscent of the meringue that sometimes comes on key lime pies. And finally, I rubbed some graham cracker crumbs with a little key lime zest and dusted a pinch over each cupcake for garnish. Look at me, I’m fancy.

I have to say, this was my first time making a cupcake with a crust on the bottom, and it is flipping fantastic! Why don’t all cupcakes have one? It’s delicious - like a cupcake and pie had a love child. The sprinkling of the crumb/chocolate mixture on the top of the cupcake definitely united all the flavors. Unless you have a mouth the size of a grapefruit, it’s cumbersome to try and bite both the top and bottom of a cupcake at the same time. Usually you go in at an angle, right? Well having the crust flavor on top of the cupcake meant that each bite had some of that graham cracker flavor, so each bite kept the connection to its inspiration - key lime pie. Husband thinks this detail is key to the success of the cupcake, so don’t skip it!

Also crucial? The key lime curd. Sure, it’s just a small dollop in the middle of the cupcake, but it’s also where you get the burst of key lime flavor. I loved all the subtle hints of lime throughout the cupcake, but it wouldn’t have tasted like a key lime pie without the curd. Plus, it was so tart, and sweet and creamy, that a smidgen is all that was needed to capture the bright flavor without getting hit in the face with it.

The cupcake was so complete without the frosting that anything like a traditional buttercream or cream cheese frosting would have detracted and distracted from it. Thrown it off the balance. So the Swiss meringue buttercream was perfect. It was light as a cloud; just a delicate, sweet touch. And look how glossy it is!  Gorgeous.  A friend of mine gave a cupcake to her son, and his feedback was that at first bite he didn’t like the frosting because he was expecting a traditional buttercream. The texture of it, so light and airy, threw him off. But on the second and subsequent bites, after he knew what to expect, he loved it. Great feedback, huh?

The cupcake itself was very light and tender. I went with a simple vanilla cupcake as the base because there were so many other flavors and elements. The cake itself was not the star, but it was still a delightful, delectable bite that helped highlight the other flavors. All the elements of the cupcake really came together in a great way. I couldn’t believe how much it brought to mind a key lime pie! These may just be the best cupcakes I’ve ever made. Ok, the Irish car bomb cupcakes I made for St. Patrick’s Day this year were pretty great, but they didn’t have a graham cracker crust, so they just don’t measure up anymore.

Delicious as they are, these cupcakes are no picnic to make. They’re not difficult, per se. Far from it. But they are labor intensive; lots of steps. Zesting and juicing one pound of key limes to start was a bit of a pain. Then you make the graham cracker crust mixture, bake it, make the batter, bake that, make the key lime curd and buttercream, and finally wait for everything to cool so you can finish putting it all together. It’s not an all day undertaking by any means, but don’t leave these until an hour before your party starts or you’ll be the unwitting host of a baking demonstration.  Also, the recipe makes a ton of cupcakes.  It was supposed to make 2 dozen, but with the graham cracker bottom and the airy cupcake batter, it made more like 2 and a half.  Thankfully, I have friends willing to eat my baking experiments!

These cupcakes may be a special occasion only treat, but boy are they ever special! Let’s hope the good folks at Bravo agree because I sure could use a $5,000 kitchen makeover.


Key Lime Pie Cupcakes

makes about 28 cupcakes

cupcakes partially adapted from Annie’s Eats and Martha Stewart

[Note: You’ll need 1lb bag of key limes, zested and juiced. Don’t have key limes? Regular limes will work fine too.)

For the graham cracker crust:
2 1/2 cups graham cracker crumbs
1/2 cup sugar
2 TB lime zest
1/2 cup (1 stick) unsalted butter, melted
7 ounces white chocolate, finely chopped

For the cupcakes:
3 cups cake flour
1 tbsp. baking powder
½ tsp. salt
16 tbsp. unsalted butter, at room temperature
2 cups sugar
5 large eggs, at room temperature
1¼ cups buttermilk, at room temperature
1 tsp vanilla extract
1 TB key lime juice
1 tsp key lime zest
  1. Preheat your oven to 350 degrees. Prepare 2 muffin tins with cupcake liners and set aside. 
  2. In a small bowl, combine the ingredients for the graham cracker crust, minus the white chocolate. Place 1 TB of the mixture into the bottom of each prepared muffin cup, and use the bottom of a small glass to pack the crumbs, then sprinkle about 1 1/2 tsp of the white chocolate over the graham cracker crust. Add the remaining chocolate to the reserved graham cracker mixture and set aside. 
  3. Bake the graham cracker crusts for about 5 minutes, or until the edges of the graham cracker mixture is golden. 
  4. Add the butter and sugar to the bowl of an electric mixer fitted with the paddle attachment and beat on medium-high speed until light and fluffy. Add the eggs, one at a time, mixing until incorporated. Make sure to scrape down the sides of the bowl after each addition. 
  5. In a medium mixing bowl, whisk together the cake flour, baking powder and salt. In a separate bowl, combine the buttermilk, vanilla extract, lime juice, and lime zest in a bowl. With the mixer on low speed, add the flour mixture to the butter mixture in 3 batches, alternating with the buttermilk mixture, ending with flour, beating until each addition is just combined. Scrape down the sides of the bowl and mix for 15 seconds longer. 
  6. Pour the batter into the cupcake liners, filling each cup to about a quarter inch from the top. Sprinkle the remaining graham cracker/white chocolate mixture over each cup, concentrating around the edges (since you'll be cutting out the center for the filling). Bake the cupcakes, rotating pans halfway through, until the tops are firm and a cake tester inserted in the center comes out clean, 18 to 20 minutes. Transfer the tins to a wire rack and let the cupcakes cool in the pan for 10 minutes, then remove them and let cool completely. 
For the lime curd:
3 large egg yolks
1 egg
1/2 cup sugar
1/2 cup fresh key lime juice
4 TB unsalted butter, melted
pinch of salt

(makes about 1 1/2 cups)
  1. In a small saucepan whisk together the egg yolks, egg, sugar, lime juice, and butter and cook over moderately low heat. Stir constantly until the mixture is thick enough to coat the back of a spoon, about 7-10 minutes, making sure not to let it boil or sit long enough to curdle. Strain the curd through a fine mesh strainer and set aside to cool. 
  2. Once cooled, using a pairing knife inserted at an angle, cut out a small cone-shaped chunk, about a 1 inch circle from the top of each cupcake. Fill the hole with the lime curd, about 1 teaspoon worth. You can either replace the chunk you removed, or leave it off. 
For the lime Swiss meringue buttercream:
4 large egg whites
1 1/4 cup sugar
1 1/2 cups (3 sticks) unsalted butter, room temperature
2 1/2 tsp vanilla extract
pinch of salt
2 TB key lime juice

(makes about 4 cups)

For the garnish:
1 tsp key lime zest
1/4 cup graham cracker crumbs
  1. In the bowl for your electric mixer (or a medium heatproof bowl if you’re using a hand mixer), combine the egg whites and sugar, and place the bowl over a small pot of gently simmering water. Whisk the mixture constantly until the sugar has fully dissolved, about 2-3 minutes. Rub a little between your fingers, and if there is no hint of a grainy texture, it’s done (or when it reaches 160 degrees in temperature). 
  2. Place the bowl in your mixer fitted with the whisk attachment, and at high speed, beat the egg mixture until stiff peaks form. Continue beating until the eggs are fluffy and the mixture has cooled, about 5-6 minutes. Make sure the stiff peaks don’t become dry, you want them to stay glossy. 
  3. Switch to the paddle attachment and with the mixer on medium-low speed, add the butter 2 TB at a time, waiting until it is fully incorporated into the mixture before adding the next addition. If the buttercream begins in separate, turn the mixer up to medium-high speed and beat for a few minutes, until it is smooth again. Add the vanilla, salt, and lime juice, and beat until incorporated. Again, if the mixture separates or thins out too much, beat on medium-high speed until it is light and fluffy again. Reduce the mixer speed to low and beat for 2 minutes to eliminate any air bubbles. 
  4. Using a pastry bag or a Ziploc with the corner cut off, frost each cupcake. In a small bowl, combine the graham cracker crumbs and lime zest, and lightly dust each cupcake with just a pinch of the mixture. 

Wednesday, August 4, 2010

Life is Liiiiike a Batch of Cupcakes


Recipe below: Strawberry Margarita Surprise Cupcakes

A healthy diet is all about balance. I’m a firm believer in working all the things you love into your life. Let’s be realistic. If you deny yourself something you truly love, how long are you going to be able to do it? And how happy are you going to be? And if you’re unhappy, what’s the point? Better to just figure out a way to work it in and be done with it. We’re not looking for temporary crash dieting here!

If we lived in a perfect world and could eat whatever we wanted with no repercussions, what foods would you ecstatically chow down on that you wouldn’t in this cruel, real world we live in? Me? It’s dessert! Ok technically, that’s not so much a food as a course, but how can you narrow down dessert? It’s one thing to justify high calorie foods that are also high in nutrients, but as much as I love them, desserts tend to be empty calories of processed flour and sugar. But I don’t care! I love to bake, and I love sweets after dinner. So I just find a way to work it in.

A friend asked me, after I told her about these cupcakes I’m about to drone on and on about, how I’m able to eat such things and stay so skinny. I told her I exercise a lot. And I do. But don’t just dismiss it! Getting fit really does just boil down to calories in and calories out. That’s boring, I know, but it’s true. Does that mean you have to meticulously count each calorie you eat and painstakingly track each calorie you burn everyday? Heck no! I mean, you can...but, ick! It’s all about finding what works for you. What’s really important is having a general understanding of what’s going in, and what’s coming out burning off. Some people like keeping a food journal. As much as I love documenting what I eat (via this here bloggy blog), I hate keeping a food journal. Go figure! There are websites to track and calculate exact calories in your meals, but that’s another post. The main idea is to have an idea of how many calories you’re consuming each day. I’m just talking in the general sense, here. Like, you ate a 1/2lb hamburger topped with a hot link and a side of fries vs. you ate a salad with grilled chicken on top.  But all that is another post because today I want to talk about exercise.

Anyone still here? Oh, I think I see someone in the back! You’ll be so glad you stayed.

A lot of us, including myself until very recently, have forgotten how important it is to move around! With everything at our fingertips, we’re lifeless blobs! Convenience is on its way to being a sin, and I’ve already embraced gluttony, so it’s off the table because I think we're only allowed one. Of course, one woman’s sin is another woman’s motivation! See, I love to eat. I don’t just love food (and oh do I ever love food...), I love the act of eating. I chew ridiculous amounts of gum between meals, just to keep my mouth busy...

[insert dirty joke here]

And since I love to eat ever so much, if I want to keep my trim figure up, I’ve got to run, run, run! The hardest part about starting an exercise routine is that starting part. The key here is routine, as in something you do more than once, regularly even! It's easy to try something once or twice, but really sticking with a regular exercise program is by far the hardest part about getting in shape, I think. The good news is, once you commit and keep it up, it becomes a part of your life, and thus, it becomes easier.  There is a light at the end of the tunnel!  It doesn't matter what you do, as long as you’re moving around. Though it does make sense to pick an activity you actually enjoy. Now don’t cop out on me people! I will maintain that anyone can find some activity they can do regularly they don’t completely hate. If you belong to a gym you never go to, chances are the gym maybe isn’t your thing. Try saving some money and finding other modes of movement! I didn’t know until I tried that I actually just preferred walking (and eventually running) around my neighborhood. Have a Wii? Try one of the many fitness games they have (and email me if you want some reviews). Try hiking somewhere scenic in your area, or a lake or forest or the beach! There’s always sports like tennis, basketball, or soccer, but since they require a friend, it’s best to find a lone activity for the everyday. The point is, move around, and do it several times a week. You don’t have to devote hours and hours to every workout. My motto is something is better than nothing. I know everybody’s daily lives are hectic and...well...packed!  It’s hard to imagine working more into your day, but trust me, it's all about baby steps. Once you work in 10 minutes, before you know it, you’ll find yourself extending it to 15. That’s how I started and look at me now! I learned to make exercising a priority in my routine and just...worked it in!  A little bit at a time.

And just one more quick rant: don't cop out on yourself!  Don't be one of those people that tries exercising once, doesn't see results, and then gives up.  It takes time, and you know it.  Don't be one of those people that chooses an activity that doesn't raise their heart rate above what it would take to get off the couch and go to the bathroom.  Exercising burns calories because your heart rate is raised.  Higher heart rate = more calories burned.  And this isn't really wrong, I just think it's silly: don't drive the two blocks to the gym (a ten minute walk, tops), and then walk on a treadmill once you get there!  There are a thousand and one excuses to not work out, and all they do is help you justify skipping something you aren't excited to do.  In the end, it's just a cop out.  Save the excuses.  You're in charge of yourself, and it's far better to just be honest with yourself.  If you don't want to exercise, then don't!  But no cake for you!


Ok, enough about exercise. Let’s talk dessert! I know they’re disgustingly trendy right now, but I’m kind of into cupcakes lately. They’re just so pleasantly pre-proportioned! And cake is so fluffy and sweet! And frosting! I love frosting. I could eat it by the spoonful. And when I say "could", I of course mean I totally have.  When I fill a pastry bag with frosting, I’m tempted to just squeeze it right into my gullet. Just tempted, haven't actually done that one...yet.  And by pastry bag, I mean a ziplock with the bottom corner cut off.  We're fancy at Chez Julie.

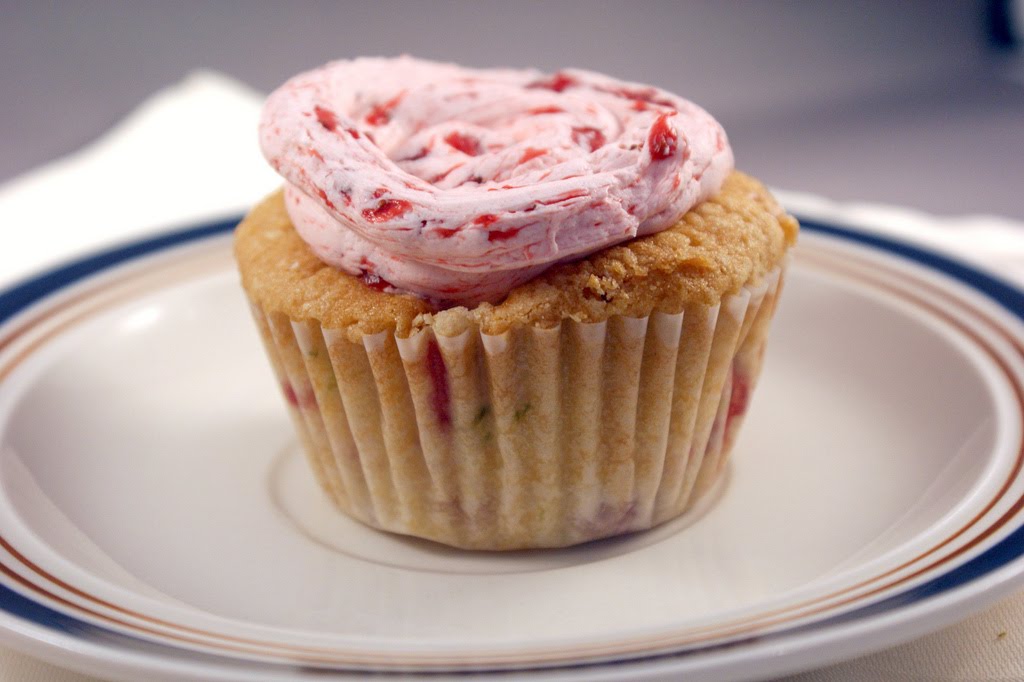
And now that my latest deep, dark secrets are out in the open, let’s talk about these cupcakes! They were awesome! The cake was light and fluffy, moist and delicious. It’s the buttermilk. Buttermilk does magical things with baked goods. And full of fruit! You’ll notice from the picture below that my strawberries sank to the bottom, which doesn’t so much matter to the overall flavor, but doesn’t make for such a pretty pic. It’s all about presentation! But fear not, I have a trick! By tossing the strawberries with a little flour, the theory is they stay properly suspended. I had to guess at how much flour to use, since obviously I'm coming up with it after the fact, so more flour might be necessary.  I've heard about this trick many times in the past, but I've never tried it, so you'll be like my guinea pigs!  Naw, it'll work.  If you're worried, you could always puree the strawberries first and just fold them into the batter, but I liked the burst of fresh berry goodness.

Mere cupcakes with frosting are not enough to fully excite me. Oh no. Not anymore.  I need to fill them. Because really, these are margarita cupcakes. Sure, there’s lime in the cupcakes, and lime in the frosting, but it’s just a hint. My cupcakes need that sour bite!  My lime needs to shine! By filling the center with lime curd, it gives the cupcakes a bright burst of citrus flavor. Delicious flavor! I love filling cupcakes. It’s a great way to sneak in another layer of flavor, and you never see it coming!  It's a surprise inside every cupcake.  They should change the saying to "Life is liiiiike a batch of cupcakes..."  See, those crazy post titles explain themselves eventually.

And who doesn’t love lime curd? Ok, probably plenty of people...but they don't exist to me.  Ever made your own citrus curd? It sounds intimidating, doesn't it? It’s actually super easy to make, as long as you keep one thing in mind: don’t leave the stove! It’s easy, but it’s also kind of a pain, unless you want scrambled eggs. But it’s only for a little while, and it only requires you to stir. Buck up and push through!

[Full disclosure: tequila doesn't come through very strong in baked goods.  In future batches, I'm still going to use it, and I still liked it in there.  Just don't expect a punch in the face like you can get with a stronger alcohol, like bourbon.  And if you're really in need of booze with only a little tequila left in the pantry, maybe just leave it out and drink a shot instead.]

This was my first time attempting swiss meringue buttercream, and not only was it a resounding success, it made a believer out of me. It’s light as a cloud and oh so delicate! The strawberry jam adds a refreshing flavor, and it’s nice and light to go with the texture. And delicate.  Just note these cupcakes don’t keep quite as well as a regular buttercream because the meringue hardens a bit in the fridge. But they still stay tasty!  And delicate!  And light!  It's like the strawberry frosting flavor is delivered to your mouth and you just have no idea how it got there.

These cupcakes really came together beautifully. The overall lightness of textures went really great with the more delicate and bright flavors of the fruit. Since it won’t weigh you down, it’s a great sweet treat on a hot summer day! This is a cupcake I will always make room for in my daily calorie bank!


Strawberry Margarita Surprise Cupcakes
(aka: strawberry lime tequila cupcakes with lime curd filling and a strawberry lime tequila swiss meringue buttercream...got that?)
cupcakes adapted from Annie’s Eats
buttercream adapted from Martha Stewart

Makes about 18 cupcakes

For the cupcakes:
2 1/2 cups cake flour
1 tsp baking soda
generous 1/4 tsp kosher salt
1/2 cup (1 stick) unsalted butter, room temperature
1 1/2 cups sugar
2 eggs, room temperature
1/3 cup buttermilk
1/4 cup canola oil
1 tsp vanilla extract
3 TB tequila
1 TB lime zest
2 cups fresh strawberries, chopped into bite-sized pieces
1/4 cup AP flour

  1. Preheat your oven to 350 degrees and line the muffin tins with paper cupcake liners.
  2. In a stand mixer, cream the butter and sugar until pale and fluffy. Add the eggs, one at a time until incorporated, then add the buttermilk, oil, vanilla, and tequila and mix until fully combined.
  3. Sift the cake flour, baking soda, and salt together and stir into the batter until just combined.
  4. In a separate bowl, toss the strawberries with the AP flour and lime zest. Add more flour if it’s not enough to coat the whole batch. Gently fold the strawberries into the batter.
  5. Fill the cupcake liners with the batter, leaving about a 1/2 inch from the top. Bake for 18-20 minutes, or until a cake tester (i.e. toothpick) comes out clean. Cool completely.


For the lime curd:
3 large egg yolks
1/4 cup sugar
1/4 cup fresh lime juice
4 TB unsalted butter, melted

In a small saucepan whisk together the egg yolks, sugar, lime juice, and butter and cook over moderately low heat. Taste the mixture (if you’re comfortable with the raw egg, which I know many people smarter than I are not) and add more sugar if it’s not sweet enough (I don't like it too sweet). Stir constantly until the mixture is thick enough to coat the back of a spoon, about 5 to 7 minutes (that means when you run your finger along the coating on the back of the spoon, it should leave a line rather than running back together). Be sure not to let it boil or sit long enough to curdle. Strain curd through a fine mesh strainer and set aside to cool.

For the buttercream:
1 pound fresh strawberries, finely chopped
1 cup sugar, divided
1/4 cup tequila
1/4 tsp salt
1 TB lime juice
1 tsp lime zest
2 large egg whites
3/4 cup (1 1/2 sticks) unsalted butter, room temperature, cut into pieces
1/2 tsp vanilla extract

(makes about 2 cups)


  1. Set a small pot over medium heat. Add the strawberries, 1/2 cup of sugar, tequila, salt, lime juice, and lime zest and simmer gently until a thickened syrup forms, about 15 minutes. Set aside to cool completely.  Once cooled, you can either puree the mixture or leave it in chunks.  I left mine chunky.
  2. Set a bowl over a pot of gently simmering water. Add the egg whites and the remaining 1/2 cup of sugar and whisk constantly over the heat until the sugar is fully dissolved and the mixture is warm when you stick your finger in it (about 160 degrees).
  3. Pour the egg mixture into the bowl of a stand mixer and using the whisk attachment, beat on high speed until stiff peaks form (not too dry though). Test this by removing the whisk attachment, swirling it around the mixture, and pulling it straight up and turning it rightside-up to face you. If they are properly whipped up, a small droopy peak should stick up on the very tip of the whisk.
  4. Switch to the paddle attachment on the stand mixer, and beat the butter into the egg mixture on a medium-low speed, a few tablespoons at a time. Make sure the butter is fully incorporated before adding the next batch. If mixture separates after all the butter is mixed in, beat at a medium-high speed for a few minutes until it comes back together. Add the vanilla, beating it at medium-low speed, then turn the speed all the way down to low and mix for a couple of minutes to remove any extra air.
  5. Gently fold in the strawberry jam mixture with a rubber spatula and stir until the buttercream is smooth.

Note: Feel free to use store-bought strawberry jam instead of basically making your own, and just cook it on the stove with the other ingredients for a few minutes until it comes together.

To assemble the cupcakes:

  1. Using a pairing knife inserted at an angle, cut out a small cone-shaped chunk, about a 1 inch circle from the top of each cupcake. Fill the hole with the lime curd, about 1 teaspoon worth. You can either replace the chunk you removed, or eat it! leave it off.
  2. Fill a pastry bag (or ziplock with the bottom corner cut off) with the frosting and go to town on your cupcakes. Or, you know, just use a spatula.

Wednesday, May 12, 2010

The Birthday Cake


As in the birthday cake.  The birthday cake to end all birthday cakes!  When Husband's birthday was approaching last month, I said I would cook him any food for his birthday dinner, and bake him any birthday dessert.  After much thought, he decided on sweet and sour pork for dinner (I have no idea where it came from, since I had never made it before), and his usual for dessert.  He always requests a cake, chocolate and raspberry.  This year was no exception.  The flavor combination is both our favorites.  Being the person I am...I wanted to make something special...and I put way more thought into it than I probably should have...I landed on the most complicated, but delicious cake I have ever made.

Are you ready to hear about it?

Prepare yourself.  It's quite a mouthful.  Ha!  Get it?

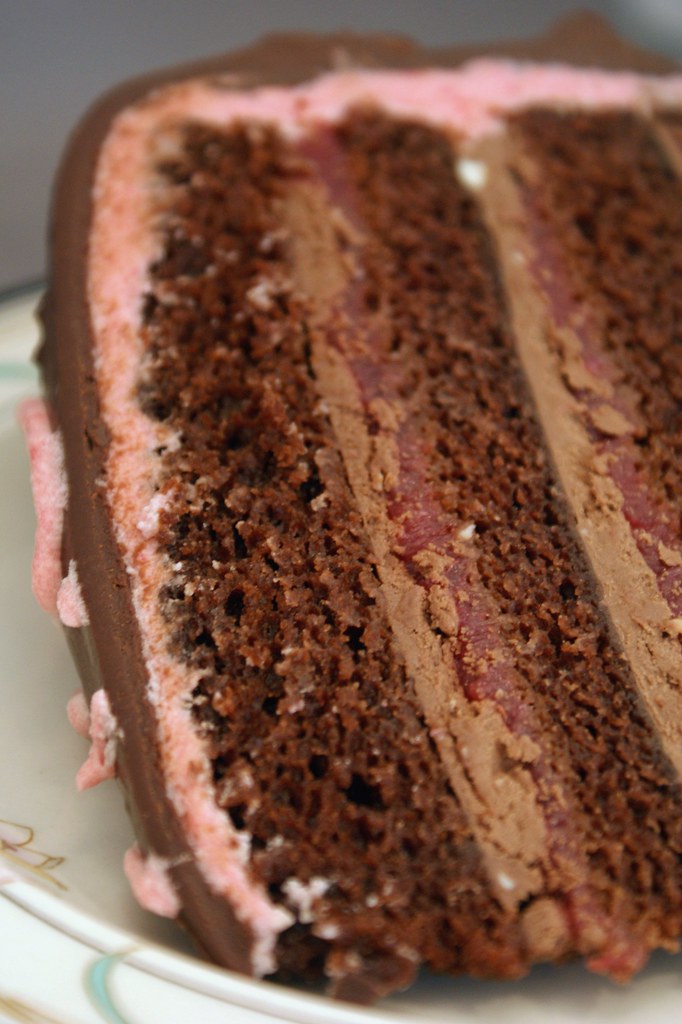
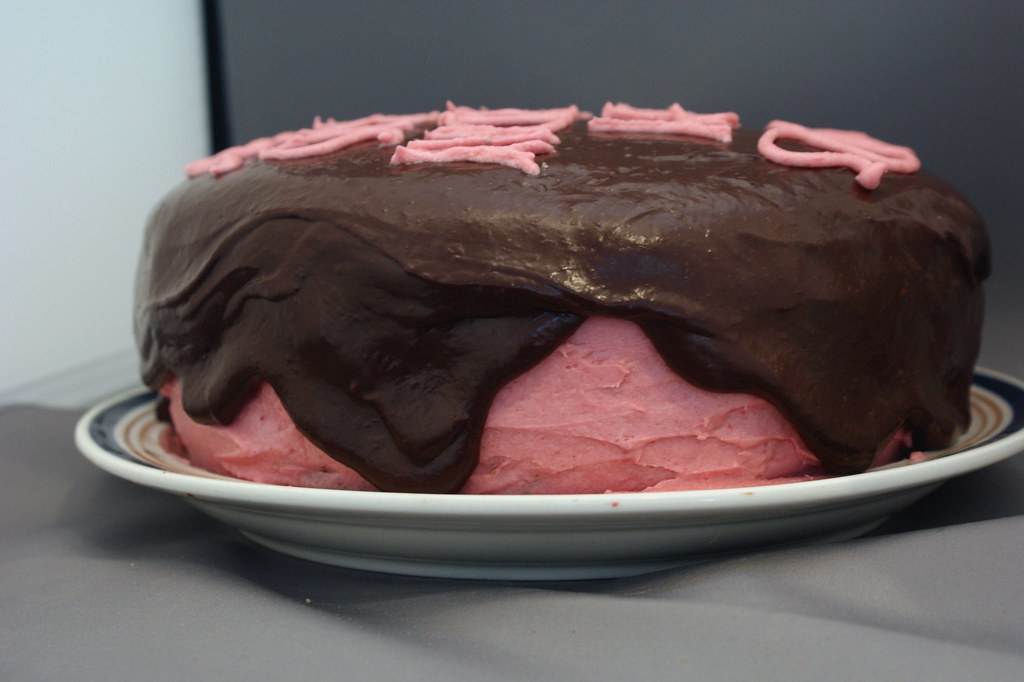
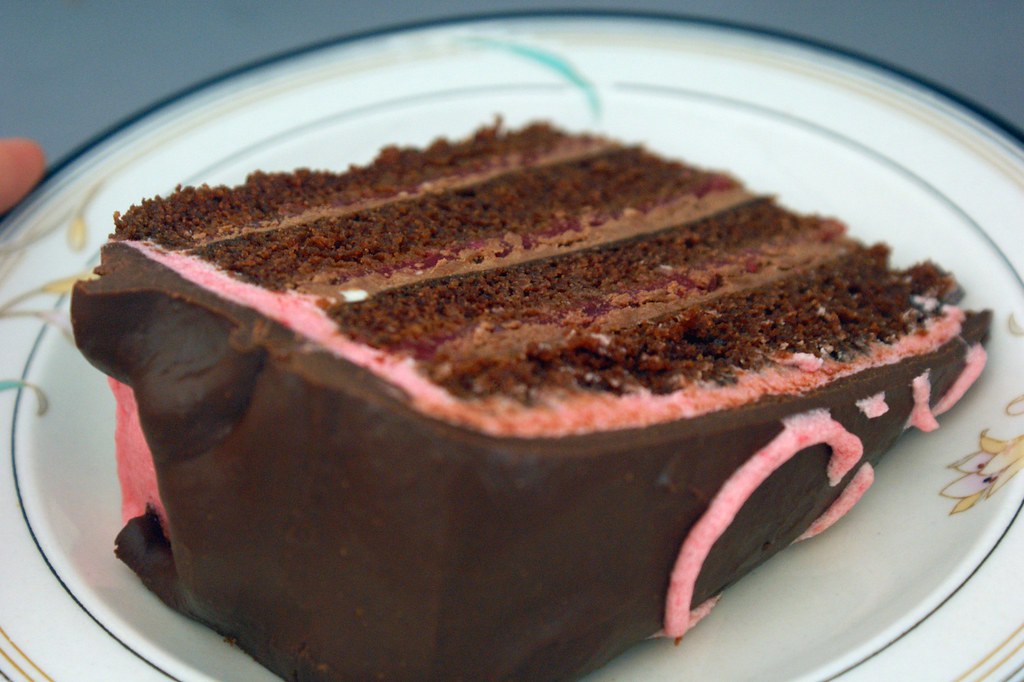
It's my favorite chocolate cake, layered with both raspberry filling and chocolate buttercream frosting.  It's topped with a raspberry buttercream, and then that's topped with a chocolate raspberry glaze.

I'm drooling right now.

Husband likes frosting.  I gave him some options on how to put the cake together, and he liked this way the best.  Cutting the layers in half allowed for more layers of frosting without adding more cake.  If you prefer more cake, or even just a taller cake, you could always do 3 or even 4 full layers instead of 2.  That cake would be a doozy!  Or, just keep the 2 layers in tact with only one measly layer of frosting between them.


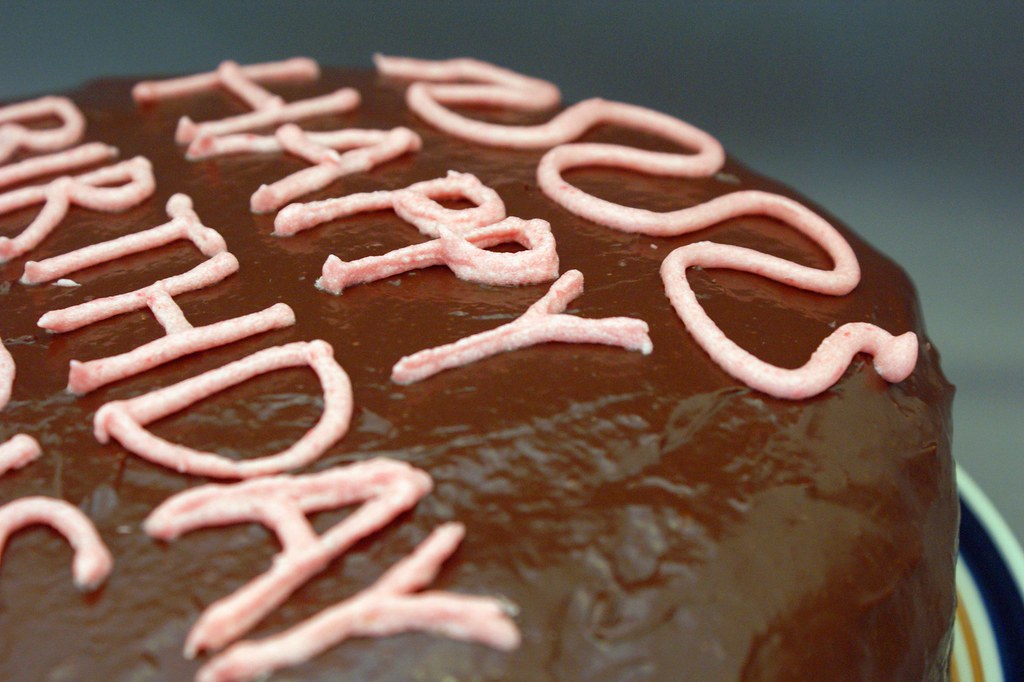
I used some of the extra buttercream to decorate the top of the cake.  Lettering and squiggles and what not.  An expert I most certainly am not.  Fresh raspberries would have worked well too, but they were too rich for my unemployed blood.

Now this may shock you, given the subject and title of this blog, but there is, in fact, no booze in this cake.  A travesty, I know!  The recipe below contains no booze.  Unthinkable!

But fear not!  I wouldn't leave you hanging.  While this blog will, from time to time, feature recipes without alcohol, this cake could easily work some in.  And so next time I will.  I just didn't have the right booze on hand, so it was left out.  Sad, I know.  I'm talking about Chambord raspberry liqueur, of course.  Wouldn't that go nicely?  When I make this cake again I plan to incorporate it in the chocolate glaze on top of the cake, as well as brush some of the liquor on the cake layers.  Did you know brushing baked and cooled cake layers with water, simple syrup, or liquor is a good way to keep a cake moist, and in the case of the latter, delicious?  This chocolate cake definitely doesn't need the moisture, but I never say no to flavor.  If you're not a fan of Chambord, I'll bet that Godiva chocolate liqueur would be delicious as well, though chocolate on chocolate...it would probably get a bit lost.

While hunting the interwebs for ideas and recipes for what I wanted to do with this cake, I happened upon this invaluable post from Deb at Smitten Kitchen.  If you're planning to make a layer cake, it's definitely worth reading her tips for a successful cake.  My chilling technique and use of the crumb layer came from her.  And her tip for baking the cakes at a lower temperature for longer to prevent the middle from puffing up is ingenious!  Totally worked for me. Check it out.


Making this cake felt like running a marathon.  Seriously.  It took me all day.  I missed a Corgi meetup at the beach because I knew I needed every available minute of the day.  It didn't really take all day.  And it didn't require constant attention.  But I took my time, making sure not to rush, so I was sure that I would be happy with the end result.  Also, I have an issue with time management.

But it was so worth it!  This cake was by far the best cake I've ever baked.  I was afraid there would be too much going on, but since I kept the flavors to just chocolate and raspberry, the taste was complex, but still cohesive and delicious.  If anything all the different fillings and frostings added a great textural element.  Especially after refrigerating it. That chocolate cake recipe really is my favorite.  The cake comes out light and very moist, and the chocolate flavor is deep, not watered down like some other cakes can taste.  Oddly enough, I think all the different fillings and frostings actually balanced themselves out well.  Without the chocolate frosting, the raspberry in the filling and buttercream together would probably have been too pronounced. And the frosting without the raspberry filling would have left the raspberry flavor not pronounced enough.  You see?

Apparently our guests liked it because they actually took some home!  Husband freaked out a bit when he saw after only one day it was already half gone.  But he's a bit selfish (read: oink, oink!) when it comes to my baked goods.  It's endearing.  And when I sent him to work with some of the leftovers when Monday rolled around, people were actually fighting over it!  Heh, ok, not really.  But Husband did bring in a slice for our old manager, a woman who has always appreciated and encouraged my baking efforts, so I share with her as much as Husband lets me.  She was out of town, but very much wanted to try the cake, so she told him to put it in the freezer for when she got back.  A few co-workers got wind of the frozen slice, and decided to pilfer it for themselves.  They're also friends who encouraged my baking efforts, so I was glad they were able to try it, but apparently my old manager was not happy to hear the cake had not-so-mysteriously disappeared from the freezer.  Husband actually asked me to bake another cake so she could try it!  I'm nice, but I'm not that nice.  Cakes are rather expensive to make!  And remember the whole marathon comment?  Pretty sure it's not healthy to run a marathon every month.  Ok, maybe it is, but I still don't want to do it.

That reminds me of a tip for people who, like me, love to bake, but don't want the calories that come with being responsible for eating an entire cake, or batch of scones, or pan of muffins.  My first line of defense is my husband.  If anything gets past him after 48 hours, then it goes to work with him to share with his co-workers.  Only the ones he likes, though.  He thinks it's an insult to feed my extra delicious baking to people who are not worthy.  This is why I bake him cakes that take all day to make.  He's a sweetie.  But I should amend that, since there are co-workers who he likes, but sometimes he just doesn't have enough to go around to everyone because he eats half of it at his desk before sharing.  The frozen slice of cake, anyone?  Sometimes I have to give him specific instructions.

Oh, and a word of warning.  If you're going to make this cake for a dude, I wouldn't skip the chocolate glaze.  I didn't realize until I frosted the cake, but without the glaze it would be a pink cake.  I don't think Husband would have particularly appreciated a pink cake.  Just sayin'.

Portions of the cake could in theory be done the day before.  I baked the cakes the day before and froze them with no issue.  But for the filling, frostings, and glaze, I wanted to make sure it was freshly made so I didn't have any consistency issues.  If you do attempt to undertake this cake, I applaud you.  I'm sure you'll make a beautiful cake, and I hope you like how it turns out!


Husband's Ultimate Birthday Cake


The Contents:
  • the cake - 2 layers chocolate cake cut in half to make 4 thin layers
  • between the cake layers - chocolate frosting and raspberry filling
  • on top of the cake - raspberry buttercream and chocolate glaze
  • decoration for the cake - leftover raspberry buttercream for lettering or fresh raspberries

The Recipes:

The Best Ever Chocolate Cake
Adapted from the Cafe Beaujolais Cookbook

3 cups flour
2/3 cup unsweetened cocoa
2 tsp baking soda
2 cups sugar
1 tsp salt
2 cups cold water
1/2 cup + 2 TB canola oil
1 TB vanilla extract
2 TB white vinegar
  1. Preheat the oven to 300 degrees.  Grease two 9-inch cake pans with baking spray, line the bottoms with parchment paper, then spray the parchment paper.
  2. Mix the flour, cocoa, baking soda, sugar, and salt, and sift together in a medium-sized bowl. In a separate bowl, combine the water, canola oil, vanilla, and vinegar. Whisk the wet and dry ingredients together, and pour through a fine mesh strainer to break up any lumps.  Whisk one more time.
  3. Pour the batter evenly into the two prepared cake pans.  Drop the pans, one at a time, about 6 inches from the counter or floor a few times to pop the air bubbles.  Bake for 30-40 minutes, until a tester inserted in the middle comes out clean.  Cool completely.

Bittersweet Chocolate Buttercream Frosting
Adapted from Smitten Kitchen

Makes about 1 1/2 cups

3.5 ounces bittersweet chocolate
1/2 cup heavy cream
4 TB unsalted butter, at room temperature
  1. Melt the chocolate and heavy cream in a double boiler, and whisk to combine.  Remove from heat and let the mixture sit, whisking occasionally, until it reaches a thick, gloppy consistency (which Deb likened to mayonnaise, which was right on).  This took me about 30 minutes.
  2. In a stand mixer, cream the butter using the whisk attachment, on medium speed until it is light and fluffy.  Add the chocolate mixture and whip until it is thicker and lighter in color, about 2 minutes.  Don't overwhip, or it could break.

    Raspberry Filling

    Makes about 1 1/2 cups

    20 ounces frozen raspberries (2 packages), thawed
    1/3 cup sugar
    2 TB cornstarch
    1 tsp freshly squeezed lemon juice
    1. Puree the raspberries in a food processor, and push liquid through a fine mesh strainer to remove any seeds.
    2. Combine all ingredients in a large saucepan and heat the mixture over medium heat, stirring constantly until it boils and thickens.  Let it cool completely, so the mixture will come to a thick enough consistency. 

    Raspberry Buttercream

    1 cup (2 sticks) unsalted butter, at room temperature
    5-6 cups confectioners sugar
    10 ounces frozen raspberries (1 package), thawed
    1 1/2 tsp vanilla extract
    1. Puree the raspberries in a food processor, and push liquid through a fine mesh strainer to remove any seeds. Set aside 3 TB of the puree for the chocolate glaze.  (To save time, I pureed the raspberries for both recipes together at once.)
    2. In the bowl of a stand mixer, cream the butter using the whisk attachment on medium speed until it is light and fluffy.
    3. Slowly add 2 cups of the confectioners sugar, and mix until smooth.  Then add 10 TB of the raspberry puree, slowly, and mix until smooth.  Add the rest of the sugar, in 1/2 cup increments, and mix until fully incorporated.  When you've added in 4 1/2 to 5 cups of sugar stop and taste the mixture.  If it is sweet enough for your liking, stop there.  If you need more, keep tasting after each 1/2 cup addition until it's sweet enough.  The exact amount of sugar will vary depending on the sweetness of the raspberries and, of course, personal preference.
    4. Finally, add the vanilla extract and beat the mixture at medium-high speed for 2-3 minutes, until it is light and fluffy.
    Note: Don't refrigerate the buttercream if you make it in advance.  It will become too hard and won't be spreadable.  It should be ok at room temperature in an airtight container.  This recipe makes enough to frost an entire cake, which will be too much since you're not using it between the cake layers.  I wasn't sure if I'd have enough if I halved the recipe, but if you're feeling brave (or miserly!), you can try it.


    Chocolate Raspberry Glaze
    Adapted from Smitten Kitchen

    8 ounces bittersweet chocolate, coarsely chopped
    3 TB raspberry puree
    2 TB light corn syrup
    1/2 cup heavy cream
    1. Melt the chocolate and corn syrup together in a double boiler.  Whisk often until the chocolate is fully melted and the mixture is smooth.  
    2. Remove the mixture from heat, and whisk in the raspberry puree and heavy cream until it is smooth.
    Note: Don't do this part until you are ready to use it (the cake is assembled).  It needs to be warm when it is poured over the cake, so it's oozy and drippy.  I waited just a few minutes to pour mine, and it stayed a little thick.

    Booze It Up!  Add 2 TB of Chambord raspberry liqueur when you add the raspberry puree and cream.


    The assembly:
    1. Cut the cooled cake layers evenly in half, so there are four thin layers.  Be careful!  They'll be very delicate.  If the tops have puffed up in the middle, use a bread knife to level them.  Put them in the freezer to firm up, about 30 minutes to an hour.
    2. Place the first layer on your cake plate.  (If boozing it up, brush the top of the first cake layer with a little Chambord raspberry liqueur.) Using a spatula, spread about 1/2 cup of the raspberry filling in an even layer over the cake.  Make sure it gets all the way to the edge.  Spread about 1/2 cup (or one third) of the chocolate frosting over the raspberry filling.  Place cake in the refrigerator to firm up, if needed. (Note: If the raspberry filling is on the runny side, put the chocolate frosting layer down first.  My filling was very thick, so it worked best for me to use it first.)
    3. Repeat Step 2 for the next two layers, making sure to work slowly and letting it set in the refrigerator if it is slipping and sliding at all.  Chilly cake is your friend!  Then place the final layer of cake on top.
    4. If there is unevenness in the shape of the cake, now is the time to even it out.  Cut off any bits that stick out...and eat them!  Gotta test for poison, right?
    5. Spread a very thin layer of the raspberry buttercream around the cake for a crumb layer.  This will glue the dark crumbs to the cake, so they don't show through the light colored buttercream.  Chill the cake in the refrigerator for 15 minutes until firm.  Apply a regular, thick layer of the buttercream, then chill again for another 15 minutes.
    6. Pour the chocolate glaze over the top of the cake and using a spatula, push the glaze just to the edge of the cake, so it spills down the sides.  Refrigerate the cake for at least 30 minutes to set completely.
    7. Decorate the top of the cake with leftover raspberry buttercream and/or fresh raspberries.
    Yum!