Friday, May 28, 2010

I Am A Man


I have a confession to make.  Bless me George Foreman, for I have sinned.  I'm kind of embarrassed about it.  My face is all kinds of sheepish at the moment.

Last week was my first time grilling.

Seriously!  I mean, I've eaten my fair share of grilled food, and some of it has even come out of my own backyard, but never prepared by me.  It was always Husband up to this point.  And since he doesn't do much of the cooking, my poor grill hasn't seen much use for the last few years.  Grilling always kind of scared me.  It's so...flamey!  And hot!  And I was afraid I would burn my face off, which if you know me, was actually a real possibility.  Still is.  I'm rather clumsy, did you know?  Plus, it's kind of a man thing, right?  Meat!  Fire!  Cook!  Eat!  Good!  Well last week I finally manned up and successfully grilled some awesome food.  It was so awesome in fact, that I went back and did it again...and again...and...I can't stop!  It just gets so hot, and charred.  Love me some char.  My name is Julie, and I am a grilling bad-ass.

And bonus?  Grilling also apparently makes me happy.  Picture it.  Last Saturday.  Husband, the puppers (my Pembroke Welsh Corgi, Theo (aka: Goofball McTroublemaker)), and I chilling and grilling in the backyard on a gorgeous Spring day.  Husband turning some vegetables on the grill, munching some bread and cheese, while I, nursing a glass of red wine, kicked the ball around for Theo to fetch.  That's my idea of a perfect day.  A little sad, but completely true.

But I don't want to talk about everything I grilled last week.  I just want to talk about one thing.  Potatoes.  Grilled.  Mashed.  These were the best mashed potatoes I have ever made.  For serious.  Let me tell you all about them.


First, I used red potatoes.  Russets work great and all, but I just have a thing for red potatoes.  They are so buttery and delicious.  And leave the skins on!  That's where all the nutrients are!  Do you know what nutrients taste like?  Deliciousness.  If your taste sensors aren't too deadened by constant exposure to processed ickiness, they respond to nutrients because your body needs them.  That's how we  survived in the wild and stuff!  So leave 'em on.  You won't even know they're there, except for the yumminess they impart to the dish.

Second, I sliced the potatoes into 1/2 inch slices for maximum surface area exposure.  More exposure means more char-grill taste and even cooking.  Win.  Then Husband did something that can only be classed as genius.  And really, it's too bad this idea didn't pop into my head, given the subject matter of this blog, but as long as my tummy ultimately got to reap the benefits, it's all good.  See, we wrapped the potatoes in a foil bundle once they were good and charred because they still needed a little cooking to be a mashable consistency.  I piled the potatoes on the foil, and right before I closed it up, Husband had the bright idea to dump the contents of my wine glass in with the potatoes. A wine marinade!  See what I mean?  Genius!

Did I mention there was garlic involved?  Roasted.  Two heads.  Now if you're not completely gaga over garlic like I am, don't be scared!  Garlic seriously sweetens and mellows when it's roasted, so you get that great garlic taste without it punching in the face.  If you're still not into it I would suggest first, that you never come over to my house to eat, and second, that you do just one head.  You won't be sorry.

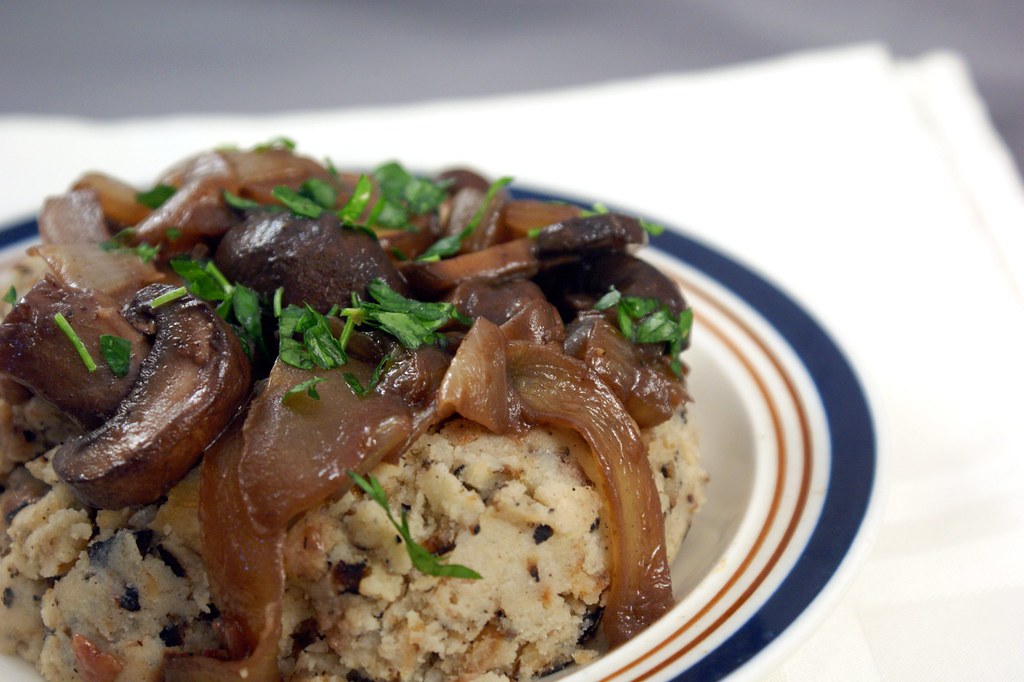
I wanted to top the potatoes with a gravy, but I was completely out of stock of any kind.  Sad, I know.  So I ended up just doing onions and mushrooms cooked in as much red wine as I could spare from my own glass (not much, it's my preciouussssss), but the recipe below is for what I would have used, had I the proper ingredients on hand at the time.  I hesitate to call it a gravy because I have an irrational fear that some Southern person is going to read this post and reach through the series of tubes that make up the interwebs and kick my butt for daring to call it gravy when it is not real gravy.  I have no idea what makes gravy gravy, so I'll just call it a sauce.  I am such a peace maker. 

What I really love about this dish is that it was completely improvised, but surprisingly successful.  Earlier in the day Husband had made a comment that he hadn't had mashed potatoes in a while, and the seed was planted.  Later that day at the store I saw red potatoes at a great priced and figured I do something with them.  When I got home we fired up the grill for other purposes, and I thought, what the heck.  Grill the potatoes while we're at it.  And by the time the sun went down, we were eating the best mashed potatoes I have ever made.  Delicious and fulfilling all at the same time.

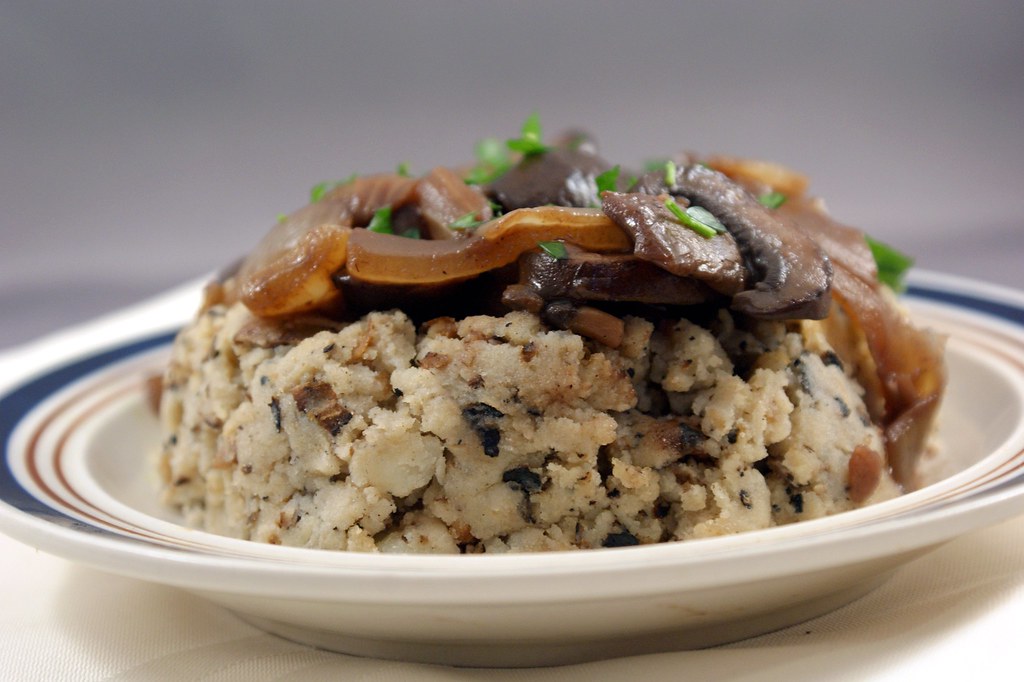
What makes these so good is that that smoky flavor you get from grilling the potatoes first.  You don't need to add two sticks of butter to make it taste like anything because it tastes like awesomeness before you even go to mash it!  Husband and I may had sneaked a potato or two from the batch before it became the mashed dish you see below.  When was the last time you sneaked a boiled russet, huh?


Julie's Favorite Mashed Potatoes
(aka: grilled red wine roasted garlic mashed potatoes with caramelized onion and mushroom gravy sauce)

Makes about 8 servings (6 if you're a side dish piggy like me)

For the potatoes:
3 lbs red potatoes
2 heads garlic
olive oil
1/4 cup red wine (white works too)
2 TB butter
1/2 cup Greek yogurt or sour cream
1 cup buttermilk
salt and pepper to taste


For the sauce:
2 large sweet onions, quartered then sliced
10 oz. cremini mushrooms, sliced
olive oil
2 TB butter
2 TB flour
1 cup red wine
2 cups chicken or vegetable stock
2 TB balsamic vinegar
salt and pepper to taste
chopped fresh parsley for garnish
For the potatoes:
  1. Slice the potatoes into 1/2 inch thick slices. Toss with about 1 TB of olive oil and a pinch of salt and pepper to coat.
  2. Cut the top off the heads of garlic to expose the top of the cloves. Place each head individually on a square of aluminum foil, drizzle with a little olive oil, and pinch the foil closed so it encases the head of garlic. Place these on a cooler part of the grill and forget about them, or alternatively, place in a 400 degree oven for about an hour.
  3. Grill the potato slices over medium heat until both sides have nice and dark grill marks, and a deep golden color. The longer these grill, the stronger grill flavor the final dish will have. I even let some of my slices get a little charred because I'm into that sort of thing.
  4. Once the slices are grilled, get a big sheet of aluminum foil, dump all the potatoes in the center, pour in the red wine, and pinch up the ends so you have a big enclosed bundle. Let this sit on the grill on low heat with the cover down.  This will let the potatoes cook until they reach mashability and infuse them with a rich wine flavor.
  5. Don't forget to check on your garlic! It's ready to come off the grill when it's soft to the touch. This for me happened to be the same amount of time it took to cook the potatoes.
  6. When the potatoes are fork tender, place them in a bowl, and while still warm, add the butter, yogurt, and buttermilk. With a potato masher, pulverize the mixture! The potatoes may have developed a bit of a crispy crust from the grilling, so initially it takes a little muscle to get the ball rolling, but don't worry, it gets easier once you break that crust down. Mash until it's the consistency you like.   It'll need more liquid than regular mashed potatoes because so much has cooked out during the grilling process.  I just kept adding buttermilk until it was creamy enough for my liking.  Add a little more salt and pepper to taste, as well as the roasted garlic. You can either tediously peel each clove, or just squeeze at the bottom until it squirts out like a tube of toothpaste.  

For the sauce:
  1. Heat a large skillet over medium heat with 1 TB of olive oil. Add the onions and a pinch of salt and sweat them until they give off all their water.  Before the onions start to brown, turn the heat down to low and cook until they fully caramelize and reach a rich, golden color, about 45 minutes to an hour.  You may need to increase the heat to medium-low if they still have a lot of moisture.  The trick is to make sure they don't brown.
  2. In a separate pan over medium heat, and add the mushrooms and a pinch of salt and pepper. Cook until the mushrooms give off their water and cook down, about 10 minutes.
  3. Clear a little spot in the mushroom pan and add the butter. When it has melted add the flour, and stir to combine into a paste. Let this cook for a minute or two to cook off the raw flour taste, then deglaze the pan with the red wine. After a couple of minutes when most of the wine has cooked down, add the chicken stock, balsamic vinegar, and caramelized onions, and let the mixture simmer until a nice, thick sauce forms.
  4. Serve this over your grilled mashed potatoes, top with some fresh parsley, and enjoy!

PS: I actually wrote up this entire post already once today, and in the course of events, mostly involving blogger being a complete tool (ha!  get it!?), it was all completely lost.  This post, naturally, pales in comparison to the work of art that was the original post.  Try as I might, I just can recreate the magic.  I hope this didn't come off as too ho hum.  

Saturday, May 22, 2010

The Muffin Man?


My husband is a muffin man.  If you ask him what his favorite dessert is, he'll say something with chocolate.  Usually cake. [see post on his requested birthday cake: chocolate!]  But if I set a tray of blueberry muffins on the counter, they are usually gone by morning.  He is a total muffin man.

Do you know the muffin man?  The muffin man?  The muffin man?

I totally have that song stuck in my head now.  It's not much of a song though, is it?  I mean, that's pretty much all there is to it.  Did you know there used to be dudes who went door to door delivering muffins?  Kind of like the milk man.  I guess that's where the song came from.  Wikipedia says so.  How did people learn anything before Wikipedia?

Bet you thought this blog was just for food chit chat and innocent, diverting entertainment, didn't you?  Oh no.  I make you learn something too.  There's life-changing information in here, people!  I mean, there's got to be the answer to some random gameshow question in there, that could win you millions of dollars.  You're welcome.  Also, I want my cut!

You totally have that song stuck in your head now, don't you? Mwhaha!


Anyways, berry season is here!  I love berry season. How awesome are they?  They're good just by themselves, over cereal, in yogurt, salads, pureed they can be used as a million different sauces, not to mention their possibilities in desserts!  Cobblers, tarts, pies, cakes, crisps, scones, breads, and...muffins!  The possibilities are so endless that I almost get overwhelmed when deciding what to do with them!

Blackberries were on sale last week, and my curiosity had just peaked by a recipe for some delicious-looking blackberry muffins...and the rest is history!  

Have you ever had blackberry muffins before?  I hadn't.  Strawberry, blueberry, raspberry...sure!  Blackberry, never.  It really doesn't make sense why not.  One might argue out of all the berries, the blackberry is one of the best!  But that's another post.

These muffins were so good.  Actually, they turned out better than I anticipated.  Usually Husband is the muffin oinker, but I definitely had my share of face stuffing with these.  It was the delicious crumb topping.  You bite into the muffin top and get that sweet and slightly crunchy crumbly top, and then right in the middle is that burst of bright sweetness from the blackberries. Oh my, they were addicting!  

See that picture below?  At ate that muffin after I took that picture.  Ok, actually I ate it after the one below it, because I cut it in half, got pictures of it's insides, then ate it.  Which is perfectly acceptable if you don't consider that I had already eaten one fresh out of the oven about 5 minutes prior.  But once I had cut this one open and it's blackberry innards looked and smelled so enticing, there was no turning back.  Yep, I had to run some extra laps for that one!  So worth it.


The muffins turned out kind of...mammothsiveossal!  Or rather, ahem, they were on the large side.  When I checked on them in the oven halfway through baking, I thought the recipe had gone horribly, horribly wrong.  They had taken on a life of their own!  They were...spreading!  But by the end they had puffed up in all the right places and made one delicious muffin.  Phew!

I like to change out about half the all purpose flour in muffin and quick bread recipes with whole wheat flour.  Not only does it make them a bit healthier (yay fiber!), it also gives them a bit of density and deeper flavor that I like.  I also like to go for recipes that use applesauce, or banana, or pumpkin, or some other fruit or vegetable puree in place of some of the oil to lighten and bright them a bit.  I prefer the more neutral taste of applesauce when I don't want the flavor to interfere with everything else going on.  I wanted blackberry muffins, not blackberry banana muffins, ya know?  But if your ears (eyes?) just perked up at the mention, feel free to try it.

I decided to booze up these muffins with brandy, not just because of the handy alliteration, but also because I wanted a rich flavor that would compliment the blackberries without overpowering them like a whiskey might.  But you could certainly use a whiskey in its stead.  You'll get a bit smokier of a flavor, I would think.  Yum!

Innards!

Blackberry Brandy Muffins
Adapted from The Hazel Bloom

Makes 12 enormous muffins

For the topping:
1/2 cup brown sugar
1/3 cup all purpose flour
1/4 cup rolled oats
4 TB butter, melted

For the muffins:
1 1/2 cups all purpose flour
1 cup whole wheat flour
2 tsp baking soda
1 tsp baking powder
1/4 tsp salt
3/4 cup sugar
1/3 cup canola oil
1/3 cup applesauce
1 egg
1 tsp vanilla extract
1 tsp lemon zest
1/4 cup brandy (optional)
1 cup buttermilk

12 oz fresh blackberries, halved
  1. Preheat the oven to 350 degrees.  Grease a muffin pan with baking spray.
  2. Combine the topping ingredients in a small bowl until it's a crumbly consistency.
  3. In a large bowl, sift together the flours, baking soda, baking powder, and salt.
  4. In a medium bowl, scramble the egg, then add the sugar and whisk until fluffy and light in color.  Add the oil, applesauce, vanilla, lemon zest, and brandy.  Mix to combine.
  5. Add the wet ingredients to the dry, pour in the buttermilk, and stir until just barely combined.  Don't over-mix!  Then fold in the blackberries.
  6. Fill the 12 muffin cups with the batter.  I fill them all the way to the top, which is probably why they're so huge.  Then crumble the topping mixture over each muffin.
  7. Bake for 25-30 minutes, until golden brown and a tester comes out clean.  Let cool for 10 minutes, which for Husband, sometimes requires an armed guard.


PS: If you check out the right-hand column of this here blog (come on, click over from your rss reader, I don't bite), there is a spot to follow this blog.  I hope if you like what your read, you'll do so.  It makes me feel all warm and fuzzy on the inside.  Also, right below it is a link to this here blog's Facebook page.  Come like me on Facebook, if you please.  It makes me feel all cozy and safe on the inside.  One more thing.  A little ways below that there is a banner that will take you to my profile on Tasty Kitchen. Come and be my friend, or rate my recipes!  It makes me feel all liked and validated on the inside.

Tuesday, May 18, 2010

Baking Till You're Skinny


Psych!!!

Sorry to yank your chain, but you won't catch me touting any kind of magic cookie diet here.  Baking generally involves things like flour, butter, oil, sugar, etc.  Nothing evil per se, but a diet high in carbs (especially refined flour like all purpose, which basically just turns to sugar right along with all that sugar already in it) and fat isn't going to lose you any notches on your belt.  Not to make you feel guilty about consuming cakes and cookies and pies and whatever your part of your brain responsible for survival instincts that respond to body fat storing foods heart desires!  On the contrary.  Dessert should be a part of everyone's life!  If dessert is banned from your diet, then it's not a diet (as in, the way you eat...like all the time), it's just a temporary way of eating.

Unless you just don't like desserts, in which case, I don't even want to know you because that is just against nature!  If this were neolithic times you would be dead, and so you're dead to me.  Makes sense, right?

That's all just a wordy way of saying everything in moderation!  Me, wordy?  But you generally don't bake 2 cupcakes or 1 slices of pie, do you?  That's just silly!  So you're faced with eating an entire pie, and if you haven't developed some seriously iron-clad willpower, your entire pie will be gone far sooner than you might hope.

My willpower is more like aluminum foil.

So how do I bake a pie and only manage to eat 2 or 3 small slices?  Ahem, that's over the span of days thankyouverymuch!  I have some tricks up my sleeve.

As I said in my last post, Husband is my first line of defense.  When I bake something he really likes, like say, muffins, they usually don't last long enough for me to really pig out on them.  But what if you're not married?  Or your spouse refuses to help you (how selfish!)?  Or you come to realize it's not really fair to Husband's waistline when you expect him to scarf down everything you take out of the oven so you don't eat it yourself? Or what if Husband expressly asks you to stop baking so much for the love of our scale!

If no one at home will help you out (ugh, selfish!), it's time to become to most popular girl at work!  Most office environments have break rooms of some kind, right?  Share your kitchen triumphs!  Not only will you gain brownie points (Ha!  Get it?), but also it invites co-workers to strike up conversation about your hobby, and who doesn't like being the center of attention chatting about food?  And if you don't work in an office, or you hate your co-workers and don't want to feed those lame losers, how about your neighbors?  Drop off a goody bag to the couple next door.  You have friends, right?  Invite some over to help you eat whatever is looming on your kitchen counter.  It's amazing how much more social I am when I have baked goods around.

The thing with moderation is it's all about portions.  Eating a dessert that is a few bites in size is obviously going to do a lot less damage to your overall calories for the day than eating half a cake.  But when I'm craving sweets, and I'm holding the knife in my hands, I don't always cut the size of slice that I should.  I know this about myself, so I take steps to prevent myself from pigging out.

Yes, one side of my brain plots deviously against the other.  I blame you, sugar!

When I bake up a pan of brownies, and they're all nice and cooled, I cut them into teeny tiny bite-size pieces, rather than the huge bars you might buy at the grocery store.  Then I put them away!  When I want dessert at the end of the day, I grab one of my small brownie squares, rather than trusting my aluminum foil will to cut an appropriate piece.  This works for cakes, bars, and pretty much anything solid baked in a pan.  When I bake muffins and they are particularly huge, I cut them in half before storing them.  When I bake cookies, I make sure to make them as small as possible, so they come out of the oven all nice and portioned for me.

In some cases, you can bake only what you want to eat right then and freeze the rest.  Remember when I said it was silly to only bake a slice of pie?  Well I didn't really mean it.  I like to keep you on your toes.  Slice and bake cookies, scones, and pie dough (for pocket pies!) all work well.  Also, did you know that a full freezer is actually more efficient than an empty one?  Apparently it's easier, from a power consumption perspective, to keep a lot of frozen food frozen than it is to keep an empty space at a freezing temperature.  So really, by freezing your doughs, you're being green.  Good for the environment.  You are welcome planet earth!  I expect some kind of rebate check from the government any day now for my services.


Really what it comes down to is calories, right?  There is no expressly evil food (except margarine.  I hate you, margarine!).  Don't give up chocolate for a year unless someone is paying you to!  If you know you have a slice of pie waiting for you in the kitchen, take a few less bites at dinner.  Don't sacrifice healthy, nutrient-dense foods for what is essentially empty calories.  Just find a good balance.  You'll be happier.  Also, baking rocks!  Total therapy.  Am I right?

[Also, when I know I really want to pig out on something I shouldn't, I just try and work out a little more that day.  Calories in, calories out!  But that's another post...]


Oh, and that muffin up there?  At the tippy tippy top of this monster of a post?  Me wordy?  That recipe is in the queue, but I can tell you there may be fresh blackberries, brandy, and crumb topping involved.

Wednesday, May 12, 2010

The Birthday Cake


As in the birthday cake.  The birthday cake to end all birthday cakes!  When Husband's birthday was approaching last month, I said I would cook him any food for his birthday dinner, and bake him any birthday dessert.  After much thought, he decided on sweet and sour pork for dinner (I have no idea where it came from, since I had never made it before), and his usual for dessert.  He always requests a cake, chocolate and raspberry.  This year was no exception.  The flavor combination is both our favorites.  Being the person I am...I wanted to make something special...and I put way more thought into it than I probably should have...I landed on the most complicated, but delicious cake I have ever made.

Are you ready to hear about it?

Prepare yourself.  It's quite a mouthful.  Ha!  Get it?

It's my favorite chocolate cake, layered with both raspberry filling and chocolate buttercream frosting.  It's topped with a raspberry buttercream, and then that's topped with a chocolate raspberry glaze.

I'm drooling right now.

Husband likes frosting.  I gave him some options on how to put the cake together, and he liked this way the best.  Cutting the layers in half allowed for more layers of frosting without adding more cake.  If you prefer more cake, or even just a taller cake, you could always do 3 or even 4 full layers instead of 2.  That cake would be a doozy!  Or, just keep the 2 layers in tact with only one measly layer of frosting between them.


I used some of the extra buttercream to decorate the top of the cake.  Lettering and squiggles and what not.  An expert I most certainly am not.  Fresh raspberries would have worked well too, but they were too rich for my unemployed blood.

Now this may shock you, given the subject and title of this blog, but there is, in fact, no booze in this cake.  A travesty, I know!  The recipe below contains no booze.  Unthinkable!

But fear not!  I wouldn't leave you hanging.  While this blog will, from time to time, feature recipes without alcohol, this cake could easily work some in.  And so next time I will.  I just didn't have the right booze on hand, so it was left out.  Sad, I know.  I'm talking about Chambord raspberry liqueur, of course.  Wouldn't that go nicely?  When I make this cake again I plan to incorporate it in the chocolate glaze on top of the cake, as well as brush some of the liquor on the cake layers.  Did you know brushing baked and cooled cake layers with water, simple syrup, or liquor is a good way to keep a cake moist, and in the case of the latter, delicious?  This chocolate cake definitely doesn't need the moisture, but I never say no to flavor.  If you're not a fan of Chambord, I'll bet that Godiva chocolate liqueur would be delicious as well, though chocolate on chocolate...it would probably get a bit lost.

While hunting the interwebs for ideas and recipes for what I wanted to do with this cake, I happened upon this invaluable post from Deb at Smitten Kitchen.  If you're planning to make a layer cake, it's definitely worth reading her tips for a successful cake.  My chilling technique and use of the crumb layer came from her.  And her tip for baking the cakes at a lower temperature for longer to prevent the middle from puffing up is ingenious!  Totally worked for me. Check it out.


Making this cake felt like running a marathon.  Seriously.  It took me all day.  I missed a Corgi meetup at the beach because I knew I needed every available minute of the day.  It didn't really take all day.  And it didn't require constant attention.  But I took my time, making sure not to rush, so I was sure that I would be happy with the end result.  Also, I have an issue with time management.

But it was so worth it!  This cake was by far the best cake I've ever baked.  I was afraid there would be too much going on, but since I kept the flavors to just chocolate and raspberry, the taste was complex, but still cohesive and delicious.  If anything all the different fillings and frostings added a great textural element.  Especially after refrigerating it. That chocolate cake recipe really is my favorite.  The cake comes out light and very moist, and the chocolate flavor is deep, not watered down like some other cakes can taste.  Oddly enough, I think all the different fillings and frostings actually balanced themselves out well.  Without the chocolate frosting, the raspberry in the filling and buttercream together would probably have been too pronounced. And the frosting without the raspberry filling would have left the raspberry flavor not pronounced enough.  You see?

Apparently our guests liked it because they actually took some home!  Husband freaked out a bit when he saw after only one day it was already half gone.  But he's a bit selfish (read: oink, oink!) when it comes to my baked goods.  It's endearing.  And when I sent him to work with some of the leftovers when Monday rolled around, people were actually fighting over it!  Heh, ok, not really.  But Husband did bring in a slice for our old manager, a woman who has always appreciated and encouraged my baking efforts, so I share with her as much as Husband lets me.  She was out of town, but very much wanted to try the cake, so she told him to put it in the freezer for when she got back.  A few co-workers got wind of the frozen slice, and decided to pilfer it for themselves.  They're also friends who encouraged my baking efforts, so I was glad they were able to try it, but apparently my old manager was not happy to hear the cake had not-so-mysteriously disappeared from the freezer.  Husband actually asked me to bake another cake so she could try it!  I'm nice, but I'm not that nice.  Cakes are rather expensive to make!  And remember the whole marathon comment?  Pretty sure it's not healthy to run a marathon every month.  Ok, maybe it is, but I still don't want to do it.

That reminds me of a tip for people who, like me, love to bake, but don't want the calories that come with being responsible for eating an entire cake, or batch of scones, or pan of muffins.  My first line of defense is my husband.  If anything gets past him after 48 hours, then it goes to work with him to share with his co-workers.  Only the ones he likes, though.  He thinks it's an insult to feed my extra delicious baking to people who are not worthy.  This is why I bake him cakes that take all day to make.  He's a sweetie.  But I should amend that, since there are co-workers who he likes, but sometimes he just doesn't have enough to go around to everyone because he eats half of it at his desk before sharing.  The frozen slice of cake, anyone?  Sometimes I have to give him specific instructions.

Oh, and a word of warning.  If you're going to make this cake for a dude, I wouldn't skip the chocolate glaze.  I didn't realize until I frosted the cake, but without the glaze it would be a pink cake.  I don't think Husband would have particularly appreciated a pink cake.  Just sayin'.

Portions of the cake could in theory be done the day before.  I baked the cakes the day before and froze them with no issue.  But for the filling, frostings, and glaze, I wanted to make sure it was freshly made so I didn't have any consistency issues.  If you do attempt to undertake this cake, I applaud you.  I'm sure you'll make a beautiful cake, and I hope you like how it turns out!


Husband's Ultimate Birthday Cake


The Contents:
  • the cake - 2 layers chocolate cake cut in half to make 4 thin layers
  • between the cake layers - chocolate frosting and raspberry filling
  • on top of the cake - raspberry buttercream and chocolate glaze
  • decoration for the cake - leftover raspberry buttercream for lettering or fresh raspberries

The Recipes:

The Best Ever Chocolate Cake
Adapted from the Cafe Beaujolais Cookbook

3 cups flour
2/3 cup unsweetened cocoa
2 tsp baking soda
2 cups sugar
1 tsp salt
2 cups cold water
1/2 cup + 2 TB canola oil
1 TB vanilla extract
2 TB white vinegar
  1. Preheat the oven to 300 degrees.  Grease two 9-inch cake pans with baking spray, line the bottoms with parchment paper, then spray the parchment paper.
  2. Mix the flour, cocoa, baking soda, sugar, and salt, and sift together in a medium-sized bowl. In a separate bowl, combine the water, canola oil, vanilla, and vinegar. Whisk the wet and dry ingredients together, and pour through a fine mesh strainer to break up any lumps.  Whisk one more time.
  3. Pour the batter evenly into the two prepared cake pans.  Drop the pans, one at a time, about 6 inches from the counter or floor a few times to pop the air bubbles.  Bake for 30-40 minutes, until a tester inserted in the middle comes out clean.  Cool completely.

Bittersweet Chocolate Buttercream Frosting
Adapted from Smitten Kitchen

Makes about 1 1/2 cups

3.5 ounces bittersweet chocolate
1/2 cup heavy cream
4 TB unsalted butter, at room temperature
  1. Melt the chocolate and heavy cream in a double boiler, and whisk to combine.  Remove from heat and let the mixture sit, whisking occasionally, until it reaches a thick, gloppy consistency (which Deb likened to mayonnaise, which was right on).  This took me about 30 minutes.
  2. In a stand mixer, cream the butter using the whisk attachment, on medium speed until it is light and fluffy.  Add the chocolate mixture and whip until it is thicker and lighter in color, about 2 minutes.  Don't overwhip, or it could break.

    Raspberry Filling

    Makes about 1 1/2 cups

    20 ounces frozen raspberries (2 packages), thawed
    1/3 cup sugar
    2 TB cornstarch
    1 tsp freshly squeezed lemon juice
    1. Puree the raspberries in a food processor, and push liquid through a fine mesh strainer to remove any seeds.
    2. Combine all ingredients in a large saucepan and heat the mixture over medium heat, stirring constantly until it boils and thickens.  Let it cool completely, so the mixture will come to a thick enough consistency. 

    Raspberry Buttercream

    1 cup (2 sticks) unsalted butter, at room temperature
    5-6 cups confectioners sugar
    10 ounces frozen raspberries (1 package), thawed
    1 1/2 tsp vanilla extract
    1. Puree the raspberries in a food processor, and push liquid through a fine mesh strainer to remove any seeds. Set aside 3 TB of the puree for the chocolate glaze.  (To save time, I pureed the raspberries for both recipes together at once.)
    2. In the bowl of a stand mixer, cream the butter using the whisk attachment on medium speed until it is light and fluffy.
    3. Slowly add 2 cups of the confectioners sugar, and mix until smooth.  Then add 10 TB of the raspberry puree, slowly, and mix until smooth.  Add the rest of the sugar, in 1/2 cup increments, and mix until fully incorporated.  When you've added in 4 1/2 to 5 cups of sugar stop and taste the mixture.  If it is sweet enough for your liking, stop there.  If you need more, keep tasting after each 1/2 cup addition until it's sweet enough.  The exact amount of sugar will vary depending on the sweetness of the raspberries and, of course, personal preference.
    4. Finally, add the vanilla extract and beat the mixture at medium-high speed for 2-3 minutes, until it is light and fluffy.
    Note: Don't refrigerate the buttercream if you make it in advance.  It will become too hard and won't be spreadable.  It should be ok at room temperature in an airtight container.  This recipe makes enough to frost an entire cake, which will be too much since you're not using it between the cake layers.  I wasn't sure if I'd have enough if I halved the recipe, but if you're feeling brave (or miserly!), you can try it.


    Chocolate Raspberry Glaze
    Adapted from Smitten Kitchen

    8 ounces bittersweet chocolate, coarsely chopped
    3 TB raspberry puree
    2 TB light corn syrup
    1/2 cup heavy cream
    1. Melt the chocolate and corn syrup together in a double boiler.  Whisk often until the chocolate is fully melted and the mixture is smooth.  
    2. Remove the mixture from heat, and whisk in the raspberry puree and heavy cream until it is smooth.
    Note: Don't do this part until you are ready to use it (the cake is assembled).  It needs to be warm when it is poured over the cake, so it's oozy and drippy.  I waited just a few minutes to pour mine, and it stayed a little thick.

    Booze It Up!  Add 2 TB of Chambord raspberry liqueur when you add the raspberry puree and cream.


    The assembly:
    1. Cut the cooled cake layers evenly in half, so there are four thin layers.  Be careful!  They'll be very delicate.  If the tops have puffed up in the middle, use a bread knife to level them.  Put them in the freezer to firm up, about 30 minutes to an hour.
    2. Place the first layer on your cake plate.  (If boozing it up, brush the top of the first cake layer with a little Chambord raspberry liqueur.) Using a spatula, spread about 1/2 cup of the raspberry filling in an even layer over the cake.  Make sure it gets all the way to the edge.  Spread about 1/2 cup (or one third) of the chocolate frosting over the raspberry filling.  Place cake in the refrigerator to firm up, if needed. (Note: If the raspberry filling is on the runny side, put the chocolate frosting layer down first.  My filling was very thick, so it worked best for me to use it first.)
    3. Repeat Step 2 for the next two layers, making sure to work slowly and letting it set in the refrigerator if it is slipping and sliding at all.  Chilly cake is your friend!  Then place the final layer of cake on top.
    4. If there is unevenness in the shape of the cake, now is the time to even it out.  Cut off any bits that stick out...and eat them!  Gotta test for poison, right?
    5. Spread a very thin layer of the raspberry buttercream around the cake for a crumb layer.  This will glue the dark crumbs to the cake, so they don't show through the light colored buttercream.  Chill the cake in the refrigerator for 15 minutes until firm.  Apply a regular, thick layer of the buttercream, then chill again for another 15 minutes.
    6. Pour the chocolate glaze over the top of the cake and using a spatula, push the glaze just to the edge of the cake, so it spills down the sides.  Refrigerate the cake for at least 30 minutes to set completely.
    7. Decorate the top of the cake with leftover raspberry buttercream and/or fresh raspberries.
    Yum!

    Monday, May 3, 2010

    Jamming Around Town


    I have a confession to make.  I'm scared of jam.  Making my own, I mean.  It's ridiculous, I know.  You hear all these horror stories about people dying horrible deaths from eating their home-canned goods in which the seals had broken!  Ok, maybe that's a bit of an exaggeration, but I still prefer not to poison myself.  Also, so much gear is required for the endeavor.  You have to have jars and racks and tongs...and you have to boil things and sterilize things!  I'm all about a clean kitchen, but the words sterilization and food together just...turns me off. And...it might have something to do with the fact that I don't own any of that gear I mentioned.

    But that won't stop me from making jam!  Ever heard of freezer jam?  For those not hip to the lingo, that would be jam that you freeze, rather than can, to preserve it. It's made much the same method.  I made some recently...and I may have boozed it up a bit.  That's what I do, right?  When I saw the recipe call for grape juice, I immediately made the jump to wine.  I perused my wine cabinet and decided that Gewürztraminer would fit the bill.

    Ever heard of it?  Don't let those two little dots above that u scare you off!  Say it with me: Guh-wurts-tra-mee-ner.  Look at you, speakin' all fancy.  It's not as popular a varietal as Chardonnay or Riesling, but if you've never tried it before, you should. It's totally tasty. I'm really not a wine connoisseur, so this won't be the most accurate description, but Gewürztraminer is a bright and light white wine.  It's floral and fruity, a little bit dry and a little bit sweet.  Only slightly!  I'm not usually a fan of sweet wines, but this wine isn't cloying by any means.  Actually, one of my favorite wines is the late harvest Gewürztraminer from Navarro in the Anderson Valley.  Heaven in a bottle.


    So I made a strawberry Gewürztraminer freezer jam that turned out so bright and complex, I was eating it all week.  I really held back on the sugar because I wanted to make sure to taste the wine, and I think strawberries are sweet enough on their own.  But if you like sweeter jams, you can always up the sugar.  You can also try a different wine varietal!  I would suggest sticking with sweeter wines, nothing too dry.  My ingestion method of preference?  That would be on a sesame cracker with some fig goat cheese I bought at a Costco roadshow a few weeks ago.  So...amazingly...good.  A fresh-baked buttermilk biscuit would do nicely as well.

    I wanted to tackle my own jam because store-bought jams tend to be, well, mostly sugar.  I don't think sugar is evil.  Not by any means.  But when I eat jam, I want to feel like I'm eating fruit, not eating dessert.  You gotta pick and choose your sugar battles, right?


    Strawberry Gewürztraminer Jam

    3 cups strawberries
    1 3/4 cups Gewürztraminer
    1/4 cup sugar
    1 pouch pectin (I used the Ball no sugar needed variety)

    1. Mash the strawberries with a potato masher into small chunks. (Don't use the food processor for this, I hear if you break it down too much, you break down the pectin and it won't set)
    2. Combine the strawberries, wine, and pectin in a pot over medium-high heat.  Bring the mixture to a rolling boil (don't jump the gun, let it really boil!), and cook for 1 minute. 
    3. Remove the pot from the heat and stir in the sugar until it's dissolved.
    4. Pour the mixture into freezer jam containers (or any freezer-safe container that tickles your fancy), leaving at least half an inch of room from the top of the container, and move to the refrigerator to set up overnight.   

    De-boozify it: Use white grape juice if you aren't so wine inclined!