Showing posts with label bars. Show all posts

Monday, October 11, 2010

Help me go to bootcamp!

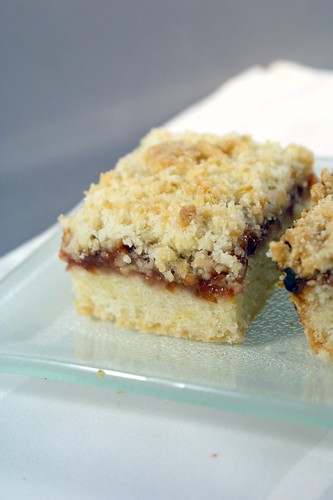
Recipe below: Earl Grey Plum Preserves Crumb Bars

Pacific Natural Foods is hosting an exciting food challenge...ok, the challenge isn't that exciting, but the prize is! An all-expenses paid two day trip to Napa to attend the Culinary Institute of America's culinary bootcamp program. Let me break down all the awesomeness I just smooshed into one sentence. Napa. A weekend in Napa. Cooking. Learning to cook. From a real culinary school! An awesome culinary school. It's the chance of a lifetime. Since money is the only thing stopping me from enrolling in culinary school tomorrow, it would be a great sneak peak into what it would be like and if it's really for me. Not to mention a weekend with a bunch of people who love food almost as much as I do.

With a prize like that, entering immediately was a no-brainer. All I had to do was post a recipe using Pacific chicken, beef, mushroom, or vegetable broth. Simple! Oh yeah, and include mushrooms in the recipe. Easy. The timing? Well that was problematic. Did I have time to run to the store, buy mushrooms and broth and other savory things and make something killer? Well no. So I did the next best thing, perused my Bananas for Bourbon recipes, and found the perfect recipe. Remember my favorite grilled mashed potatoes? Think they’re culinary bootcamp worthy? I think so!

Here's where you all come and in to help. Just go to my grilled mashed potatoes recipe on the challenge website, scroll down to the bottom of the page, and click to button to vote for my recipe. It's that easy! And you can do it everyday! Tell all your friends, and maybe a few random strangers while you're at it. Think of all the stories and recipes I'd bring home to share with you all. Everyone wins!


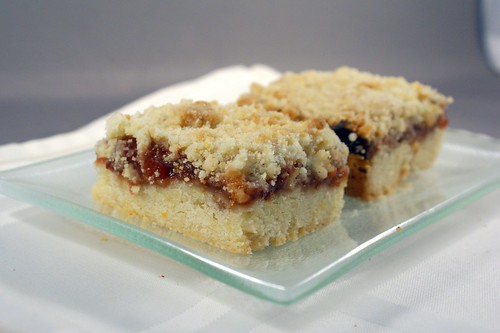
And in return for supporting me...dessert! Beautiful, ruby red plums have been prominently displayed at the store for weeks and weeks, and I finally decided to use some in more than just my morning cereal. These earl grey plum preserves are fantastic on their own, spread on some fresh bread or spooned over greek yogurt. Baked into these buttery, crumbly bars, they are even better. The preserves thicken into a sweet, almost candy-like in texture syrup, and the citrus and tea notes keep it fresh and interesting.  A beautiful pairing.

Earl Grey Plum Preserve Crumb Bars

crumb bars adapted from Smitten Kitchen
plum preserves adapted from The Kitchn

Makes 36 1 1/2”squares

For the preserves
1 1/4 lbs black or red plums*
1/4 cup sugar
1/4 cup honey
2 TB lemon juice
1 tsp orange zest
2 TB Grand Marnier (optional)
1 cup boiling water
2 TB Earl Grey tea leaves

For the bars
3 cups AP flour
1 cup sugar
1 tsp baking powder
1/4 tsp kosher salt
1 tsp lemon zest
1 tsp orange zest
1 cup (2 sticks) unsalted butter, cut into cubes and very cold
1 egg
1 TB cold water, optional

To make the preserves:
  1. Cut the plums into bite-sized pieces. I cut each plum into eighths and quartered each piece, but whatever works for you. Transfer the plums to a medium saucepan, along with the sugar, honey, lemon juice, orange zest, and Grand Marnier. Toss until the plum pieces are coated, then set it aside.
  2. Combine the boiling water and tea leaves in a small bowl and steep the mixture for 15 minutes. Strain the leaves out through a fine mesh strainer. Place the brewed tea in a small saucepan, bring it to a boil, and let it simmer uncovered for about 10 minutes, or until the liquid is reduced by half (~1/2 cup).
  3. Pour the concentrated tea into the saucepan with the plums. Bring the mixture to a boil, and let it simmer uncovered, stirring occasionally, for 25-30 minutes, or until the plums have broken down and the mixture has thickened. Let the preserves cool for about 30 minutes, then move them to the refrigerator for another 30 minutes to fully cool and thicken. 
Note: You want the preserves a little on the thin side, or what you would consider thin if you were going to spread some on a slice of bread. Remember they’ll thicken up more when you bake them into the bars.

To make the bars:
  1. Preheat the oven to 375 degrees and spray a 9x9” baking dish with baking spray.
  2. In a medium bowl whisk together the flour, sugar, baking powder, and salt. Stir in the lemon and orange zests. Using a pastry blender, a fork, or your finger tips, cut the cold butter into the flour until the butter and flour are worked into pea-sized crumbs. Stir in the egg to get a crumbly dough. If the dough feels a little too dry and isn’t forming very large crumbs, add the water. I didn’t do this and I wish I had.
  3. Press 1/2 to 2/3 of the dough into your prepared baking pan, depending on the bar-base to crumbly-top ratio you prefer. I used almost 2/3 because I wanted a more substantial shortbread base. Pour the chilled preserves over the dough, using a spatula to gently spread them to an even layer. Crumble the remaining dough over the preserves and very gently press them into the preserves.
  4. Bake the bars for 45 minutes, or until the crumbs are golden brown. Let it cool completely in the pan so everything sets up properly, about an hour. When cooled, cut the bars, using a sharp knife, into 1 1/2” squares.

*Don’t worry about buying exactly 1 1/4 lbs of plums, just make sure it’s on the heavy side of 1 lb. The pits take up a bit of the weight and I wanted a hair more plum when I bought just 1 lb.

Monday, June 28, 2010

Cinnfully Delicious

Recipe below: Tipsy de Leche Cheesecake Squares

The last P is here! Were you dying in anticipation? I know you were. Even though I already told you it was practicality, and even though that’s pretty darn self explanatory. That said, let me explain to you all about it!

All those instances in the two previous posts where I mentioned being reasonable? That’s where the practicality comes in. Use your judgement! Whatever I tell you, whatever anyone else tells you, it should make sense. Starving Cleansing myself with some nasty lemonade pepper mixture for a week obviously isn’t healthy. Reverting to our hunter/gatherer roots and cutting out all foods that depend on “modern” agriculture is...well probably fine, but weird, and must be a total pain. No wheat! And cutting out entire food groups (i.e. super low-fat, super low-carb), or depending on outside companies to feed you is not a realistic long term solution. What happens when you’re fed up with your diet? You haven’t built any new habits, so you’ll go right back to your old ones. If it doesn’t sound healthy, don’t do it. If it’s a temporary solution, it won’t be a permanent solution, so why do it?

I also thought of some more Ps that have been important to my weight loss.  It's a coincidence, I swear. Patience and persistence. If you’re being healthy, it’s not going to be fast. You’re going to have good days and bad days. It’s all about sticking with it. It’s not about making numbers move on a scale, it’s about feeling good! Change is hard, in any aspect of life. Have the patience to learn what works for you, and have the persistence to see it through.

Being mindful of portion, proportion, practicality, patience, and persistence, these guidelines have really helped when relearning how to feed myself. And it was a learning process. But at the same time, it was actually kind of fun! Every week was a new experiment. I found some recipes that sounded delicious, tried them out, had some hits, had some misses, and then tried a new experiment the next week. I figured out what I was comfortable with, what I enjoyed, and as I cooked more recipes, it got easier and it ended up being a lot of fun! I didn’t set out to develop a serious cooking and baking hobby. It just happened! I just wanted to learn how to cook well enough to feed myself in a healthy way. You don't have to get as involved as I did.  Healthy options can be fast and easy, and even inexpensive!  Give change a chance.


I've always loved cheesecake, but I’ve never owned a springform pan, which kept me from attempting my own all this time. Then I saw this recipe for cheesecake squares, and the heavens parted. Why didn’t I think of this sooner?

I love the combination of graham crackers and cinnamon, so I thought infusing it with a little Goldschlager, which is a cinnamon liquor, would go nicely. And it was awesome! Don’t have Goldschlager on hand? Well I highly recommend it for your liquor cabinet. Ever had a gingerbread martini? It's 2 parts Bailey’s, 1 part butterscotch schnapps, 1 part Goldschlager, shaken over ice. It will change your life. My favorite cocktail to drink around Christmas.

I love the deep, rich sweetness from the dulce de leche, and the Kahlua complimented the flavor subtly, but deliciously. Next time I want to try it with rum just to see if it holds up a bit stronger, but I definitely liked the Kahlua. Do I even need to go on about the flavor of these little gems? The cinnamon graham crust, the creamy, caramel cheesecake, the silky chocolate... They are divine. Heaven in your mouth. Ecstasy!  All the flavors and textures were wonderfully balanced in a perfect bite.

I cut these up super small so I could have just a bite of deliciousness. They are rich and the flavors are bold, so a bite was really a satisfying treat.  Feel free to cut yours a wee bit bigger.

The original recipe called for a 8 inch square baking pan, which I don’t have, and I didn’t modify the recipe to account for that when I made it. I think overall it was fine, but the crust layer was a bit too thin.  I had to really stretch out the crust layer to cover to whole pan. So I tweaked a few of the ingredients in my recipe to account for it.

This recipe, I would guess like many cheesecake recipes, is a bit of a process.  It involves lots of time in the refrigerator to chill and set, so make sure you read through the entire recipe before planning to bake it up an hour before company comes over.  I'm notoriously forgetful of that kind of thing when I bake.


A special thanks to my friend Geri for helping me come up with the name of these beauties!  You gotta have fun with it, right?


Tipsy de Leche Cheesecake Squares
Adapted from Smitten Kitchen

Makes 81 1-inch squares

For the crust:
4oz graham crackers, or enough for 1 1/4 cups of crumbs
2 TB sugar
pinch of salt
1/4 cup unsalted butter (4 TB), melted
2 TB Goldschlager (cinnamon liquor)

For the cake:
1 14oz can sweetened condensed milk (for the dulce de leche)*
1 tsp unflavored gelatin
1/4 cup milk (I used 1%, but whole is probably preferred)
1 8oz package cream cheese, room temperature
2 large eggs, room temperature
1/2 tsp kosher salt
1/4 cup Kahlua (or rum)

For the glaze:
3.5 oz dark chocolate, finely chopped
1/4 cup unsalted butter (4 TB)
2 tsp light corn syrup


For the crust:
  1. Preheat oven to 325 degrees. Line a 9 inch square baking pan with a sheet of aluminum foil, leaving a few inches of overhang on the two opposite sides. Lay another sheet of aluminum foil similarly, covering the other two sides. Spray the pan with baking spray for good measure.
  2. In a food processor, break up the graham crackers and pulse until you have crumbs. Measure out 1 1/4 cups of the crumbs, remove any leftover (and munch while you bake!), and put the measured crumbs back in the bowl of the food processor.
  3. Add the sugar and salt, and with the mixer running, drizzle in the melted butter and then the Goldschlager and blend until it is fully combined.
  4. Press the mixture into the prepared baking pan in an even layer. Bake 10 minutes, then cool in the pan for 5-10 minutes.

For the cake:
  1. To convert the sweetened condensed milk to delicious dulce de leche, pour the can of milk into a bowl (or small pot) set over simmering water. Cover bowl and cook, stirring occasionally, for 40-50 minutes until the milk is thickened and a light caramel color.*
  2. In a small bowl, sprinkle the gelatin over the milk, and let stand for 2 minutes.
  3. In a stand mixer, beat the cream cheese, eggs, salt, Kahlua, and milk mixture at medium speed for a few minutes until fully combined. Add 1 cup of the dulce de leche and mix at low speed until just combined.
  4. Pour the batter over the crust and smooth into an even layer. You're going to bake this in a hot water bath.  To do this, place the baking pan in a larger oven-proof container (I used a large roasting pan), and pour in boiling water until it reaches about halfway up the pan. Carefully move this to the oven and bake at 325 degrees until the center of the cake is set, about 40-45 minutes.
  5. Chill the cake completely in the pan for a few hours, then chill in the refrigerator, covered, for several hours or overnight.

For the glaze:
  1. In a bowl set over a pot of simmering water, combine all the ingredients. Stir until the chocolate is melted, and everything is incorporated and smooth.
  2. Pour mixture over the cheesecake and spread in an even layer. Chill, uncovered until the glaze is set, about 30-40 minutes. Make sure it's not too hard or it will be difficult to cut your squares.

To serve:
  1. Using the overhanging foil, gently pull the cheesecake from the pan and place on a cutting board. Using a thin knife, cut cake into 1 inch squares. To make sure you don’t make a total mess of your beautiful squares, wipe off the knife after each cut.
  2. Store in an airtight container in the refrigerator.
*Note: You can also buy dulce de leche, but I figure why bother?  It costs twice as much, and it's not hard to make.  But if you prefer to save a step over a penny, just measure out 1 cup of the store-bought stuff.