Showing posts with label spring. Show all posts

Wednesday, May 18, 2011

Grilled Shaved Asparagus Pizza


Pardon the bandwagon jumping, I hear it’s great for toning your butt. I’m going to be yet another food blogger talking about shaved asparagus this week. It’s everywhere! If you’ve tried it, you’ll know why – because it’s awesome! I actually shaved the asparagus in question almost two weeks ago, and was only completely copying inspired by one food blog (a certain Kitchen we’re all completely Smitten with) in particular. My dish turned out great. Figured I’d blog it (which unfortunately rates below painting guest rooms and attending anniversary parties at local breweries on the priority scale). Then boom, come Monday morning, shaved-asparagus-palooza! Dang! But none of that matters. What matters is the utter deliciousness of what I made.

That’s not the only bandwagon I jumped on recently. A few weeks ago Husband and I joined the scores of other bloggers who have made the same big, life-changing decision of late. That’s right...we joined a CSA*! Every other week we’ll be getting a big box of fresh from the local farm organic produce. The “get what you get” nature of a CSA gave me pause when we first considered joining a couple of years ago. Another way my confidence in my cooking has progressed – I don’t need a recipe to follow and an iron-clad shopping list to buy from every week. I’m now comfortable with pulling a head of romanesco cauliflower out of a box, knowing I’ve never cooked with it before. In the end produce is produce. Sure, certain flavors and preparations work better than others, but ultimately, if it’s fresh, it’s going to be delicious. And if I’m ever really stumped, I’ll channel my grandmother and throw it into a pot of broth and add things until it is some kind of delicious soup. I’m glad we waited to join. A few years ago, I might have met the bi-weekly pickup with stress and trepidation of how to consume everything in a delicious way before it expired. Now I wake up excited for “CSA pickup day”! It helps that my love of fresh produce has grown to obsessive proportions.

It’s a good thing Husband doesn’t mind being married to a woman whose idea of evening conversation is naming off the different possibilities for dishes using CSA ingredients…

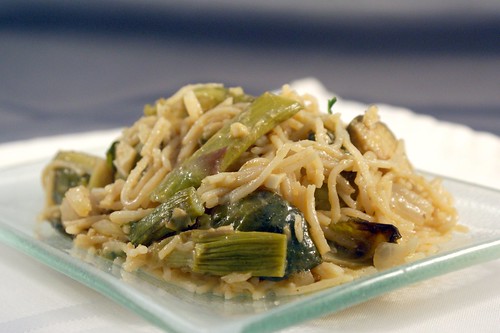
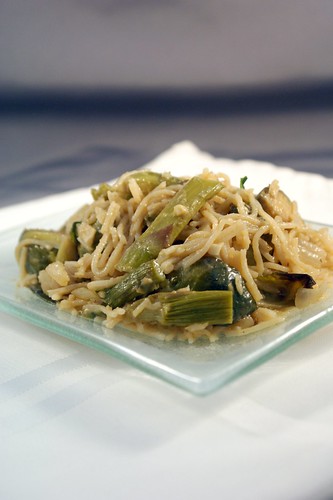
I’m happy to report my first CSA box experience had very little stumpage. Quite the opposite, in fact. I pulled out a beautiful bushel of asparagus and did a little dance (I hope no one was watching…) because I knew exactly how I wanted to use it. Here’s how it went down:
  1. Husband had requested I make grilled pizza of some kind.
  2. The pizza dough recipe I wanted to try required overnight resting, so there were several balls of pizza dough ready and waiting in the fridge.
  3. I had bought some Iberico cheese on a whim at Trader Joe’s. I wanted to try something Spanish and it had a nice soft, yet sturdy feel to it.
  4. I had just read about a shaved asparagus salad that sounded divine. 

When I saw that asparagus, everything clicked. Husband might like his bbq chicken pizzas, but he was just going to have to go without. Shaved.Asparagus.Salad.Grilled.Pizza. It called to me. “If you grill it, deliciousness will come…”

Did I mention I made garlic-infused olive oil, then used the oil to brush the pizza dough before it went on the grill, and used the resulting garlic confit on top of the pizza, hidden beneath the creamy melted cheese? That happened.

I also put raw asparagus on a pizza that only cooked for about 2 minutes. Not quite raw, but definitely not cooked. It was sweet! Who knew raw asparagus had a mild sweetness to it? After I had shaved each asparagus spear down to a nub with my vegetable peeler, I bit off that last nubby bit before the woody stem. It was so crunchy and succulent, I knew the salad by itself, which I simply tossed with lemon juice and red pepper flakes, would be fantastic.

The farm fresh asparagus made an interesting and discernable difference. All asparagus spears get woody and tough at the bottom of the stem, but this asparagus was so tender that quite a few spears weren’t woody at all. I was able to use all but the tiniest of partial inches off the bottom. And I have been known to sacrifice almost half a stalk out of fear of the woody end.

I was equally pleased with how my pizza dough turned out. Some extra hydration and the overnight resting allowed the whole wheat flour to properly mellow along with it’s already mellow cousin, AP flour. When I went to start shaping it, it practically melted over my fists and stretched beautifully with just the slighted tug. More relaxed gluten I have never seen. I stretched it super thin, so the quick, high heat from the grill would give it a charred, crispy flatbread consistency. The earthy flavors from char and whole wheat went beautifully with the Iberico and Parmesan cheeses.

The Iberico cheese was a new ingredient to me, and I was so happy with it. It was sturdy enough to grate, yet creamy enough to pair nicely with the Parmesan. Sometimes creamy cheeses can be a little bland in pizza applications. Not this one. I wouldn’t say it’s pungent, but it definitely has a mild grassy earthiness that was a perfect complement to the vegetal asparagus. Milder than goat cheese, but stronger than mozzarella. I think I’m in love.

It sure sounds like a lot of steps – making dough, infusing oil, peeling individual asparagus spears, etc. But that’s the great thing about grilled pizza – it comes together really fast! The actual cook time is almost negligible. “Infusing” something sounds like a lot of work, but really you just throw some garlic cloves in some oil over low heat and mostly forget about it for a few minutes (like, say, while you’re prepping the asparagus). And of course, you can always buy pizza dough. Trader Joe’s even has a wheat option! Because if you’re like me, you balk at eating white breads, yet inexplicably have no qualms with using white flour in cakes, pies, muffins, and every other dessert application. Um, moderation?

This pizza has, after just one go, already carved a special place in my mouth stomach heart. It was the perfect way to celebrate the end of this highly unusual rainy season. [At least, it would have been, had the rain not inexplicably come back yesterday.] Dough chewy and blistered, cheeses creamy and walnutty, and a bright, crunchy salad on top to make you feel like you’re eating a real meal. And let’s not forget the occasional bite of sweet, mellow garlic. Oh yes, this was worth every bounce of my happy dance.

Sorry for the pictures, featuring what can only be described as limp pizza. In my rush to get the leftover pizza put away and out of the reach of a certain cohabitating pizza-monster, I may have stacked and smushed the slices into a Tupperware container, forever ruining their structural integrity. Don’t be like me. Just wrap it in foil.


*Did I get ya!? Have you noticed all the bloggers are pregnant right now? Not gonna lie, it’s weirding me out.


Grilled Shaved Asparagus Pizza
adapted from Smitten Kitchen

Makes one 10-12” pizza

1 portion of pizza dough (see recipe below – Note: it’s an overnight process!)
¼ cup olive oil
6 cloves garlic
1 bunch asparagus (~1 lb.)
Juice of ½ lemon (~ 1 TB)
¼ tsp salt
¼ tsp freshly ground black pepper
¼ tsp red pepper flakes
½ cup freshly grated parmesan cheese
½ cup freshly grated Iberico cheese (any soft cheese like mozzarella, goat, or feta will do)

  1. Preheat your grill to medium heat.
  2. In a small saucepan over the lowest heat you can manage on your stove, combine the olive oil and garlic cloves. Let this mixture stew or a good 20 minutes so the flavors can marry. Check on it every few minutes, giving the pan a good swirl, to ensure that the garlic doesn’t brown. We want the flavors to cook out, but not sauté. When it is done to your liking, remove the pan from the heat and set aside to cool.
  3. Once the oil is cooled, fish out the garlic cloves (you’ve made garlic confit!). Either chop them into small pieces, or leave them whole. Those babies are going on the pizza. I opted for chopped for more garlic coverage. 
  4. Using a vegetable peeler, shave the asparagus stalks into beautiful ribbons (or hack into ribbon-like bits, if you’re me). You can use the woody ends as a handle and discard it once you’ve shaved down to the nub. In a medium bowl, combine the asparagus ribbons, lemon juice, salt, pepper, and red pepper flakes. Toss to combine.
  5. On a pizza peel or large cutting board, stretch your pizza dough to your desired shape and thickness. I did most of my dough stretching on my fists, letting gravity do the work. The gluten in the dough was so relaxed, that it pretty much melted over my hands. I also opted for a very thin dough, since the crispy texture you get from the grill goes best with a thin crust.
  6. From here on out, things happen fast, so make sure you have everything prepped and ready to go – tongs, plates, brushes, etc. at the ready.
  7. Brush the shaped dough with the garlic oil. Carefully (it’s going to stretch, it’s ok, it doesn’t have to be pretty) lay the pizza dough with the oiled side down on the grill. While that side cooks, brush the top of the dough with more garlic oil. Using tongs, peak under the dough after about 2 minutes to check doneness. You want some nice char marks, but you don’t want it to burn. When it’s ready, flip the dough over. Working quickly because this is going to cook fast, sprinkle the garlic over the dough. Then sprinkle the parmesan Iberico cheeses. Then top with as much of the asparagus as you think fits nicely without too much heaping (I heaped quite a bit because I’m like that). Close the lid on the grill and let it cook for 2 minutes. Check the pizza to see if the cheese has melted. If it hasn’t, keep cooking it covered until it melts. Once it’s melted and the underside of the dough is nicely charred, remove it from the grill. 
  8. Slice and enjoy!

Note: You can alternatively bake this pizza on a baking stone or sheet pan in a 450 degree oven.

Partial Wheat Pizza Dough
adapted from 101 Cookbooks

Makes 6 portions

2 ½ cups white whole wheat flour
2 cus bread flour
1 tsp instant yeast
1 ¾ tsp kosher salt
¼ cup olive oil
1 ¾ - 2 cups ice cold water
  1. In the bowl of a stand mixer fitted with the paddle attachment, stir together the flours, salt, and yeast on the slowest setting until mixed. Stream in the oil, and then 1 ¾ cups of the cold water. Switch to the dough hook and mix on medium speed. The dough should clear the sides of the bowl but stick to the bottom of the bowl. If it is too dry, add the remaining water, a tablespoon or so at a time until it sticks appropriately. Continue mixing for 5 to 7 minutes, or until the dough is smooth and sticky, and a small piece passes the window pane test (to tell if the gluten has fully developed). The finished dough will be springy, elastic, and sticky, but not just tacky.
  2. Transfer the dough to a floured countertop, and portion into 6 equal pieces (I used a scale because I’m anal like that). Mold each into a ball, creating some nice surface tension (Peter Reinhart and I are all about surface tension). Rub each ball with olive oil and seal into ziplock bags. Refrigerate overnight (or up to a few days). Alternatively, you can freeze the dough balls at this point – just thaw them in the refrigerator when you’re ready to use them.
  3. The next day remove the desired number of dough balls from the refrigerator at least 1 hour before making the pizza (I’d suggest 2 unless it’s a hot day). Leave them in their plastic bags, so they don’t dry out. I like to turn my oven on for literally a minute, then turn it off and put the dough inside. It’s slightly warmer than room temperature, so they wake up nicely.
  4. When you’re ready to shape the dough, on a floured surface, press it gently with your fingers into a round disk. Balance the disk on your fists and gently work the dough apart as evenly as possible. You can also use your hands to stretch it. If the dough is not cooperating, it means the gluten isn’t relaxed enough, and letting it rest for 15-20 minutes should help.
  5. Bake in a 450 degree oven or grill on the barbecue with desired toppings until the crust is crisp and nicely colored.
Note: You can use all AP flour, but you'll want to reduce the water to 1 ¾ cups.

Monday, February 21, 2011

Pasta with Roasted Spring Vegetables in Cambozola Sauce


Let’s start with the giveaway winner. Congratulations...

...drum-rolling...


 ...Kelly! You win the CSN Stores gift certificate! Congratulations! And who says the person who enters 5 minutes after you post it won’t win? Not I. I’ll be sending your email address to my contact with the company. Stay tuned!


When I researched the best ways to start an exercise plan - what was now all those moons ago - one thing I always saw mentioned was goal setting. Most “professionals” agree that it is important to set both long term and short term goals, the idea being to motivate yourself early with small accomplishments, and to keep the motivation going for the long term. By accomplishing your smaller short term goals, you’ll build up enough muscle, endurance, discipline, etc. to complete your long term goals. Makes sense. And for some people, like Husband, it’s invaluable advice. Results can be slow to show on the scale or on our bodies, but when you have a cold, hard accomplishment under your belt, that can be just the thing to keep you going. Me? I make goals, sure. But I never took much time to structure them or really give much thought to them. I was so overweight that the scale provided me with all the motivation I needed pretty early on. I guess that’s one advantage to to being obese vs. just overweight? Heh.

I’ve been thinking more about goals lately, and I’ve come to realize it’s kind of like the approach you take when applying to colleges. When deciding where to apply you have the schools you’ll probably get into, and probably end up going to. Those are the realistic schools that are “the middle”. But what if by some catastrophe, you don’t get into any of those middle schools? The probability is low, sure, but you don’t want to be caught with no acceptances. Catastrophe indeed! So you apply to a “safe” school or two - schools you know for sure you’ll get into and wouldn’t be completely miserable attending. Even better is when your safe school has rolling admissions. Having that acceptance under your belt does wonders for your confidence when applying to the better schools. And then, of course, you have to apply to a few schools - the ivy leagues - that you don’t seriously think you’ll get into, and never really considered attending, but figured it’d be fun to try on the off chance that by some miracle of paperwork error, they let you in.

What does any of that have to do with goal setting? Bear with me. As I’m writing this, I’ve just come from a local wine-maker’s house. Ever had a pot luck luncheon with a wine-maker? Let’s just say my glass was never allowed to go empty. Let’s also say it was very good wine, and it seemed to evaporate from my glass as soon as wine was poured in.

I expect I’ll be getting an email from my editor sister tomorrow with a few dozen corrections and even more questions of clarification of what the heck I’m talking about.

But I do have a point! And it’s that goal setting should be like applying to college. Shoot for the stars, hope to get there, but at the same time be practical and expect for something a bit closer to earth. When I first started running, I couldn’t even run a mile. So that was my first goal. Run a mile. Did that. Then my goal was to run a mile under 14 minutes. Then 12. Then run 2 miles. Then 3. When I first started out, my long term goal was to be able to run a 5K (aka: 3.1 miles). It sounded so far, but I was confident I could reach it with a little work. And I was right! My next long term goal was a 10K (aka: 6.2 miles). I started getting my runs to 3.5 miles, then 4, etc., etc.. The thought of running over 6 miles sounded crazy, and I wasn’t sure I’d ever get there, but I figured I’d try. And with a little more work, I did it! I just kept pushing back my goals, and eventually meeting them - both short term and long. They were like getting into my safe schools right away and my middle schools eventually. All the while I was secretly shooting for the stars.

I was at the gym once - gosh, maybe almost a year ago now. A neighbor who had seen me running around the area and being a regular at the gym asked me if I was training for a marathon. I scoffed. A marathon!? At that point I wasn’t yet able to run a 10K let alone several 10Ks. I still don’t think I’ll ever be crazy enough to run a full marathon (aka: 26.2 miles). Just can’t imagine doing that to my poor, poor body. But. In just a few weeks, I’ll be running my very first race. A half marathon, no less! Aka: 13.1 miles. I’ve never actually run that far before, but I’m confident I can finish. That confidence actually blows my mind. This time last year I was scoffing at the very idea of running a half marathon, and now I’m actually going to do it. I feel like I just go into Stanford!


I’m a little embarrassed to admit this, but I am far too sauced to think of a not-so-witty segue into this dish. Besides mentioning that the recipe is basically a sauce. So there’s that. Not my best work, I know.

A Facebook friend of mine has been mentioning her current obsession with paninis, and especially her complete obsession with cambozola cheese on these paninis. Always one willing to talk food, I commented on her status, asking what was this cambozola cheese and why was it so special? And then proceeded to Google the stuff, since I’m impatient and a dork. And let’s just say it went downhill from there. Cambozola cheese is described as a blue brie, and that’s exactly how I would describe it too. It’s a triple cream cheese, so it’s rich and creamy like brie, but it’s also made from the blue mold of other blue cheeses, so it does have what I like to call, a bit of stinkiness to it. Who doesn’t like a beautiful marriage of a creamy, stinky cheese?

On a happy, splurging shopping fest last week I picked up a wedge of the cambozola, along with some Brussels sprouts and asparagus. I thought a good cheese with two of my favorite vegetables would be a good way to celebrate my finally landing a job. No biggie. I start tomorrow. I’m breezy.

Who knows what possesses me to cook the things that I cook, but I thought the cheese would go beautifully in a pasta sauce. The creaminess added a wonderful, velvety texture, and the stinkiness added a beautiful dimension to the dish. I could definitely taste it, but it sat in the background and sang me a light tune. Husband came home and tried this pasta, and he of the not very sensitive taste buds concurred. He loved how the flavor came through, and he’s not even big into the stinky cheeses. Another thing I appreciated was that while this sauce is completely heavy on flavor, as you can see from the pictures, it’s not very saucy. There is no puddle of creamy liquid that’s dripped off the pasta to rest at the bottom of the plate. All the sauce is stuck firmly to the food, as it should be. In that sense, it doesn’t feel like a heavily sauced dish. But the flavor is so present, you don’t miss it. By all means, if you like a looser sauce, go ahead and add some cream or milk or chicken broth. Whatever your heart desires. My heart desired this sauce as is, and so did my taste buds.

Think you don’t like Brussels sprouts and asparagus? Ever tried roasting it? Brussels sprouts can be bitter, but roasting them for a long time under high heat with some balsamic vinegar brings out their hidden sugars and really makes them something special. I would highly recommend giving it a try. But if you’re not into it, any vegetable will do. You could throw in some artichoke hearts and peas, or broccoli would be delicious. I used whole wheat pasta, an angel hair.  You could use a regular fusilli.  That’s the great thing about cooking - just tweak it till you love it!


Pasta with Roasted Vegetables in Cambozola Sauce

Makes ~6-8 servings

½ lb. whole wheat pasta (I used angel hair)
1 ½ lb. Brussels sprouts, trimmed and quartered
½ lb. asparagus, trimmed
3 TB olive oil, divided
2 TB balsamic vinegar
2 pinches of salt
1 medium yellow onion, chopped
1 small shallot, chopped
5-6 cloves of garlic, minced
2 TB butter
2 TB flour
2 cups dry white wine
½ tsp crushed red pepper flakes
½ tsp ground black pepper
6 oz. cambozola cheese
¼ cup freshly grated parmesan cheese
1 TB fresh lemon juice (about half a lemon)
¼ cup fresh parsley, minced

  1. Preheat the oven to 400 degrees. In a roasting pan, toss the Brussels sprouts and asparagus with 2 TB of olive oil, the balsamic vinegar, and a pinch of salt. Roast the vegetable mixture in the oven for 25-30 minutes, until they are soft and have a nice golden brown color, tossing every about 10 minutes to ensure they brown evenly.
  2. Now would be a good time to get a large pot of water boiling for your pasta. The sauce only takes about 15 minutes, not counting the prep for the mise en place, so might want to wait until the vegetables have a good head start in the oven before starting.
  3. In a large sauté pan over medium heat, sauté the onion and shallot in the remaining 1 TB of olive oil and pinch of salt until they are softened, about 5 minutes. Add the garlic and cook for another minute. Add the black pepper and red pepper flakes, stir, and cook for one more minute.
  4. Now would be a good time to drop your pasta, if you haven’t done it yet.
  5. Clear a space in the pan and add the butter. When it has started to melt down, add the flour and mix them together to form a paste. Let the paste cook for a minute or two to get rid of the raw flour taste. Add the wine and bring the mixture to a simmer. Let the mixture cook until it has thickened and the wine has reduced by about half, about 3 minutes.
  6. Turn the heat down to low and add the cheeses, stirring until they are fully melted and incorporated into the sauce. Stir in the lemon juice, parsley, and roasted asparagus and Brussels sprouts. Stir in the cooked pasta drained straight from the pot, you can use a little of the starchy pasta water if you want to thin out the sauce at all.

Monday, May 3, 2010

Jamming Around Town


I have a confession to make.  I'm scared of jam.  Making my own, I mean.  It's ridiculous, I know.  You hear all these horror stories about people dying horrible deaths from eating their home-canned goods in which the seals had broken!  Ok, maybe that's a bit of an exaggeration, but I still prefer not to poison myself.  Also, so much gear is required for the endeavor.  You have to have jars and racks and tongs...and you have to boil things and sterilize things!  I'm all about a clean kitchen, but the words sterilization and food together just...turns me off. And...it might have something to do with the fact that I don't own any of that gear I mentioned.

But that won't stop me from making jam!  Ever heard of freezer jam?  For those not hip to the lingo, that would be jam that you freeze, rather than can, to preserve it. It's made much the same method.  I made some recently...and I may have boozed it up a bit.  That's what I do, right?  When I saw the recipe call for grape juice, I immediately made the jump to wine.  I perused my wine cabinet and decided that Gewürztraminer would fit the bill.

Ever heard of it?  Don't let those two little dots above that u scare you off!  Say it with me: Guh-wurts-tra-mee-ner.  Look at you, speakin' all fancy.  It's not as popular a varietal as Chardonnay or Riesling, but if you've never tried it before, you should. It's totally tasty. I'm really not a wine connoisseur, so this won't be the most accurate description, but Gewürztraminer is a bright and light white wine.  It's floral and fruity, a little bit dry and a little bit sweet.  Only slightly!  I'm not usually a fan of sweet wines, but this wine isn't cloying by any means.  Actually, one of my favorite wines is the late harvest Gewürztraminer from Navarro in the Anderson Valley.  Heaven in a bottle.


So I made a strawberry Gewürztraminer freezer jam that turned out so bright and complex, I was eating it all week.  I really held back on the sugar because I wanted to make sure to taste the wine, and I think strawberries are sweet enough on their own.  But if you like sweeter jams, you can always up the sugar.  You can also try a different wine varietal!  I would suggest sticking with sweeter wines, nothing too dry.  My ingestion method of preference?  That would be on a sesame cracker with some fig goat cheese I bought at a Costco roadshow a few weeks ago.  So...amazingly...good.  A fresh-baked buttermilk biscuit would do nicely as well.

I wanted to tackle my own jam because store-bought jams tend to be, well, mostly sugar.  I don't think sugar is evil.  Not by any means.  But when I eat jam, I want to feel like I'm eating fruit, not eating dessert.  You gotta pick and choose your sugar battles, right?


Strawberry Gewürztraminer Jam

3 cups strawberries
1 3/4 cups Gewürztraminer
1/4 cup sugar
1 pouch pectin (I used the Ball no sugar needed variety)

  1. Mash the strawberries with a potato masher into small chunks. (Don't use the food processor for this, I hear if you break it down too much, you break down the pectin and it won't set)
  2. Combine the strawberries, wine, and pectin in a pot over medium-high heat.  Bring the mixture to a rolling boil (don't jump the gun, let it really boil!), and cook for 1 minute. 
  3. Remove the pot from the heat and stir in the sugar until it's dissolved.
  4. Pour the mixture into freezer jam containers (or any freezer-safe container that tickles your fancy), leaving at least half an inch of room from the top of the container, and move to the refrigerator to set up overnight.   

De-boozify it: Use white grape juice if you aren't so wine inclined!

Friday, April 23, 2010

Springing Up!


Welcome to my new blog.  I'm Julie, and I'm bananas for bourbon!  Well, booze in general, really.  Not that I hang around drinking all day.  No no.  I love food, you see, and I think alcohol does a fantastic job of adding complexity and depth of flavor to most dishes.  I may take a sip or two for myself while the rest goes in the pot, pan, or bowl, but I'm pretty sure that's some kind of law of the kitchen, right?  Well it's the law in my kitchen, anyway.

So here's a bit about me and my general philosophy.  A year and a half ago I was over 70 pounds heavier, an out of shape couch potato.  Somewhere around 38% body fat, according to my fancy bathroom scale I used to avoid like the plague.  I didn't cook, my husband and I ate out for pretty much every meal most days.  Today I am in the best shape of my life, and overall healthier and happier.  How?  Diet and exercise of course!

Wait!  Don't go!  Hear me out!

I've seen so many peoples' eyes fall in disappointment when they ask me how I lost so much weight and that's how I answer.  Here's the thing.  Diet and exercise doesn't mean I ate boiled chicken and lived at the gym for a year.  Heck no!  No fad diets, no starving myself, and no flavorless food!  A masochist, I am not.  First off, I quit my gym membership.  Seriously!  I looked long and hard at myself and really tried to be honest about what was going to work for me.  Piling myself and my husband in the car and driving 10 minutes to the nearest gym was something at the height of our motivation we only ever did once a week.  Not good enough.  It was an expense we weren't getting anything out of, so we quit!  If you are really determined to exercise, you don't even need to leave your house.  And no, I don't have fancy gym equipment in my house.  What a cop out it would be if there were, right?  I'll get more into that later.

In terms of diet, believe it or not, I started feeding myself better.  I started paying attention to proportions of what I was eating.  Everything in moderation.  Words to live by.  I still eat dessert every night.  I still eat unhealthy foods on occasion.  But most importantly, I still eat good food every single meal, every single day.  That's ultimately what we want, right?  It's not that we want to eat unhealthy food.  We want to eat good food, and fat tastes good.  Well the good news is that so does a whole hell of a lot of other food!  The key is being open.  Think you don't like vegetables?  Instead say that you don't like vegetables as you've had them prepared before.  Just because you don't like broccoli steamed to death in the microwave doesn't mean you wouldn't like it roasted in the oven, tossed with some olive oil, bread crumbs, and Parmesan cheese.  I went 20 years of my life saying I didn't like meat.  It's true that as I matured my taste buds changed, but really what changed was my ability to identify what I didn't like about meat and how I could go about preparing it in ways I do like.  Now I love it!

Over time I was essentially able to retrain my body.  Healthy foods starting tasting better to me, and unhealthy foods tasted worse. Exercise started feeling good, and eating heavy, fattening foods felt very bad. So far I've been able to maintain what I worked so hard to achieve because it really was a lifestyle change.  It changed for the better, and I've never looked back. By getting into the kitchen, and getting outside, I've taken responsibility for myself, and I've managed to keep myself in this non-flabby state.  Yay!

My goal with this blog is to share my recipes, healthy ones when I can help it.  And share some tips, methods, and ideas on how I got healthy and a year and a half later, have stayed healthy.  And, of course, to have some boozy fun!

I'm starting us off with a delicious spring soup!  I love soup.  It's warm and comforting during any season.  It's simple and easy to make.  And just about any combination of ingredients can be a soup.  The world is your oyster soup!  Also, it's pretty darn healthy.  Did you know studies have shown that starting a meal off with soup makes you some very scientific percentage less likely to overeat?  Basically, since it's usually water based (stock), you feel like you're eating a lot when you're not.  Works for me!

This mushroom and asparagus soup is thick and creamy without heavy cream.  It's light and a perfect way to bring in the Spring.  The asparagus is sweet and delicious, the mushrooms add a meaty substance, and the sherry plays a subtle role in the background, as booze in cooking tends to do.  Wine, sherry especially, goes with mushrooms like..bananas on bourbon!

See what I did there?  That's called bringing the conversation around full circle.  It's a gift.

When I first made the soup I thought it wasn't quite creamy enough with the vegetables and broth alone.  Don't get me wrong, it tasted awesome!  But it lacked a certain oomph...a depth of flavor. So I added the milk and butter, and that really gave it the consistency and flavor I was looking for.  Small amounts, that's the key.  Just a little lowfat milk, spiked with a couple of pats of butter, to bring a whole pot of soup to another level of delicious.

I hope you'll give it a try, and check back for more!


Creamy Mushroom and Asparagus Soup

makes about 4 servings

1 medium yellow onion, chopped
2 shallots, chopped
5 cloves of garlic, minced
1 bunch of asparagus, chopped into pieces about 1in long
10 oz cremini mushrooms, chopped
1 TB rosemary, finely chopped
1 tsp sage, finely chopped
1 cup dry sherry (a dry white wine would do nicely as well)
3-4 cups chicken stock
2 TB butter
1/3 cup milk (any kind, I used 1%)
1/4 cup parsley, finely chopped
salt and pepper to taste
olive oil

  1. In a dutch oven or heavy pot heat 1 TB of olive oil over medium heat. Add the onion and cook until just softened, about 3 minutes. Add the shallot and cook until they both sweat a bit, about 5 minutes. Add the garlic and cook for 1 minute. Add the asparagus and mushrooms, then add the rosemary, sage, and salt and pepper. Cook this mixture until the asparagus has started to soften and the mushrooms have given off their water and started to cook down, about 10 minutes.
  2. When the vegetables have cooked a bit, add the sherry (oooooh yeah!) and deglaze the pot (meaning, use a wooden spoon to scrape up the cooked on bits on the bottom, they have flavor you want!). After the liquid has mostly cooked off, add the chicken stock. Add as much as you want for as creamy a texture as you want. I like a thicker soup, so I only added 3 cups. Bring the soup to a boil, then drop the heat to low, place a lid on the pot, and simmer for about 15 minutes.
  3. When the soup is done, remove the pot from the heat and let it cool down for a few minutes. Use a blender, food processor, or my favorite, an immersion blender to blend the soup until creamy.
  4. In a microwave-safe container, combine the butter and milk and microwave until the milk heats up enough to melt the butter. Watch this carefully, it only takes about 20-30 seconds and you don't want to burn your milk. Stir the mixture until the butter is incorporated with the milk, then stir into the soup.
  5. Stir in the chopped parsley and enjoy!