Showing posts with label brandy. Show all posts

Saturday, January 8, 2011

Fig Einsteins - It's Fruit and Cookie!


A new year, a new start. A time to resolve oneself for the year to come. The difficulty of this past year, and the inevitable difficulty of this new year to come, is part of the reason for my month-long absence from posting. Reflecting back, it was truly the worst year of my life, and at the same time, in some ways, one of the best. I’ve grown and learned so much about myself. I’ve become a different person, a better person, and most importantly, more like the person I want to be. I try to focus on that and have faith that the rest will work itself out for the best. I resolve to keep growing and learning this year, to keep finding the bright sides and silver linings, and to continue to be thankful for all the great things in my life - my friends, my family, and my amazing husband. And also, to never go so long without posting again! Inexcusable.

You might think I’m done with the sappy bits, but I’m feeling very sentimental. Bare with me for another paragraph or two...

I asked my friend on January 1st if she had any New Year’s resolutions, and she responded something along the lines that she had been done with those years ago. I know it’s a bit like asking a husband if he’s buying flowers for his wife on Valentine’s Day. We feel like we should do it because society tells us to, but we grumble and curse the commercial holiday (with gym memberships being sold in place of flowers). While I think the traditional approach to New Year’s resolutions is tired and completely unmotivated, the original idea shouldn’t be sloughed aside. How often do we plan to start something and then put it off until later? We all have a little Scarlett O’Hara in us. A new year is nothing more than an excuse, a reason to finally convince yourself that later is here, and it’s time to start. It’s that push out the door that we need sometimes.

And I’m not talking about “the resolutioners”. The people who make a vague, empty promise to themselves because they feel like they have to. They resolve to “eat better”, and buy a stock of celery that goes untouched in the vegetable bin until the rot can no longer be tolerated. They resolve to “exercise more”, and go stand around their gym a time or two, mostly just taking up space on equipment other people are waiting to use. Don’t be a resolutioner! Make a real promise to yourself that you intend to keep. It doesn’t have to be big, or even related to your health. You could give your house that big scrub down you’ve been meaning to do since last spring, or even just one room. You could go through your DVR season pass list and clean out the shows that are no longer on the air (man, I need to do that). And yes, I supposed you could eat better and exercise more. But how will you eat better? When will you exercise more? Baby steps, people.  Husband has started to change how he eats for breakfast, hoping that eating more food, higher in protein, he’ll eat healthier and feel better throughout the day. I’ve seen spouses out walking their dog together, rather than just one or the other. Do something small, and when you feel great about doing it, do something else. Not because it’s New Years, but because there’s never a better time than now.  Today could be the day I finally frame my ketubah!

FYI:
That's a Jewish marriage contract.
It's been sitting unframed on my mantle in a plastic protector since I got married.
I've been married 4 years now.
It's sitting upside down.
I'm not really going to frame it today.


Ok, enough of this nonsense. Let’s talk food.  Now I know this is the time of year everyone dawns their halo and posts the uber-healthy meals.  I know I should be giving you a recipe for kale chips (which are amazing, by the way, and so flipping healthy), and telling you twelve easy steps for staying motivated at the gym (I really only have one trick - constantly telling myself "suck it up, pansy!").  But you know what?  That just ain't my style.  Plus, there's an entire year for that.  Next week when everyone is back to posting their recipes for brownies and fried chicken, I'll be posting a light and satisfying soup.  This week, I want to tell you about these cookies.


I may not have been posting the last few weeks, but I’ve certainly been eating. As anyone who reads my posts on Facebook can attest. I made these fig cookies awhile ago. I remember the day I made the first batch because it was the day that I discovered Urge Gastropub. A joint truly after my own heart. I went there for dinner with some very good friends, and I brought some of these cookies along to give to them. It’s always good to feed the ones who encourage you in the kitchen, right? I kept calling them Fig Newtons, but was dissatisfied with the name because, while anyone who watched ample tv in the late 80s/early 90s, as I did, can attest, Fig Newtons are fruit and cake. My cookies were most definitely fruit and cookie. My friend dubbed them Fig Einsteins, and so they have been called since.

A very fitting name, in my opinion, because these cookies are genius!  And so delicious - soft and chewy. The flavor was buttery and had a density from the whole wheat flour, yet the texture was still light and fluffy. They were so good that I made a second batch just a few days later. Because, like a good cookie should be, these were super fast to throw together. Minus making the jam of course. But the jam was so worth the effort.  It had the deep, rich, sweetness of figs, with a beautiful balance from the lemon.  Though the real hit for me was the brandy.  It lent a nice background flavor, and somehow worked its magic breaking down the figs to really bring out their sweetness.  I actually reduced the sugar in the recipe by at least half because the natural sugars brought out were so powerful.  A jam worthy of its own cookie, for sure.

If you aren't a fan of figs, or just can't find them, no worries.  These cookies are versatile!  Any jam would work, really. Even store-bought, if you must. But the deep sweetness from the figs works especially well with the richer flavor of the cookie. I could see blueberry jam also working quite well.  You'll just want to make sure it's a thick jam, otherwise it'll just run out of the cookie while it bakes.  If you're worried, you could always reduce it on the stove for a few minutes.

When people scoff at you for eating cookies, you can inform them that you're just fulfilling your New Years' resolution to eat more whole grains.  It's all about eating right, right?
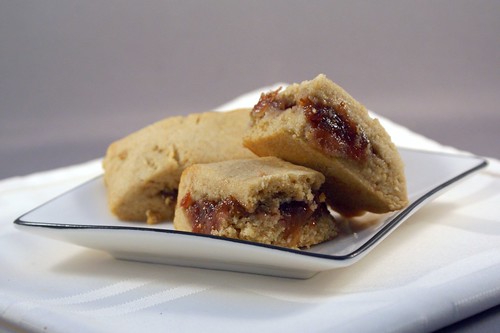

Fig Einsteins
adapted from Cate’s World Kitchen

Makes about 2 dozen cookies

½ cup (1 stick) unsalted butter, room temperature
½ cup sugar
1 TB buttermilk (or substitute milk)
1 egg
1 tsp vanilla extract
1 TB bourbon (optional)
½ tsp salt
½ tsp baking soda
2 cups white whole wheat flour
2/3 cup fig jam* (recipe below)
  1. Preheat the oven to 350 F 
  2. In the bowl of a stand mixer, cream together the butter and sugar on medium speed until the mixture is light and fluffy. Turn the speed down to low and beat in the egg, milk, vanilla, and bourbon until well combined. Add the flour, baking soda, and salt, and stir just until combined. Divide the dough into even quarters, it will be quite sticky. 
  3. Working on a well floured surface, roll one quarter of dough into a log about 12 inches long. Using your fingers, pat the dough out into a rectangle about ⅛ inch, and 2 inches wide. Spread half the jam down the center of the dough. Press out another portion of dough into a rectangle of the same size, and place it on top of the dough with the filling. Seal the long edges of the dough together by pressing the two sides together, then cut crosswise into 1 inch lengths, until you have 12 cookies. 
  4. Repeat step 3 with the remaining dough and jam. 
  5. Place the cookies on a cookie sheet and bake for 15 minutes, until they just begin to brown. 
*Or whatever jam tickles your fancy.

Fig Brandy Freezer Jam
jam adapted from Bon Appetit

Makes about 6 cups

2 lemons
4 pounds fresh figs, stemmed and cut into 1/2-inch pieces (about 8-9 cups)
2 cups sugar (or more to taste)
3/4 cup brandy
½ tsp kosher salt
  1. Using a vegetable peeler, remove strips of peel from the lemons, careful not to get any pith. Cut the strips into tiny matchsticks. 
  2. Combine the lemon peel, figs, sugar, brandy, and salt in a large heavy pot. Let the mixture stand at room temperature for 1 hour, stirring occasionally. 
  3. Bring the mixture to boil over medium-high heat, stirring until the sugar dissolves. Reduce the heat to medium and continue to simmer until the jam thickens and reduces to about 6 cups, about 30-35 minutes, occasionally mashing the mixture with a potato masher. Remove the pot from the heat. When the mixture cools down a bit mix in the juice from one of the lemons, then taste it. If it’s too sweet, add more lemon juice, if it’s not sweet enough, add more sugar. 
  4. Ladle the mixture into freezer jam jars (or any freezer-safe container that tickles your fancy), leaving at least half an inch of room from the top of the container, and move to the refrigerator to set up overnight. The next day, move any jam to the freezer that you’re not planning to eat in the next week or so. 
Note: Cate has a fig filling recipe using dried figs. If you can’t locate fresh figs, that would be a good option.

Tuesday, September 7, 2010

Cinnamon Spiked Blueberry Icebox Pie


Remember when I said you should buy up every clamshell of blueberries you can still find at the store? Well that’s partly because I have another blueberry pie up my sleeve. What a minx I am! But this pie couldn’t be more different than my previous azure berry exploit. That blueberry pie was a traditional pie. The kind of pie that comes to mind at the mention of pie. The kind with a tender, buttery crust and a warm, ooey gooey center. The kind that bakes forever in the oven and then cools mercilessly on the counter all afternoon. This blueberry pie is not that kind of pie. This is an icebox pie. Totally different! Ever had an icebox pie? I hadn’t until I made this one. I think I may need a do-over of the last 28 years, just so I can work this pie into my childhood food memories. When I was 5 - barbecue beef (it was my favorite kind of chicken!) and icebox pie. When I was 10 - blueberry pancakes and icebox pie (sounds like quite a combo to me!). When I was 16 - macaroni salad and icebox pie.  Annual Mother's Day picnic - Everett and Jones BBQ and icebox pie (*drool!*).

But what is it?

It’s a chilled pie (a correlation I'm sure you made on your own) with a graham cracker crust, a thick fruit jam filling, and a whipped cream topping. It’s a pie for those hot summer days when you don’t want your oven on for an hour. It’s a pie for when you’re craving something sweet and creamy, yet light and cool. It’s a pie for you, right now. Promise.

It all started a few weeks ago. I had an odd craving for graham crackers - odd because I don’t really ever eat graham crackers. Apart from this pie, the cheesecake squares, and the ‘smores in Reno, I haven’t eaten a graham cracker since I was maybe 14. No joke. (I used to think they ruined the 'smore.  The idiocy of youth, right?)  So when I saw graham crackers on sale that very week, I picked up a box. Why not, right? Then, the very next week, a giant 18oz container of blueberries was on sale for $2! Why,those little buggers hopped into my cart of their own accord. They know a good home when they see one. So there I was, craving graham crackers and mulling over blueberry recipes, and it just clicked. I searched around my Google reader for recipes, landed on a strawberry icebox pie I could modify for my own devilish purposes, and the rest, as they say, is history.


Now, let me tell you about this icebox pie. Because you know I gave it the Julie touch. I spiked it of course! I just love the combination of cinnamon and blueberry, so I gave the Goldschlager a second try, and I think it came through much more prominently this time. I used it in the crust and the whipped cream topping, and the cinnamon liqueur flavor that added that hint of something extra I looking for was definitely present. The blueberry jam filling for the pie also turned out great. I let half the blueberries break down into a syrup, and I left out the other half until the very end so they would stay intact. That way it felt like you were still eating a blueberry pie and not a blueberry syrup pie. I wanted some identifiable berry. And I needn’t mention yet again how well brandy goes with berries in baked goods. If you’ve tried it, you know. I kept the sugar in this recipe pretty low because I prefer to let the flavor of the fruit come through, and there’s enough sweetness that comes from the graham crackers (especially sugar-leaden store-bought ones), but you could always add more if you've got a sweet tooth.

Overall, this pie was amazingly good, satisfying my craving and then some! Don't you love it when you make something on a whim and it turns out far better than you expected? It makes it all that much more satisfying, I think.  The crust has that sweet, kind of comforting taste you get from graham crackers, the filling is really just a jam, but a jam you might eat straight out of the jar because it’s so tasty. It's light and summery, yet with the cinnamon and graham cracker crust, almost homey and comforting.  (As good desserts should be. Or maybe I’m just comforted by weird things...)  The whipped cream topping just turns everything to silk in your mouth, brings it all together. It's definitely the star, and I’m not even a whipped cream kind of person.  I think doctoring it up made all the difference. I also really like the proportions of the three components in this recipe. The crust to filling to topping ratio is right on.

Yes, the pie is good.  But really, it's dangerously good. I couldn’t stop eating it! I kid you not, I ate a third of this pie in one night. In my defense, it is a bit of a vertically challenged dessert.  But it's also a baked good of mass waistline destruction, people! Make at your own risk!

But really, make it.  It's yummy.

Cinnamon Spiked Blueberry Icebox Pie

adapted heavily from Shutterbean

For the crust:
10 graham crackers (standard 2 1/2 by 5 inches)
2 TB sugar
1 tsp cinnamon
5 TB melted unsalted butter
2 TB Goldschlager

For the filling:
18oz fresh blueberries
1/4 cup sugar (or more to taste)
1/2 cup fresh squeezed orange juice (about 1 1/2 oranges)
3 TB cornstarch
1 tsp cinnamon
1/4 tsp kosher salt
1/2 tsp vanilla
1/4 cup brandy

For the topping:
1/2 cup heavy whipping cream
2 TB powdered sugar
1 TB Goldshlager
1/2 tsp vanilla
pinch of cinnamon

  1. Preheat the oven to 350 degrees. 
  2. In a food processor, pulse the graham crackers, cinnamon, and sugar together until they are reduced to fine crumbs. With the machine running, stream in the melted butter and Goldschlager and process until the crumbs are moistened. 
  3. Press the crumb mixture into a 9” pie plate in an even layer. Bake the crust for 12-14 minutes until it is golden brown and when you poke it with your finger, it feels like a crust, rather than moistened crumbs. Let the crust cool completely. 
  4. In a medium saucepan over medium heat, combine the sugar and half of the blueberries, and bring the mixture to a simmer. Let the berries cook until they have started to break down and form a thickened syrup, about 5-10 minutes. 
  5. In a small bowl, whisk together the orange juice, cornstarch, cinnamon, salt, vanilla, and brandy until the cornstarch is fully incorporated. Stir this slurry into the blueberry mixture, and continue to simmer for a few more minutes, until it has thickened to the consistency of a jam. Stir in the rest of the blueberries, reserving a small handful for garnishing the top of the pie. Remove the blueberry mixture from the heat and let it cool for a few minutes. 
  6. Pour the blueberry mixture into the cooled pie crust and refrigerate for at least 4 hours. 
  7. To finish the pie, pour the heavy whipping cream into the bowl of a stand mixer set with the whisk attachment and beat on high until soft peaks form. Add the powdered sugar, Goldschlager, and vanilla, and continue to beat on high until soft peaks form again. Be careful not to overbeat! 
  8. Spread the whipped cream evenly over the chilled pie and sprinkle with cinnamon and the reserved blueberries. 

Wednesday, September 1, 2010

Blueberry Rhubarb Pie


I apologize for my lack of posting last week.  Took the husband and furkid up to Reno for a visit with the family and I was just having far too much fun to talk to you.  The highlight?  There was 'smores making by the firepit in my parents' backyard on a gorgeous, crystal clear night.  There was getting smashed together on cocktails and wine and then stumbling around the neighborhood, attempting to take my dog for a walk.  But the real highlight was definitely getting to hang with my 10 month old nephew, who is the perfect package of happy, hilarious, and adorable.  The kid has what my sister calls "his badass face" for goodness sakes!  It's badass.

Another highlight was a second go at Husband's Ultimate Birthday Cake.  You may recall I made this for Husband's birthday a few months ago with much success.  Too much success!  Husband had been bugging me to make it for him ever since, and this trip finally seemed like a good time to do it.  Something about having 4 other people in the house to help eat it quickly was certainly appealing.  This was actually the first time I've followed one of my own recipes.  Sure, I've written stuff down as I go, jotted down quick instructions to myself, or modified and adapted other people's recipes, but hearing my own voice come through as I followed this recipe step by step was kind of surreal.  And kind of awesome!  I kept thinking, "I know exactly what I mean!" 

And having made this cake twice now, I can safely boast that it is awesome!!!  Seriously.  Not to toot my own horn or anything, but both my sister and my dad declared their disdain of the chocolate/raspberry flavor combination before trying this cake.  [*GASP!*  Blasphemy!  Chocolate and raspberry are the ultimate!  ULTIMATE!  Ok, only my dad expressed disdain.  My sister merely said she had never tried a chocolate raspberry dessert to her liking before.  My sister - always the diplomat.]  After they each tried a piece, however, it was a whole other matter.  There was lots of raving.  And not polite raving.  Adamant, genuine, "I'm a believer!!!" raving.  They both said the flavors were perfectly balanced - not too sweet, not too tart.  And my mom, who was of the opinion that no cake could be worth that much effort, decided that this cake was worth that much effort, as long as someone else was making it.  Anyone know the onomatopoeia for a head inflating?  *Wooshooop!*  Because that's what's happening right now.  I just love cooking for my family.  Part of the reason I'm so neurotic about feeding other people is that I get so worried that they hate my food but they're too polite to say so, so I just tend to assume no one liked anything and I was just this crazy food-pusher they couldn't get away from.  But family is different.  You can tell when they're lying. Mwhahaha!

And one more highlight - my discovery of pumpkin seed oil!  Have you ever heard of it?  Apparently it's common in Europe, and there's a European market in Reno where my mom can buy it.  I'm, of course, kicking myself for not getting to that market to get my own bottle because it is some seriously nommy stuff.  For dinner one night my mom grilled some veggies simply tossed with a little olive and pumpkin seed oils, then threw it all together with some brown rice and shrimp.  I figured it would be tasty, but the pumpkin seed oil hit this meal out of the park.  It was that secret ingredient that made all the flavors come together perfectly. Yum!   Mom, if you are reading this, please bring me a bottle next time you visit! 

But enough about cake and plant oils.  I'm here to talk about pie.  I've been sitting on this recipe far longer than I wanted to.  It's still blueberry season, right?  Well I highly suggest you run out and buy every last clamshell of blueberries you can find because this pie is worth it.  I know, rhubarb usually goes with strawberries, in fact strawberry rhubarb is Husband's favorite pie, but one bite of this baby had him saying "Strawberry who?" No joke.

Pie crust.  Let's hash it out and get it out of the way.  Tender vs. flaky.  Shortening vs. butter.  Everyone has their own pie crusts tastes.  Some people like all of one or another, some people have different ratios of both.  I have by no means baked pie crusts extensively enough to give a definitive opinion on the matter, but I will say that of the crusts I've made so far, I am in the all butter camp.  First, shortening doesn't taste like anything.  People use it because it makes for a flakier crust.  But here's the thing.  I find butter crusts plenty flaky, and I actually prefer the more tender texture all butter crusts have.  Not to mention their amazingly buttery flavor.  You just have to incorporate the butter the right way, and maybe have a trick or two up your sleeve.  Like booze!  Have you heard of using vodka in pie dough?  It's wet enough to bring the dough together, but it doesn't gum up the flour like water does.  But vodka has no flavor, so I decided to try Goldshlager instead.  I thought the cinnamon liqueur might infuse a little extra flavor into the dough.  While it succeeded in keeping my dough light, I didn't get a lot of cinnamon flavor, so next time I might just stick with vodka.  I'm on a budget, after all, and they unfortunately don't sell Goldschlager at Costco.  The most important thing with a good pie dough is making sure everything is cold.  I actually stuck the butter in the freezer until it was just frozen, which worked perfectly.  I like to work the dough with my hands, but that always warms the butter too much.  This way the frozen butter actually needed the heat from my finger tips to become workable. 

To the novices out there who are completely intimidated at the thought of making pie: you can totally do this.  Pie crust can be a pain, and if you want it perfect, you do have to be somewhat of an artist, but I maintain that anyone can make a decent pie crust.  It'll probably be flawed, sure, but it'll be tasty, and isn't a tasty pie the real goal?  Start off by reading Deb's tips for the logistics of proper pie construction at Smitten Kitchen.  I always thought the hardest part was rolling it out.  I remember my mom's many failed attempts to get her pie crusts from the mat to the pie plate in one piece.  Turns out the secret is just lots of flour, and lots of turning.  Easy!

Now the filling.  I'm swooning just thinking about it.  I actually set out just to make a plain blueberry pie, but when I had all the berries in the bowl, I knew it was lacking in volume.  I had by chance bought some frozen rhubarb at Sprouts a few weeks ago because I was curious (also, it was on sale - impulse buy!). I had never seen frozen rhubarb before, and neither had the cashier who rang me up.  She asked if it was good, and I told her I'd have to let her know.  I figured, what the hell, and threw it in with the rest of the filling.  I guess it was fate because this is easily the best pie I've ever made - including strawberry rhubarb!  It was just the right balance of sweetness from the blueberries and that touch of sour tartness from the rhubarb.  I love the sweetness of blueberries, but find a little acid to break up their flavor really brings them up a notch. And the deeper sweet flavor of the brandy brought everything together perfectly.  But the real secret was the tapioca starch.  All purpose flour is normally used in pies to help thicken the filling, but tapioca starch does a much better job of making a glutenous mixture.  Got that trick from Alton Brown.  I buy tapioca starch at the Asian market, but I'm sure it can be found at other specialty markets.  If you don't have any, just use regular AP flour.

It may be an ugly pie, but it was darn delicious.  When Husband and I were ready for dessert all conversation would cease while consumption was happening. Unless it was one of us chiming in to say how good the pie tasted.  But usually it just came out as approving grunts and groans.

  
Blueberry Rhubarb Pie

crust adapted from Smitten Kitchen
filling adapted from Joy the Baker

For the crust (both top and bottom):

2 1/2 cups flour
1 tablespoon sugar
1 teaspoon salt
1 cup (2 sticks) unsalted butter
2 TB ice cold water
Goldshlager (or vodka)
For the filling:

18oz fresh blueberries
12oz bag frozen rhubarb, thawed (or about 2 cups fresh rhubarb, chopped)
1 cup sugar
1/2 cup tapioca starch (or substitute AP flour)
zest of half a lemon (about 1/2 tsp)
1 tsp lemon juice
1 tsp cinnamon
pinch of kosher salt
3 TB brandy
1 egg
1 TB milk
To make the dough:
  1. Cut the butter into small pieces and break them apart. [I like to cut the stick lengthwise, turn it 90 degrees, and then cut it lengthwise again, so I have 4 long sticks. Then I cut regular tablespoon-size pats, so I end up with a bunch of 1/4 TB pieces.] Put the well-separated pieces into a bowl and place it in the freezer for about 30-40 minutes, or until they are just barely frozen through.
  2. In a medium bowl, mix together the flour, sugar, and salt. Add the frozen butter and gently work it into the flour with your fingertips. Since it’s frozen, you’ll have to kind of smush it out. Use your finger muscles! The butter will be incorporated enough when you have small pea-sized bits of butter left.
  3. Add the very, very cold water and stir it into the mixture. This shouldn’t be enough moisture to bring the dough together, so add the Goldshlager 1 TB at a time until the dough will just form into a ball. Divide the dough evenly into two balls. Wrap each ball tightly in plastic wrap and squish it into the shape of a round disc, like a giant hockey puck.
  4. Chill the dough in the refrigerator for at least 2 hours, but overnight is okay too.
To make the pie:

  1. In a bowl, combine the blueberries, rhubarb, sugar, tapioca starch, lemon zest, lemon juice, cinnamon, salt, and brandy. Mix until everything is incorporated and the fruit is well coated. Set aside.
  2. Remove one hockey puck of dough from the refrigerator. On a very well floured surface, roll out the dough evenly until it is big enough to cover your pie plate, plus a 1/2 inch or so. This is best achieved by constantly turning and flipping your dough so it doesn’t stick to your surface. Don’t be afraid to add too much flour, you can’t. Transferring to the pie plate can be tricky. I like to fold the dough in half, and then in half again, and then transfer the quarter wedge to the plate and carefully unfold it. But use whatever method you like.
  3. Gently press the dough into the plate and trim off any dough overhanging more than a 1/2 inch over the plate. Using the excess bits to fill any holes or imperfections you have. Remember, you won’t see the bottom crust, but you’ll taste any spots where there’s missing dough. Pour the blueberry mixture over the bottom crust and set aside.
  4. Remove the second hockey puck of dough from the refrigerator, and roll it out the same way you did the first one. When it is big enough to cover the pie with at least a 1/2 inch overhang, figure out what’s going to be the center. You need to make vents in the top crust for the steam to escape. I cut a hole about the size of a shot glass in the very center, but it can be anywhere. You’ll want at least one. I also cut a few smaller holes around the edges. When the dough is properly ventilated, carefully cover the pie, and again trim any excess. Tuck the two crusts under so it is flush with the plate. Using your fingers or a fork, crimp all the way around the edge of the pie so it’s sealed. Cut a few more vents in the crust. Put the pie in the refrigerator to chill for about 20 minutes.
  5. While the pie chills, preheat your oven to 425 degrees and move the rack to the lower third of your oven. If you’re worried about filling bubbling over and making a mess you can put a cookie sheet under the rack to catch any drippings.
  6. Beat the egg and milk together and brush evenly over the top of the chilled pie, making sure none of it pools.When the oven is ready, bake for 30 minutes, then knock the heat down to 375 degrees and bake for another 30 minutes. If the pie starts to get too brown before it is finished baking, cover it loosely with foil (I did this about 45 minutes in). The pie is finished baking when the crust is golden brown and the filling is thick and bubbling.
  7. Let the pie sit and fully cool before cutting into it to give the filling time to come together, at least 4 hours.  Don't jump the gun, you'll regret it!

Monday, June 14, 2010

The 3 Ps, Portion, And Delicious Cake

Recipe: Brandy Buttermilk Apricot Cherry Upside-Down Cake

I read somewhere a few months ago that one of the reasons maintaining weight loss is so difficult is that a person spends so much time thinking about food while they're losing the weight, that when they've finally lost it, they are completely food obsessed.  As you can imagine, it's very difficult for someone who is obsessed with food not to eat...and eat...and eat...to the point of obesity!  And I can tell you, it is so true.  I was food obsessed before I lost 70 pounds, so you can imagine my struggle to balance my constant desire to shovel food in my mouth with my desire to stay healthy.  No really, when I say obsessed, I mean obsessed!  A good or bad meal can instantly affect my emotional state.  My social activities generally involve food in some way.  Want to hang out?  Sure, let's grab lunch!  You want to see that new movie with me?  Awesome, let's hit up the matinée and get dinner afterwards!  Hey Julie, how was your vacation?  Great!  The food was good!*  So yeah, I think it's safe to say I genuinely love food.  I am not one of those people couldn't care less what foods they ate, so eating healthy is just as easy as eating unhealthy. Oh ho ho ho, no.

I've developed a few methods for keeping my eating in check because a healthy lifestyle is about so much more than just switching to healthier food choices.  Despite what the masses tell you, there are no "good foods" and "evil foods".  Fat (and then Carbohydrates) is not the Devil's nutrient. Everything is a balance, and the loss of that sense of balance is why we're all fat!  And I could go on, but you don't have all day.

One of these methods, it's really more of a healthy lifestyle philosophy, I call the 3 Ps.  And those Ps would be portion, proportion, and practicality.  [I thought about prudence instead of practicality, but who wants to be prudent?]  Yeah, I know...it's is beyond cheesy.  But I can't help it they all begin with P!  Just bear with me people, mkay?  In the interest of keeping this post at short story length, I'm going to break this explanation up into a series.  Today I'll talk just about portion.

One of the keys to eating right is eating the right amount and eating the right amount of the right things.  [And if you only had to read that sentence once to understand it...10 points for you!] That's where portion comes in.  It refers, of course, to portion size.  As gluttonous, greedy Americans, we have been bred to always want more.  It's economical.  And we're nothing if not economical, am I right?  I'm sure you've read the news stories about how much more a single serving of coffee is today versus 50 years ago, or how much bigger portion sizes are at restaurants.  The first thing you need to do is get your portions back under control.

I find this difficult because when I'm eating something I like, I want to keep eating it until I can't possibly eat any more.  Well that's just too damn bad.  Now I (on my good days) eat the amount of food I need, rather than the amount of food I want.  I judge my need based on both hunger and calories.  I took some time to research the amount of calories I needed to eat in a day based on my sex, height, weight, and activity level, divided it up between whatever meals and snacks I wanted to eat in a day, and tried to hit those goals.

I just scared you away, didn't I?  Counting calories scares a lot of people away.  Including me.  Fear not!  In all that work I figured out that if I also ate the right proportions of types of food and stayed practical and realistic, I was hitting my calorie target all on my own.  No counting calories needed!  Thank goodness!  Basically, the idea is eat until you're no longer hungry, and try to eat sensibly.

So as I was saying, one important step to overcoming over-eating was getting a handle on my portions.  I'm sure you've heard this before, but it is so true.  Using smaller vessels to hold your food helps you eat less.  Now, I'm not saying switch your soup bowl out for a shot glass.  Be reasonable!  But switch out your ridiculously large dinner plate for a salad plate, perhaps.  Not only does it keep you from piling too much food on your plate, but you'll feel like you're eating a lot of food because the plate is full.  No joke!  If you scoop a correct serving of rice onto a giant plate, your eyes are going to tell you you're not eating very much, and your eyes send data to your brain way faster than your stomach!  I know when Husband and I finally replace our hand-me-down dinnerware collection (We kind of desperately need to.  As much as I love it, it's totally chipped!), it's going to be hard to find something isn't ridiculously over-sized.  Gluttonous, greedy Americans, remember?  If you're worried about taking too little food, just remember you can always go back for seconds if you really need to.  I don't recommend having seconds as a general rule, but if you do just be sure to wait 15-20 minutes between helpings to give your stomach a chance to tell your brain you're full.

The same goes for containers you pack your lunch in.  If you have some huge 4 cup capacity container to hold your super healthy brown rice and vegetable stir fry, when you go to fill it up, you're going to keep filling and filling until it's full, or at least way fuller than it should be.  And while one of the perks of healthier eating is getting to eat more food for the same amount of calories as unhealthy foods, there is a limit.  Be reasonable!  Here's why.  When you eat a lot of food, your stomach expands.  When you eat less food, it shrinks.  When your super stretched out stomach is empty, you eat until that big stretched tummy feels full.  If your stomach isn't so stretched, you feel full sooner, and as a result eat less to get that same satisfied feeling.  So it's not just about what you eat, but how much.  Being able to control your portions is essential.

Baby steps!  When faced with a sweet tooth and an uncut cake, I'll take a bigger piece than I should just as sure as the next gal.  That's why I take steps to prevent Piggy Julie from rearing her ugly snout.  You may recall I posted a few of those steps? Just being aware of your portions ensures you're headed in the right direction!


*It's completely true that I judge a place I've been based on how good the food was.  What's worse, my desire to visit a particular location is generally right on par with how good their food reputation is.  Case in point, I couldn't wait to visit France and Greece, and oh my word is the food there ever the best!  Germany?  Not such a huge desire.  That's not normal, right?


If you couldn't tell from the pictures of cake sprinkling this post, I may have just been bestowing my wisdom about eating right as a way to off-set that fact that I'm posting another delicious Summer fruit dessert.  Not to mention, that makes you one of the most unobservant people ever.  Way to go.  Did you also fail to observe that the Summer stone fruit is finally here?   I for one did not!  I love stone fruit!  Apricots, peaches, and plums, oh my!  What's more, I love baking with stone fruit!

You know what I really love about this cake?  It was one of those unexpected kitchen successes. I had some apricots and wanted to do an upside-down cake, so I hunted around my Google Reader until I found one that tickled my fancy.  As luck would have it, I had cherries on hand too!  I thought I'd get something ordinary but delicious, but this cake was delicious!  I actually exclaimed "Oh my!" when I took the first bite.  The cake was light and fluffy (and boozy!), and the fruit topping was sweet and bright (and boozy!).  The apricots were a little bit tart, the cherries had that deep, sweet cherry flavor.  Everything was beautifully balanced and delicious. And the brandy!  Oh the brandy.  It was a beautiful compliment to both the cake and fruit.  It's richness and complexity are definitely part of what made this cake so memorable.  When can I make it again?


Brandy Buttermilk Apricot Cherry Upside-Down Cake
adapted from Eating Out Loud

Makes a 12" cake

For the topping:
1/4 cup butter (1/2 a stick)
3/4 cup brown sugar, packed
2 TB brandy

For the cake:
1/2 cup butter (1 stick)
1 cup sugar
2 eggs
1/2 cup buttermilk
1 1/2 cups flour
1 1/2 tsp baking powder
1/2 tsp salt
1 tsp vanilla
1/4 cup brandy
1 tsp fresh lemon zest
7 apricots, sliced into medium-thin slices
1/2 cup cherries, pitted and sliced in half

  1. Preheat oven to 350 degrees.
  2. In an oven-proof skillet (preferably cast iron), about 10-12", melt the butter, brown sugar, and brandy.  Over medium heat, cook the mixture until it begins to bubble.  Remove the skillet from the heat and set aside to cool.
  3. In a bowl, beat the butter and sugar together until light and fluffy.  Add the eggs, one at a time, and then the buttermilk.
  4. Slowly add the flour, and then add the baking powder, salt, vanilla, brandy, and lemon zest.  Mix just until a smooth batter is reached.
  5. Arrange the slices of apricots and cherries in the skillet, on top of the sugar mixture.  I wanted the top of the cake completely covered in fruit, so I really jam packed it in there.  If you want more of the cake to show through, use less.
  6. Pour the batter over the fruit, and use a spatula to smooth it evenly over the cake, making sure to spread it all the way to the edge of the skillet. Move the skillet to the oven and bake for 40-45 minutes, until a tester comes out clean.
Make it your own!  This recipe can be done in a ton of variations.  You can use any stone fruit in place of the apricots and cherries.  You can use any liquor you think will compliment the flavors well.  You know what would be really delicious?  Bananas and bourbon, of course!  I'll have to try that sometime soon.  

For the more vestal readers, first, I have no idea what you're doing reading a blog all about pairing booze and food (not that I don't appreciate the readership), and second, I'm confident this cake is still a knock-out without the brandy.  

Friday, June 4, 2010

Invoking Memories

Recipe: Berry Crisp

The best compliment I've ever received from someone who ate my food was an old co-worker who said that my Christmas rugelach reminded her of the ones her aunts used to make when she was a kid.  She said the best food is the food that invokes memories, and it is so true!  Vegetable and barley soup reminds me of my grandmother.  She always had a pot of it simmering on the stove when I went to her house.  Rice sprinkled with seaweed will always remind me of my freshman year in college, when Husband and I practically lived off the stuff (he had a handy little rice cooker in his dorm room).  And blackberries...well there will always be a special place in my heart for blackberries.

Growing up, there was an abundance of blackberry bushes all around my neighborhood.  Right across the street was the best spot for picking.  Come summer we would pick tubs and tubs of blackberries and bake tarts, pies, and cobblers galore!  I remember my neighbor's adorably cuddly Samoyed, rather ironically named Killer, helping himself to the berries of our labor if we weren't careful.  I remember baking with my mom in the kitchen, my sister and I fighting over who got to eat the leftover pie dough.  And unfortunately, I remember the year a fire burned down a sizable portion the area due to a brush fire, after which the city passed super strict laws about the distance of brush growing near peoples' houses.  They came and cut away all those wonderfully blackberry bushes, and our summer blackberry baking became nothing but an occasional occurrence. It was sad. Those poor blackberry bushes would never have dreamed of catching fire and burning our neighbor's house down!

To this day blackberries are my favorite berry.  A good, ripe blackberry has such a deep, sweet flavor.  It has the brightness of a berry, but something more too.  They're just more complex than a blueberry and strawberry in a way I can't describe. You just can't beat it.  So when they were on sale for cheap a few weeks ago, naturally, I stocked up!

I was tempted to do a cobbler, always my mom's go-to dessert.  They're delicious and easy, what's not to like?  But I was really in the mood for a little texture, and something with oats.  Oats are just the best in desserts, aren't they?  Once I decided on doing a crisp, I hunted around for a recipe, and ended up kind of mushing a bunch of ideas into one.  After the muffins, I didn't really have enough blackberries to go for a mono-fruit dessert, so instead I opted for an ensemble.

I had some delicious pears, a few strawberries, and to get the volume of fruit I wanted, I threw in a few frozen blueberries I had left over.  The great thing about crisps is that you can use whatever you want.  You could do one entirely with blackberries, or mix it up with some apples or stone fruit.  Whatever floats your boat, which is extremely useful when there's something different on sale at the store every week at this time of year.

I did end up making this boozy by throwing in some brandy.  When it first came out of the oven and I burned my mouth I was so impatient to try it, I could taste the brandy and it was delicious.  But when I ate some the next day the flavor had dissipated and I couldn't really taste it anymore.  I like booze to play a part in the background of my baked goods, but if it's not even detectable, then you're just wasting perfectly good alcohol..  Blasphemy!  Next time I would just leaving it out all together.  Blasphemy!  Damned if I do, damned if I don't.  It really just comes down to what fruit you're using.  If I had used only blackberries, the brandy probably would have come through a bit better.  If I was using apples, some apple brandy would have been awesome.  Grand Marnier and peaches. Bourbon and apricots.  Chambord and raspberries...

I'll stop before my drool over the keyboard rends finishing this post impossible, but the point is, finding ways to better booze this recipe is as limitless as deciding what fruit to use.  And that's what makes it fun!  Crisps are right there with cobblers when it comes to simplicity.  This is definitely one you could make with your kids, and start your own food memory tradition.

You may notice there's a bit of ice cream in these pictures.  I think ice cream and crisps go together like booze and berries. But it's a trick!  That's no ice cream.  It's a frozen banana.  Have you heard of this trick? Take a frozen banana (because you're freezer is overflowing with overripe bananas you're constantly stashing away like mine is, right?), and put it in the food processor.  At first it'll look a bit iffy, but after a minute or two, the banana breaks down enough that it gets this irresistibly creamy texture that is very reminiscent of ice cream (or frozen yogurt may be a bit more appropriate).  Seriously, that is 100% banana!  It's an easy, healthy dessert!  If you want to really spice it up, throw a spoonful of peanut butter in the food processor with the banana and top it with some chocolate chips. Heaven!  Ok, I admit it. I wanted a scoop of ice cream for the picture, and with my lack of an ice cream maker, I used the frozen banana trick.  But that's all changed now because I am now the proud owner of an ice cream maker!  Yay!  But that's another post.

So what's one of your favorite food memories?


Boozy Berry Crisp
loosely adapted from Parade

makes about 8 servings

For the berries:
6 cups berries (or other fruit of your choice, cut into bite size pieces)
1/4 cup sugar
1/4 cup all purpose flour
1 tsp lemon juice
a pinch of cinnamon
1/4 cup booze of choice (completely optional, choose wisely)

For the crisp:
1 cup oats
1/2 cup all purpose flour
2/3 cup brown sugar
1 tsp cinnamon
1/4 tsp ground ginger
1/4 tsp nutmeg
1/4 tsp salt
7 TB butter, cubed and chilled

  1. Preheat the oven to 350 degrees and prepare a 9" pie plate (or similar-sized vessel) with baking spray.
  2. Combine all the ingredients for the berries in a bowl and set aside.  [If you want to save on dishes to wash, you can just mix this directly into the pie plate.]
  3. In a medium bowl, combine all the ingredients for the crisp except the butter. Stir to combine, then cut in the butter with a pastry blender, a fork, or even your fingers, until it comes together into small crumbles.
  4. Pour the berry mixture into the pie plate, then sprinkle the crisp mixture over the top.  Bake for 1 hour, or until the crisp is a golden brown and the berries underneath have make a bubbling, thick syrup of deliciousness.  Let cool for 15 minutes.  Trust me on this one, it's hot.  You might want to place the pie plate on a baking sheet in case the fruit bubbles over, creating a total mess in your oven.  I decided to be a daredevil and wing it, and I came out unscathed.  Or rather, my oven did.

Saturday, May 22, 2010

The Muffin Man?


My husband is a muffin man.  If you ask him what his favorite dessert is, he'll say something with chocolate.  Usually cake. [see post on his requested birthday cake: chocolate!]  But if I set a tray of blueberry muffins on the counter, they are usually gone by morning.  He is a total muffin man.

Do you know the muffin man?  The muffin man?  The muffin man?

I totally have that song stuck in my head now.  It's not much of a song though, is it?  I mean, that's pretty much all there is to it.  Did you know there used to be dudes who went door to door delivering muffins?  Kind of like the milk man.  I guess that's where the song came from.  Wikipedia says so.  How did people learn anything before Wikipedia?

Bet you thought this blog was just for food chit chat and innocent, diverting entertainment, didn't you?  Oh no.  I make you learn something too.  There's life-changing information in here, people!  I mean, there's got to be the answer to some random gameshow question in there, that could win you millions of dollars.  You're welcome.  Also, I want my cut!

You totally have that song stuck in your head now, don't you? Mwhaha!


Anyways, berry season is here!  I love berry season. How awesome are they?  They're good just by themselves, over cereal, in yogurt, salads, pureed they can be used as a million different sauces, not to mention their possibilities in desserts!  Cobblers, tarts, pies, cakes, crisps, scones, breads, and...muffins!  The possibilities are so endless that I almost get overwhelmed when deciding what to do with them!

Blackberries were on sale last week, and my curiosity had just peaked by a recipe for some delicious-looking blackberry muffins...and the rest is history!  

Have you ever had blackberry muffins before?  I hadn't.  Strawberry, blueberry, raspberry...sure!  Blackberry, never.  It really doesn't make sense why not.  One might argue out of all the berries, the blackberry is one of the best!  But that's another post.

These muffins were so good.  Actually, they turned out better than I anticipated.  Usually Husband is the muffin oinker, but I definitely had my share of face stuffing with these.  It was the delicious crumb topping.  You bite into the muffin top and get that sweet and slightly crunchy crumbly top, and then right in the middle is that burst of bright sweetness from the blackberries. Oh my, they were addicting!  

See that picture below?  At ate that muffin after I took that picture.  Ok, actually I ate it after the one below it, because I cut it in half, got pictures of it's insides, then ate it.  Which is perfectly acceptable if you don't consider that I had already eaten one fresh out of the oven about 5 minutes prior.  But once I had cut this one open and it's blackberry innards looked and smelled so enticing, there was no turning back.  Yep, I had to run some extra laps for that one!  So worth it.


The muffins turned out kind of...mammothsiveossal!  Or rather, ahem, they were on the large side.  When I checked on them in the oven halfway through baking, I thought the recipe had gone horribly, horribly wrong.  They had taken on a life of their own!  They were...spreading!  But by the end they had puffed up in all the right places and made one delicious muffin.  Phew!

I like to change out about half the all purpose flour in muffin and quick bread recipes with whole wheat flour.  Not only does it make them a bit healthier (yay fiber!), it also gives them a bit of density and deeper flavor that I like.  I also like to go for recipes that use applesauce, or banana, or pumpkin, or some other fruit or vegetable puree in place of some of the oil to lighten and bright them a bit.  I prefer the more neutral taste of applesauce when I don't want the flavor to interfere with everything else going on.  I wanted blackberry muffins, not blackberry banana muffins, ya know?  But if your ears (eyes?) just perked up at the mention, feel free to try it.

I decided to booze up these muffins with brandy, not just because of the handy alliteration, but also because I wanted a rich flavor that would compliment the blackberries without overpowering them like a whiskey might.  But you could certainly use a whiskey in its stead.  You'll get a bit smokier of a flavor, I would think.  Yum!

Innards!

Blackberry Brandy Muffins
Adapted from The Hazel Bloom

Makes 12 enormous muffins

For the topping:
1/2 cup brown sugar
1/3 cup all purpose flour
1/4 cup rolled oats
4 TB butter, melted

For the muffins:
1 1/2 cups all purpose flour
1 cup whole wheat flour
2 tsp baking soda
1 tsp baking powder
1/4 tsp salt
3/4 cup sugar
1/3 cup canola oil
1/3 cup applesauce
1 egg
1 tsp vanilla extract
1 tsp lemon zest
1/4 cup brandy (optional)
1 cup buttermilk

12 oz fresh blackberries, halved
  1. Preheat the oven to 350 degrees.  Grease a muffin pan with baking spray.
  2. Combine the topping ingredients in a small bowl until it's a crumbly consistency.
  3. In a large bowl, sift together the flours, baking soda, baking powder, and salt.
  4. In a medium bowl, scramble the egg, then add the sugar and whisk until fluffy and light in color.  Add the oil, applesauce, vanilla, lemon zest, and brandy.  Mix to combine.
  5. Add the wet ingredients to the dry, pour in the buttermilk, and stir until just barely combined.  Don't over-mix!  Then fold in the blackberries.
  6. Fill the 12 muffin cups with the batter.  I fill them all the way to the top, which is probably why they're so huge.  Then crumble the topping mixture over each muffin.
  7. Bake for 25-30 minutes, until golden brown and a tester comes out clean.  Let cool for 10 minutes, which for Husband, sometimes requires an armed guard.


PS: If you check out the right-hand column of this here blog (come on, click over from your rss reader, I don't bite), there is a spot to follow this blog.  I hope if you like what your read, you'll do so.  It makes me feel all warm and fuzzy on the inside.  Also, right below it is a link to this here blog's Facebook page.  Come like me on Facebook, if you please.  It makes me feel all cozy and safe on the inside.  One more thing.  A little ways below that there is a banner that will take you to my profile on Tasty Kitchen. Come and be my friend, or rate my recipes!  It makes me feel all liked and validated on the inside.