Showing posts with label pasta. Show all posts

Sunday, November 13, 2011

Pumpkin Ravioli Surprise

My Ode To Dough:


Here’s how my crazy brain works: rather than a measure of your skill in the kitchen, I think a recipe’s degree of difficulty is more like your investment in making it from scratch vs. just buying it.  Muffins, pancakes, and cookies are totally worth making at home because they’re easy and taste a thousand times better.  But a rustic ciabatta loaf?  I can hear my mom in the back of my mind saying “why go through all that work when you can just find a good bakery where they make it better than you anyway?”  Because let’s face it - bread is hard.  Your yeasts can be temperamental and sluggish.  Your gluten can be obstinate and unpliable. Your environment can cause changes in moisture absorption and and rising times.  But you don’t have to be a bread-whisperer or anything.  It’s a matter of practice in some cases - like getting a feel for working the dough, and knowledge in others - like learning that when you use water that’s too warm you kill all your yeasts.  Oops!

So why do I waste my time?  Because it’s fun and rewarding!  Because I like knowing there’s nothing in my bread except flour, water, salt, and yeast.  And because I don’t always have access to a good bakery!  So while I won’t say bread isn’t an undertaking, I will say if it’s something that interests you, you should give it a go.  It takes time to perfect, but not necessarily prone to disasters of epic proportions. The trick is finding someone to walk you through it.  This is where Nicole of the wonderful Pinch my Salt comes in.  She’s posted a plethora of bread recipes, always with great step by step pictorial instructions and lessons to learn.  Essentially, she makes bread baking a whole heckofalot less scary.

Back in September Nicole posted a day by day set of instructions for how to create your own wild yeast sourdough starter.  From scratch!  Using just water, flour, and a little pineapple juice to start.  In case you’re wondering the pineapple juice is used because the acidity helps the right kind of bacteria to grow, which is what the wild yeasts come to the party to eat.  Err, or something like that...?


I love sourdough bread.  I love that tangy, sour flavor.  I love the smell.  And Husband has a special soft spot for it too.  We’re both Bay Area natives, after all.  It’s in our blood or something.  But sourdough starters scared me.  Sent me for the hills.  Arms flailing.  All that. Even after I conquered my fear of yeast, this blob of gloppy mess gave me pause.  But there was something about the bubbles and the way the blob would climb up the jar a little more each day.  It was like a pet, but one you wouldn’t feel too bad about accidentally killing.  Tamagotchi!  And on top of that, Linda from Salty Seattle was posting her usual food porn featuring sourdough recipe (linguine with chocolate lamb ragu? omg!) after sourdough recipe (sourdough pumpkin beignets with pork belly? Hello!).  Those two trouble-making ladies have since gotten together and declared this month in the name of Doughvember.  

Good thing I had already decided to take the plunge and my starter was already under way!  I am now the proud owner/parent of my very own sourdough starter.  I grew/birthed it myself!  It did take a couple of tries, and it was touch and go there for awhile, but I think we’ve ultimately reached a delicious understanding.  I feed it - it feeds me.  Here are some lessons I learned in my failed and almost failed attempts (most of it either wisdom directly from Nicole or online resources pointed out to me by Nicole - she rocks!):

  • It’s easier to create a starter with whole wheat flour instead of refined flour because the sugars in the whole wheat provide more food for the yeasts to feed off of.
  • If your starter is a bit sluggish at the get-go, it can be helpful to stir it once a day or so, just to redistribute stuff.
  • After day 5 or so, when you’re feeding it twice a day, it helps to move to a scale.  Measure 8 oz. of starter and mix in 4 oz. flour and 4 oz. water. And make sure your water isn’t too hot or cold or you’ll kill/scare away your yeasts.
  • When you’re ready to move your starter to the fridge, cover it in plastic wrap with a few holes poked in it.  That way the yeasts can breathe, but the blob won’t dry out.
  • When adding your starter to recipes, 1 cup of starter can replace approximately 1 cup of flour and ½ cup of water in the recipe.


My favorite recipe to use my extra sourdough starter so far has been these sourdough crumpets from Chocolate & Zucchini.  They take literally 10 minutes to make, start to finish (7 minutes of that is letting your pan heat up), making them invaluable for a quick weeknight meal accompaniment.  It helps that they’re flipping delicious too - like a tangy, savory pancake.  I’ve also tried throwing a little starter in pumpkin muffins and cream cheese biscuits, to great success.  It really just adds a hint of something extra.  


I ended up making Salty Seattle’s sourdough pasta recipe.  I would recommend halving it, unless you truly have an army to feed.  Half was plenty for the chocolate lamb ragu I made (recipe coming!), and after making pumpkin ravioli for dinner last night, I still have a small dough left for a rainy day.  I wasn’t going to blog the ravioli.  It was an experiment.  I didn’t even really expect it to turn out edible.  But thank goodness it did because I had no backup dinner standing by, and now I can tell you all about the magic of egg yolks inside pasta dumplings.  Oh yes, these raviolis featured a raw egg yolk placed in the center of a filling with pumpkin, pistachios, sage, shallots, garlic, and Parmesan cheese.  Every good thing, right?  It was like hiding all the magic of a poached egg inside for a nice surprise.  I cooked the ravioli long enough for the yolk to cook to about the point of a poached egg.  It’s hard to judge because you don’t know how done it is until you eat it, right? I did a test run before I cooked the rest, just to be sure.  I would recommend it.  But one fork-pierce and out runs the yolky goodness!  It’s heaven.  Pure heaven.  Who needs marinara?  The pumpkin and pistachio filling was a sweet accompaniment that actually paired wonderfully with the richness of the egg and the slight tang of the pasta dough (remember, it’s sour!).

So while my lame ineptitude prevented me from having the foresight to get a money shot of these babies - the one where you see yolk running from the center like an erupting volcano - I did remember to write down the method to my madness, so you can give it a go and see the insanity for yourself.  You’re welcome.  
Doughvember, for the win!

PS: Why yes, I am addicted to instagram. Feel free to follow me at bananasforbourbon!


Pumpkin Ravioli (with an egg yolk - surprise!)

Makes 8 raviolis (these are rich, so I would say that’s more than 2 portions)

~ ¼ batch of this recipe for sourdough pasta dough
1 large shallot, finely chopped
4 cloves of garlic, minced
6-7 leaves of sage, minced
1 TB olive oil
pinch of kosher salt
¼ tsp ground black pepper
¼ tsp ground nutmeg
½ cup white wine
1 cup pumpkin puree
¼ cup pistachios, lightly toasted and cooled
¼ cup Parmesan cheese
lemon juice (optional)
8 egg yolks

  1. In a small saucepan, heat the olive oil over medium heat.  Add the shallots with a pinch of salt and saute until softened, about 5 minutes. Add the garlic and cook for a minute or two to soften.  Add the pepper and nutmeg and stir to incorporate. Add the wine and bring it to a simmer.  Once the wine has reduced by about half, or a little more, remove it from the heat and let it cool.
  2. In a food processor, finely grind the pistachios.  Add the pumpkin puree, Parmesan cheese, and the cooked shallot mixture.  Process until the mixture is smooth.  Adjust the seasoning to your taste.  Add a little lemon juice if it needs some brightness.  Add the mixture to a ziplock bag (or pastry bag if you want to be fancy), and cut the corner so you can pipe it.
  3. Roll out the pasta dough into very thin sheets.  I don’t have a roller, so I did it by hand.  You’ll need about a 4 inch square to work with.  Pipe the filling in a circle, leaving about an inch-wide circle of open space in the middle (about the size of your egg yolk).  I didn’t measure, but I’d say it was about 1-2 TB of filling.  Basically, you want about ½ inch of thickness and ½ inch of height for the filling, or about the level with the yolk.  Carefully place an egg yolk in the middle of the filling.  Place a sheet of dough on top and gently press around the filling, sealing it as tightly as possible.  Then press a little firmer to make sure the dough it good and sealed.  Cut out the ravioli with a glass, a biscuit cutter, or just a knife.  I opted for about ¼ - ½ inch between the edge and the filling.  Repeat this for as many ravioli as you want to make.
  4. In a pot of gently simmering water, add the ravioli.  Make sure the water doesn’t boil too hard, or you raviolis could fall apart, and make sure it’s not set too low or once you add them, it’ll take too long to come back to a boil.  Boil the ravioli for 4-5 minutes, depending on how runny you like your yolks.  
  5. Remove the ravioli from the water, and add them to whatever sauce floats your boat.  I did a simple olive oil drizzle (with good olive oil), since the yolks are essentially all the sauce you need, but I’m sure tossing them with some browned butter and sage would be divine too.

Monday, February 21, 2011

Pasta with Roasted Spring Vegetables in Cambozola Sauce


Let’s start with the giveaway winner. Congratulations...

...drum-rolling...


 ...Kelly! You win the CSN Stores gift certificate! Congratulations! And who says the person who enters 5 minutes after you post it won’t win? Not I. I’ll be sending your email address to my contact with the company. Stay tuned!


When I researched the best ways to start an exercise plan - what was now all those moons ago - one thing I always saw mentioned was goal setting. Most “professionals” agree that it is important to set both long term and short term goals, the idea being to motivate yourself early with small accomplishments, and to keep the motivation going for the long term. By accomplishing your smaller short term goals, you’ll build up enough muscle, endurance, discipline, etc. to complete your long term goals. Makes sense. And for some people, like Husband, it’s invaluable advice. Results can be slow to show on the scale or on our bodies, but when you have a cold, hard accomplishment under your belt, that can be just the thing to keep you going. Me? I make goals, sure. But I never took much time to structure them or really give much thought to them. I was so overweight that the scale provided me with all the motivation I needed pretty early on. I guess that’s one advantage to to being obese vs. just overweight? Heh.

I’ve been thinking more about goals lately, and I’ve come to realize it’s kind of like the approach you take when applying to colleges. When deciding where to apply you have the schools you’ll probably get into, and probably end up going to. Those are the realistic schools that are “the middle”. But what if by some catastrophe, you don’t get into any of those middle schools? The probability is low, sure, but you don’t want to be caught with no acceptances. Catastrophe indeed! So you apply to a “safe” school or two - schools you know for sure you’ll get into and wouldn’t be completely miserable attending. Even better is when your safe school has rolling admissions. Having that acceptance under your belt does wonders for your confidence when applying to the better schools. And then, of course, you have to apply to a few schools - the ivy leagues - that you don’t seriously think you’ll get into, and never really considered attending, but figured it’d be fun to try on the off chance that by some miracle of paperwork error, they let you in.

What does any of that have to do with goal setting? Bear with me. As I’m writing this, I’ve just come from a local wine-maker’s house. Ever had a pot luck luncheon with a wine-maker? Let’s just say my glass was never allowed to go empty. Let’s also say it was very good wine, and it seemed to evaporate from my glass as soon as wine was poured in.

I expect I’ll be getting an email from my editor sister tomorrow with a few dozen corrections and even more questions of clarification of what the heck I’m talking about.

But I do have a point! And it’s that goal setting should be like applying to college. Shoot for the stars, hope to get there, but at the same time be practical and expect for something a bit closer to earth. When I first started running, I couldn’t even run a mile. So that was my first goal. Run a mile. Did that. Then my goal was to run a mile under 14 minutes. Then 12. Then run 2 miles. Then 3. When I first started out, my long term goal was to be able to run a 5K (aka: 3.1 miles). It sounded so far, but I was confident I could reach it with a little work. And I was right! My next long term goal was a 10K (aka: 6.2 miles). I started getting my runs to 3.5 miles, then 4, etc., etc.. The thought of running over 6 miles sounded crazy, and I wasn’t sure I’d ever get there, but I figured I’d try. And with a little more work, I did it! I just kept pushing back my goals, and eventually meeting them - both short term and long. They were like getting into my safe schools right away and my middle schools eventually. All the while I was secretly shooting for the stars.

I was at the gym once - gosh, maybe almost a year ago now. A neighbor who had seen me running around the area and being a regular at the gym asked me if I was training for a marathon. I scoffed. A marathon!? At that point I wasn’t yet able to run a 10K let alone several 10Ks. I still don’t think I’ll ever be crazy enough to run a full marathon (aka: 26.2 miles). Just can’t imagine doing that to my poor, poor body. But. In just a few weeks, I’ll be running my very first race. A half marathon, no less! Aka: 13.1 miles. I’ve never actually run that far before, but I’m confident I can finish. That confidence actually blows my mind. This time last year I was scoffing at the very idea of running a half marathon, and now I’m actually going to do it. I feel like I just go into Stanford!


I’m a little embarrassed to admit this, but I am far too sauced to think of a not-so-witty segue into this dish. Besides mentioning that the recipe is basically a sauce. So there’s that. Not my best work, I know.

A Facebook friend of mine has been mentioning her current obsession with paninis, and especially her complete obsession with cambozola cheese on these paninis. Always one willing to talk food, I commented on her status, asking what was this cambozola cheese and why was it so special? And then proceeded to Google the stuff, since I’m impatient and a dork. And let’s just say it went downhill from there. Cambozola cheese is described as a blue brie, and that’s exactly how I would describe it too. It’s a triple cream cheese, so it’s rich and creamy like brie, but it’s also made from the blue mold of other blue cheeses, so it does have what I like to call, a bit of stinkiness to it. Who doesn’t like a beautiful marriage of a creamy, stinky cheese?

On a happy, splurging shopping fest last week I picked up a wedge of the cambozola, along with some Brussels sprouts and asparagus. I thought a good cheese with two of my favorite vegetables would be a good way to celebrate my finally landing a job. No biggie. I start tomorrow. I’m breezy.

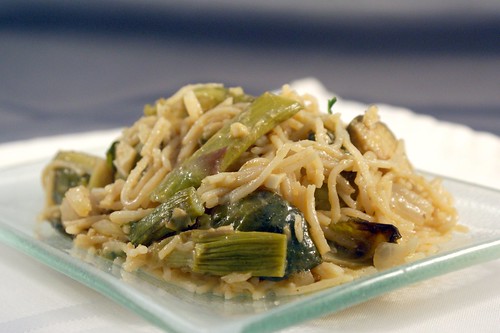
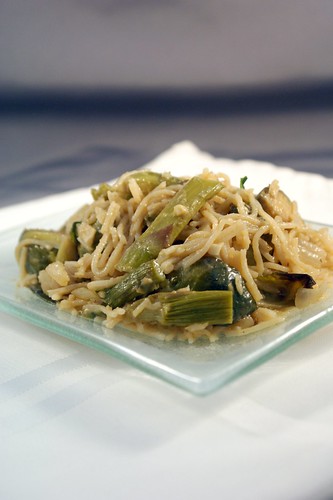
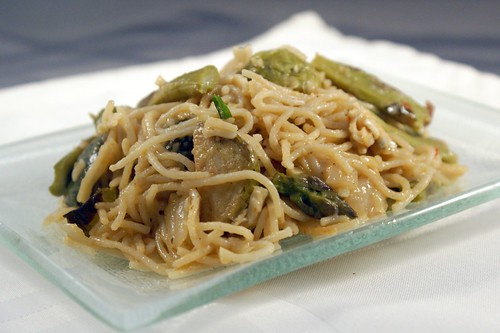
Who knows what possesses me to cook the things that I cook, but I thought the cheese would go beautifully in a pasta sauce. The creaminess added a wonderful, velvety texture, and the stinkiness added a beautiful dimension to the dish. I could definitely taste it, but it sat in the background and sang me a light tune. Husband came home and tried this pasta, and he of the not very sensitive taste buds concurred. He loved how the flavor came through, and he’s not even big into the stinky cheeses. Another thing I appreciated was that while this sauce is completely heavy on flavor, as you can see from the pictures, it’s not very saucy. There is no puddle of creamy liquid that’s dripped off the pasta to rest at the bottom of the plate. All the sauce is stuck firmly to the food, as it should be. In that sense, it doesn’t feel like a heavily sauced dish. But the flavor is so present, you don’t miss it. By all means, if you like a looser sauce, go ahead and add some cream or milk or chicken broth. Whatever your heart desires. My heart desired this sauce as is, and so did my taste buds.

Think you don’t like Brussels sprouts and asparagus? Ever tried roasting it? Brussels sprouts can be bitter, but roasting them for a long time under high heat with some balsamic vinegar brings out their hidden sugars and really makes them something special. I would highly recommend giving it a try. But if you’re not into it, any vegetable will do. You could throw in some artichoke hearts and peas, or broccoli would be delicious. I used whole wheat pasta, an angel hair.  You could use a regular fusilli.  That’s the great thing about cooking - just tweak it till you love it!


Pasta with Roasted Vegetables in Cambozola Sauce

Makes ~6-8 servings

½ lb. whole wheat pasta (I used angel hair)
1 ½ lb. Brussels sprouts, trimmed and quartered
½ lb. asparagus, trimmed
3 TB olive oil, divided
2 TB balsamic vinegar
2 pinches of salt
1 medium yellow onion, chopped
1 small shallot, chopped
5-6 cloves of garlic, minced
2 TB butter
2 TB flour
2 cups dry white wine
½ tsp crushed red pepper flakes
½ tsp ground black pepper
6 oz. cambozola cheese
¼ cup freshly grated parmesan cheese
1 TB fresh lemon juice (about half a lemon)
¼ cup fresh parsley, minced

  1. Preheat the oven to 400 degrees. In a roasting pan, toss the Brussels sprouts and asparagus with 2 TB of olive oil, the balsamic vinegar, and a pinch of salt. Roast the vegetable mixture in the oven for 25-30 minutes, until they are soft and have a nice golden brown color, tossing every about 10 minutes to ensure they brown evenly.
  2. Now would be a good time to get a large pot of water boiling for your pasta. The sauce only takes about 15 minutes, not counting the prep for the mise en place, so might want to wait until the vegetables have a good head start in the oven before starting.
  3. In a large sauté pan over medium heat, sauté the onion and shallot in the remaining 1 TB of olive oil and pinch of salt until they are softened, about 5 minutes. Add the garlic and cook for another minute. Add the black pepper and red pepper flakes, stir, and cook for one more minute.
  4. Now would be a good time to drop your pasta, if you haven’t done it yet.
  5. Clear a space in the pan and add the butter. When it has started to melt down, add the flour and mix them together to form a paste. Let the paste cook for a minute or two to get rid of the raw flour taste. Add the wine and bring the mixture to a simmer. Let the mixture cook until it has thickened and the wine has reduced by about half, about 3 minutes.
  6. Turn the heat down to low and add the cheeses, stirring until they are fully melted and incorporated into the sauce. Stir in the lemon juice, parsley, and roasted asparagus and Brussels sprouts. Stir in the cooked pasta drained straight from the pot, you can use a little of the starchy pasta water if you want to thin out the sauce at all.