Showing posts with label soap box. Show all posts

Sunday, January 30, 2011

Chocolate Covered Peanut Butter Bourbon Balls


This week’s soap box ramble will focus on shopping, and is brought to you by the letter $. Because you have to buy your food before you can cook it, right?

Facing a drastically lower income 10 months ago, I was forced to reexamine my food spending. I admit, prior to my layoff, I was spoiled. I shopped primarily at Jimbo’s out of loyalty and hoping my weekly spending would do it’s part toward keeping the only Whole Foods-like store in my area open. I loved their local, organic produce, their fresh, organic meats, their wide array of whole grain dried goods, and their minimally processed packaged food selection. I also shopped for convenience, valuing my time saved by shopping at just one or two stores a week, rather than hunting down the deals at several stores to save a few bucks. When suddenly faced with an excess of time and a deficit of money, old habits went out the window and I took the opportunity to pick up some new smart-shopper skills. I figure I can pass on a few tips I picked up while tightening the belt - not just how I saved a buck, but how I turned that into an opportunity for eating healthier foods. But first I want to preface this list by saying the very first step is to evaluate the value of your time vs. the money you could save with thriftier shopping. Obviously, if you really take the time to research the price of each product and each store to compare, are willing to hit up five or six grocery stores as opposed to just one or two, and basically able to spend hours a week being the thriftiest shopper you could be, you could save what ends up being oodles of money! But if you’re, say, juggling being a mom, working full time, and a flourishing social life, you’re probably less inclined to care if your bath tissue is 10 cents cheaper at the store across town. There’s nothing wrong with either scenario. The right thing for you is the right thing. Either way, here are some things I picked up along my miserly way that I intend to remember, no matter my food budget situation:

  • Learn all of the grocers in your neighborhood, not just the big names, and decide at which stores you are willing to shop - In my neighborhood I have Ralph’s, Vons, Albertsons, Stater Bros, Barons, Jimbo’s, Fresh and Easy, Trader Joe’s, Sprouts, Henry’s, and Costco. That’s too many stores, even for me, so I decided Stater Bros and Barons I was just going to ignore because they don’t offer anything particularly different from the others. Fresh and Easy isn’t actually open yet, so I have yet to evaluate it. Jimbo’s is out of my price range. Costco is a separate beast I’ll get to later. I treat Ralph’s, Vons, and Albertsons as one store (The Megamart, I dub thee). So that leaves Trader Joe’s, Sprouts, and Henry’s as my main stores (Love them!). 
  • Stop throwing away those weekly ad circulars - I used to curse the grocery stores clogging up my mail box with ads. It was such a waste, since I would throw them directly into the recycling, and I often wished for a way to opt out of having them sent. But they have become the highlight of my Monday evening. Pathetic, but true. First I check Sprouts and Henry’s. They often have similar foods on sale, but always slightly different, or one store will be slightly cheaper than the other. So I make a list of which store is carrying sale items I’m interested in. I made the mistake of not making a list in the beginning and often overpaid because I would forget the cheap apples were at Henry’s while shopping at Sprouts. Then I check The Megamart ads and pick out any extra special deals, whether $.77/lb chicken thighs at Vons, or $2 off Peet’s coffee at Ralph’s, whichever store has the deals I’m interested most in, and that’s which one I end up patronizing that week. It sounds like a big time commitment, but I actually peruse the ads while watching tv after dinner. I’m just sitting around anyway, right? 
  • Be flexible with your menu - One of the reasons I never bothered checking the ads before was because I didn't much care what was on sale. I knew what I wanted to make, and I was going to make it, sale or no. Now I plan my weekly menu around the ads. I’ll often turn to Husband and say “Cauliflower, eggplant, and zucchini is on sale. I’m thinking a vegetable lasagna with a side of roasted cauliflower, does that sound tasty?” Or usually it goes more like, “Broccoli is on sale again, and I already did roasted broccoli 3 weeks in a row. I’m thinking I’ll make a white bean, broccoli, cheddar soup to spice things up.” I admit that I totally plan my meals around what produce is on sale. Hey, it works for me! If you were planning to do pulled pork and chicken is on super sale, maybe you could substitute. 
  • Meat is expensive - And by meat I mean meat, poultry, and seafood. Especially seafood. I nice fillet of salmon hasn't been in my budget for a long time. But even when it’s just a couple of pounds of chicken thighs or some cheap ground beef, meat easily ends up making up half of the total cost on the receipt. If environmental and health reasons weren't enough to practice a meat-lite lifestyle, cost definitely is. I’m not suggesting conversion to vegetarianism or replacing your burger patty with a tofurky substitute. You know me better than that! I’m merely suggesting buying less. Eating less. And learning how to incorporate meat as a flavor rather than the main event of the plate. Remember, it’s not the only form of protein out there. 
  • Produce is cheap - I can buy two overflowing bags of produce for under $20. How much would the equal amount of meat set you back? Hundreds? The trick is to buy what’s in season and buy what’s on sale, though that usually means the same thing. When a crop is in season, the stores get an overflow and they sell it cheap to get rid of it before it spoils. So in summer it’s zucchini and berries, in fall it’s squash and apples, in winter it’s cruciferous vegetables (i.e. broccoli and cauliflower), etc. Some produce always costs more - asparagus, winter greens, persimmons, eggplant. Some produce is always reasonably priced - celery, carrots, onions, bananas, potatoes. But even the “expensive stuff” still only sets you back a few bucks. 
  • The bulk bins are your friend - Don’t fear the bulk bins! Sure, you’re forced to come up with your own air-tight packaging when you get it home, but it’s called $.99 tupperware, and it’s your friend. Dried beans, split peas, lentils, rice, quinoa, millet, almonds, pecans, peanuts, etc. These items are great because, aside from the nuts, which tend to be pricier (but worth it because you don’t typically use more than a cup or so at a time at most), they are dirt cheap and amazingly healthy. You can buy a pound of dried black beans for about a buck. That’s the equivalent of I don’t even know how many cans once they’re cooked. A ton! The trade-off is the time you take into account for soaking and cooking the beans (neither activity requires much active participation from you, it’s more a planning issue). Lentils and quinoa are two bulk bin items I’m never without because they are so fantastic in every way. They are high in protein and fiber, give you the satisfaction you get from eating carbs, but are still low in the glycemic index. They are very budget-friendly, cook up in about 20 minutes, and are very versatile for a number of varying applications. Win, win, win! My Megamart, tragically, doesn’t have bulk bins worth acknowledging, so that’s another reason to scope out the alternative markets in your area, if need be. 
  • Packaged foods often make you pay more for less - There’s two main points here. First, the more hands your food passes through before it gets to you, the less fresh it’s going to be, the more stuff they’re going to add to it to keep it a viable product, the more you have to pay to recoup those costs. You’re not only paying more, but you’re also eating all the preservatives and additives they add to the food to keep it shelf-worthy for all those years. Second, all the pretty packaging itself boosts the cost. That little 2 serving box of cous cous or quinoa is probably something you could get in the bulk bin for a fraction of the cost. 
  • Find the ethnic markets - Once every 2-3 months I have a list saved up of all the ingredients I need to stock up on at my local Asian market. It usually has some combination of soy sauce, rice wine, chili oil, sesame oil, seaweed, green tea, and brown rice. I can buy every one of those items at The Megamart, but for several times the cost, and without the option of selection. The soy sauce aisle at the Asian market? Dizzying. I still have it on my to-do list to find an Indian market in the hopes they have a vast and reasonably priced spice section. Sure, it’s a special trip where you’ll only pick up a few items, but that’s why you go just every once in a while. Treat it like a special occasion. 
  • Join Costco - You might say you don’t need a Costco membership, you’re fine without a 5lb jar or mayonnaise. I would agree, but there is a lot more to Costco than that nowadays. When it comes to certain items, pricing at Costco just can’t be beat. A bag of fresh frozen 4oz. mahi mahi fillets for $4.99/lb - pre-portioned, convenient, and actually very delicious! I go through vanilla extract like crazy, so the huge bottle is actually totally worth it, and it’s such a deal. It’s a great place to buy pantry staples - hot sauce, green chiles, tuna, diced tomatoes, tomato paste. Sure, you’ll take awhile to go through them, but it’s canned, it’ll keep. Their prices on dairy and meats is great, though you have to evaluate your consumption needs. I can’t drink 2 gallons of milk before it spoils, so I don’t bother. But I’ll pick up a whole pork loin, portion it into 1-2lb portions when I get it home, and freeze them for easy use later. And if you’re a booze hound like my, their prices on beer, wine, and hard liquor, if you can find what you want, can’t be beat. You might even be able to share your membership. When I joined in college they let Husband (who was then merely Boyfriend) join my account, even though we weren’t related or married, so we were able to split the cost of the membership. One section to stay away from, however, is the produce section. Their prices can be confusing because they post prices by the package, but if you look in the corner of the price tag you’ll see the price per pound, and it’s generally higher than even The Megamart. And since the quality of their produce tends to be more miss than hit for me, why pay more for it? 

I could go on, but I’m sure this glimpse into the inner-workings of my miserly mind is about as much as any person can take in one sitting. Basically, I try to stay on a varied and healthy diet, spending as little as I can. Husband often commends my efforts, saying he wouldn’t even know we’re on such a tight food budget because I keep him so well fed. It’s not without effort, but I consider it well worth it.


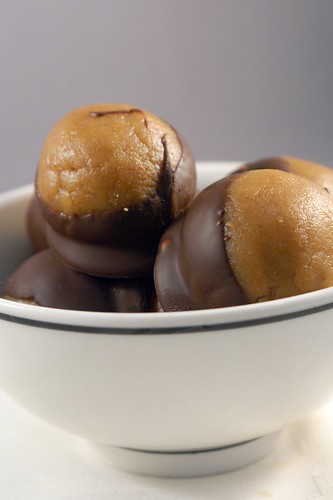
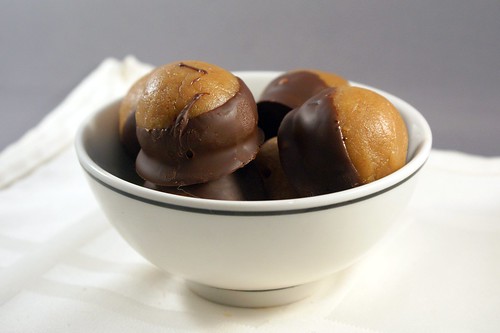
Now that we’ve shopped, let’s eat! These little bundles of joy combine three of my favorite flavors - chocolate, peanut butter, and bourbon. Each flavor really stands outs and brings its own personality to the party. The dark chocolate shell gives you that hit of rich cocoa right off the bat, and the bit of crunch is the perfect contrast to the soft, boozy, peanut buttery goodness in the middle. Oh the middle... I don’t know how to describe it, except to say that I really love the balance of ingredients. The cream cheese and graham crackers make it creamy yet substantive. I love the sweet yet salty compliment from the sugar, salt, and peanut butter. And the bourbon rounds everything out nicely, as bourbon always does. It really tastes like you’re eating a bourbon ball, but the peanut butter by no means plays second fiddle. It’s everything that makes Reese’s Peanut Butter Cups so great, but a thousand times tastier. No joke. The first time I made these was Halloween weekend - the one time of year Husband gets to eat his favorite store-bought candy. He actually jokingly chided me for ruining the moment for him, since compared to these peanut butter balls, the Reese’s just didn’t measure up. Sorry Husband. Next year I will steer clear of making these, so you can enjoy your Reese’s in peace.

Something tells me that’s not going to fly...

These make a great party dessert. Like, say, your Superbowl party next weekend. For instance. You can make them in advance, and they’ll even do better with a night in the fridge, where the flavors can introduce themselves to each other. They are easy to serve, whether plopped onto a plate or heaped in a bowl. They are finger-friendly, no utensils or plates needed, and I guarantee your friends will not be able to eat just one, so I doubt you’ll be dealing with leftovers. Plus, what is a better way to nosh during the second half than with chocolate, peanut butter, and bourbon?

These balls come together wonderfully fast and easy right up until it’s time to coat them in chocolate. I won’t lie, that part was tricky. A total pain in the butt, even. There were casualties. Some balls just weren’t destined to make it through the molten swamp of chocolate to reach their resting place of my tupperware container. Where some balls managed to keep it together, others were made of lesser stuff and fell apart. My heart went out to them. But worry not, it doesn’t mean the balls you will inevitably lose will be ruined. I called those little mishaps “happy accidents” and promptly ate them before Husband could see what a failure I was. The things I eat do for ego’s-sake! It does mean that if you plan on a specific number, you’ll definitely want to make some extra. The first few will be the baker’s treat, and once you get the hang of it, you’ll be fine.

Happy Accident!

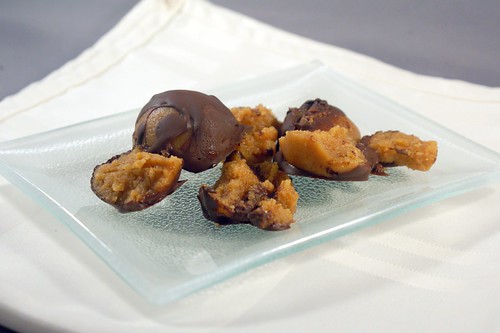
Besides my structural issues, I also struggled with what to call these. I couldn’t exactly walk around asking people if they wanted to try my balls, now could I? Chocolate covered pb bourbon balls is what they are. It’s descriptive. But it’s also cumbersome! See how I was too lazy to spell out peanut butter? The recipe I adapted these from were called buckeyes because they are reminiscent of the nuts that grow on the buckeye tree. Since I’m not familiar with buckeyes, and since I think that’s kind of lame, and since these have bourbon, and thus are way better, I think they deserve their own distinction. But they do kind of look like eyes, especially if you aim your skewer right through the center.

Chocolate covered peanut butter bourbon balls, you shall henceforth be known as Bourbon Blinders.

Is that stupid? It’s a little stupid. But don’t hate on my Blinders until you’ve tried one. Because then you won’t care what I call it, as long as you get to eat it. Mwhaha!

Are you planning any fun finger foods for the Superbowl next weekend? Have a better suggestion for what to call my balls? Any thrifty shopping tips my list is lacking? Send it all my way!


PS: I feel comfortable asking you to name my balls, knowing that I have just the edible kind at my disposal. Otherwise, I might be opening myself up for teasing. Thank goodness that’s not the case.

Bourbon Blinders
AKA: Chocolate Covered Peanut Butter Bourbon Balls
Adapted from Smitten Kitchen

makes about 2 dozen

1 oz. cream cheese (I used neufatel or lowfat), at room temperature
¾ cup smooth peanut butter
½ cup graham cracker crumbs
¼ tsp sea salt (or substitute kosher salt)
1 ½ cups powdered sugar
4 TB unsalted butter, melted
3 TB bourbon
1 tsp vanilla
8 oz. dark chocolate, chopped (I used 72% chocolate chips)

  1. In a stand mixer fitted with a paddle attachment, beat the cream cheese and peanut butter until they are well combined. Add the graham crackers and mix until combined. Add the butter, sugar, salt, bourbon, and vanilla and mix on low speed until the sugar is incorporated, then increase the speed to medium and mix until the mixture is uniform. 
  2. Line a sheet pan with parchment paper. Using a tablespoon or a 1TB scoop, shape the dough into balls and place them on the sheet pan, leaving enough space that they are not touching. Make sure you use some pressure to make them as dense as possible to avoid fall-aparts later. Place the sheet pan in the freezer for about 15 minutes so the balls will firm up. 
  3. Melt the chocolate in a double boiler. Using a toothpick or thin skewer (the thinner, the better), spear a ball and dip it in the chocolate, rolling it around so it is well coated, and place it back on the parchment. My method was inserting the toothpick into the side of the ball, dunking it in the chocolate at about a 45 degree angle, and swirling it one rotation, all the way around. The more quickly you work, the less time the ball will have to fall apart in the molten chocolate. 
  4. Repeat with the remaining balls, then chill them in the refrigerator to set up, about 30 minutes.

Friday, January 14, 2011

Roasted Vegetable Winter Soup


Last post I promised a healthy soup to help shed those extra pounds we tend to get as a result of all that sticky toffee pudding, gingerbread, and eggnog around the holidays, and I am quite the deliverer, if I do say so myself. And I do!

I gullibly keep recording shows on the Food Network promising healthy and light meals, excited that it’s finally the time of year when those celebrity chefs might just be cooking something I’d like to try. Then they pull out the lite mayo or top a plain, grilled chicken breast with cheese and pepperoni and call it pizza (and healthy pizza no less!), and I stop and delete the episode. Healthy does not mean diet! Diet food is flavorless, rubbery chicken with microwaved broccoli. Diet food is a punishment to teach yourself not to be such a pig the next holiday season. Diet food is stupid. Healthy eating is about thinking outside the deep fryer box and finding ways to prepare fresh foods in flavorful ways that make us want to eat them. It’s about shifting your habits to eat a different way. Instead of trying to take an unhealthy dish and removing everything that makes it taste good, just eat something that’s healthy to begin with. No brainer, right?

I learned early in my healthy eating transition that I like to eat. Actually, I love to eat. Sure, I’ve lessened my portions, but I used to eat on par with Husband and his roommates in college. I am not a 6’2” male, but I sure liked to eat like one. I still eat plenty because I knew for this to work, I had to let myself eat. Then I found vegetables. They’re such wonderful things. So full of flavor and texture and every good thing. There’s a reason that Weight Watchers puts vegetables at zero points, and that would be how totally nutrient rich are for being so low in calories. As Rachel Ray likes to say - if you eat healthy, you can eat more. A sentiment I always identified with. Just remember that eating too much stretches your stomach, which is a recipe for disaster later. Eat until you’re satisfied, not waddling. Be reasonable. 

One way I like to fill up my tummy without filling up my calorie bank is soup. Broth-based soups feel substantial because of their high water content, but still add a great amount of flavor. Toss in a healthy dose of vegetables and some form of lean protein and/or whole grains, and you’ve got yourself a meal you can sink a spoon into.


I love soup. I have always loved soup. It’s a love affair that started with my grandmother. She made a mean soup, and growing up a picky eater, I was always happy to go to her house knowing there would be a large pot of soup that had been sitting on the stove slow cooking all day and brimming with vegetables, barley, lentils, and meat (though I ate around that part). Her theory was that I just didn’t like to chew. I think I just like the infinite blend of flavors and the comforting feeling it brings. Warm liquids bring me joy. I love my sludgy coffee in the morning, my steamy afternoon tea, and a silky bowl of soup for dinner. I had a friend in college who didn’t like warm liquids of any kind. We no longer keep in touch.

I’m actually surprised I haven’t posted twenty soup recipes by now, but I guess they’re usually so flung together that I don’t really have a recipe prepared, or sometimes they’re so simple I would feel silly posting it.

If you couldn't tell already, I might be a little obsessed with vegetables. I never feel like I eat enough of them, even though probably 75% of my diet is vegetables (if we don’t count breakfast because I eat zero for breakfast, and if we’re counting breakfast the percentage drops to like 45% because even if I ate nothing but vegetables for lunch and dinner, the most it could be is 66%, so let’s just not count it, m’kay?). I have this little trick with soups. It helps me with portion control and it’s a good way to get a few more leafy greens in my diet. Because I’m seriously lacking in that department, right? I’m talking about spinach. I line my soup bowl with a good helping of fresh baby spinach leaves (I always have some on hand from Trader Joe’s, they have those handy resealable bags), more if it’s a veggie-lite soup, less if it’s veggie-heavy. Then I add the soup until my piggy eyes see it reach the rim of the bowl. This is where it helps with the portion control. The fresh spinach takes up a lot of room in the bowl, so even though I can’t stop myself from filling the bowl, it’s not really full. Of soup anyway. Aw, what a trickster I am! After a few minutes in the microwave the soup is hot and the spinach is wilted, and magically (good ol’ water evaporation!) the level of soup in the bowl is no longer threatening to spill over the sides. It’s ok to be a piggy if you recognize it and trick yourself from letting it impede your health, right? Right. Plus, spinach is delicious and is always a yummy addition to whatever soup I’m enjoying, such as this roasted vegetable soup I made recently.

I am a master of the segue.
This soup was just a happy accident, brought together - like the plot of many a good novel - by a random string of circumstances. Zucchini and eggplant were on sale (seriously, how crazy has the zucchini crop been this year?). I had fresh thyme leftover from my Thanksgiving splurge. I happened to be drinking white wine that night. I wanted the soup creamier without using cream. But here’s the kicker - I was freezing my booty off and I wanted an excuse to turn on the oven. I may be too poor (err, cheap) to heat my house properly, but it encouraged me to roast my veggies before throwing them into the soup, and man did it make this one of the better soups I’ve ever made. 

Husband gobbled it all up in record time, and he's not even a soup person!  We no longer keep in touch.  

Roasting the vegetables caramelized the sugars, making the soup sweeter, richer, and more complex. Love it! And apparently eggplant pureed in soup is like liquid silk, it adds a lovely texture. Who knew?  The evaporated milk thickened the soup beautifully without all that pesky fat. I just need to be mindful that it’s concentrated milk, so 1 cup of evaporated milk is still a hefty amount of calories compared to a cup of milk. But a little goes a long way, so it's all good. Definitely a trick I'm going to remember.  Oh, and did I mention this soup is pretty darn quick? Definitely doable for a weeknight meal. Only about 30 minutes of total cook time, and since I used the broiler setting on the oven, I didn’t even have to wait forever for it to heat up. Win!

So to sum up the awesomeness of this soup, let’s count the ways:
  1. Healthy - fresh vegetables, stock, and lowfat milk 
  2. Fast - 45 minutes tops, depending on how long it takes you to chop
  3. Easy - mostly just chop, dump, or stir
  4. Delicious - eggplant = silky 
  5. Comforting - it’s cold everywhere right now 
  6. Why are you still reading this? Go make this soup! 

What healthy foods are you cooking up to stay warm?  Will you be bringing home your own bag of spinach from Trader Joe's?


Roasted Vegetable Winter Soup 

4 medium zucchini, roughly chopped
2 small eggplant, roughly chopped
2 medium onions, roughly sliced
5-6 cloves of garlic, minced
1 TB fresh thyme, minced
2 cups dry white wine
1 cup chicken broth (or vegetable broth)
1 12oz. can evaporated milk (I used 2%)
2 TB white wine vinegar
olive oil
salt and pepper

  1. Turn the oven on to broil (500 degrees). In a large roasting pan, toss the zucchini, eggplant, and onions with about 2 TB of olive oil, a pinch of salt, and a pinch of pepper. Roast the vegetables until they are soft and nicely browned, tossing every 5-7 minutes so they cook evenly. This will take about 20 minutes total. 
  2. When the vegetables are out of the oven heat 2 TB of olive oil in a dutch oven or soup pot over medium heat. Add the garlic and cook for a minute or two until it is softened and fragrant. Add the thyme and cook for another minute. Add the wine and bring the mixture to a simmer. Cook until it is reduced by half, then add the chicken broth and roasted vegetables. Bring the mixture back to a boil and simmer for about 10 minutes, until everything is softened and incorporated. 
  3. Turn off the heat and let the soup cool down a bit. Once cooled, puree with an immersion blender (or regular blender or food processor). Add the evaporated milk, as much as you prefer. I added the whole can for optimal creaminess, but a few tablespoons would have been plenty. Then add vinegar, and salt and pepper to taste.


Edit for SoupaPalooza 2012: Come join SoupaPalooza at TidyMom and Dine and Dish sponsored by KitchenAid, Red Star Yeast and Le Creuset

Monday, August 16, 2010

In Which I Say Naked A Lot


Recipe below: Grilled Corn Chowder

Well, fellow eaters, I am still on my exercise kick, so skip down past the next picture if you don’t want to read my latest soliloquy because either way, you are going to want to hear about this soup. The problem with discussing exercise is keeping it short, as there’s just so much to say! But I’ll attempt to rein myself in by keeping to one very specific topic. Equipment.

In my opinion there is only one piece of exercise equipment you absolutely need - a heart monitor. Whether you do swimming, running, walking, biking, cardio kick-boxing, or even weight lifting, the point of exercise is to get your heart rate up. That’s how you increase your fitness level. A higher heart rate means your heart is working harder to pump that blood through your system, making it stronger, and burning oodles of calories in the process. Monitoring my heart rate means I can ensure I am not over-doing or under-doing my workout (and it is so easy to do both!).

The way it works is a heart monitor comes with 2 pieces - a transmitter and a receiver. As I’ve seen them, the transmitter is a band that goes around your chest, just under the she-boob or he-boob, as the case may be (or as close to your heart as possible). It has these nifty sensors that can measure your heart rate pretty darn accurately when placed against your skin. The receiver is a wrist watch that displays your heart rate, and depending on the product you get, generally has a ton of other features. Mine has settings for my age, height, weight, and target heart rate, and uses this information in conjunction with my heart rate to display how many calories I’ve burned. And obviously, most can double as a real watch as well.

What should your target heart rate be? If you take a look at the cardio equipment at the gym, some machines will display a small graph with a descending line, comparing heart rate with age. That’s the really high level answer. The most basic formula is to subtract your age from the number 220 to give you your maximum heart rate. So as I’m 28, my maximum heart rate is 192. That means if I let my heart rate get that high, I am a moron who probably will seriously hurt myself. But don’t worry; I would probably pass out before it got that high anyway. Your target heart rate is all about the percentage of your maximum heart rate. And the percent you choose is based on how hard of a workout you’re looking for. 50-60% is a good place for beginners, and people looking for serious cardio health generally shoot for 70% or higher. I found this article to be a good, short summary of this information, and that website can be a great resource for more fitness information. Though it can be a bit intimidating, since it’s geared more to serious athletes that make me look like a lazy bum.

I’ve become so dependent on my heart monitor, I feel absolutely naked working out without it! But you might decide they’re not for you, and that’s okay too. There are other, far less accurate, but perfectly acceptable methods to give you an idea of how hard your heart is working. There’s the conversation method for one (or “talk test”). Do you ever come across a pair of women who are briskly walking and carrying on a full conversation? They are most likely not exercising in the aerobic zone. When your heart rate is in the aerobic zone, generally you can carry on light conversation, so short answers, not full sentences, and not easily. If your heart rate is too high, it’s uncomfortable to say more than one word before taking a breath. And, again, if you can carry on a full conversation without any trouble, your heart rate isn’t high enough.  And of course, that's not to say that going for a light walk with some pals isn't a perfectly acceptable form of exercise.  Something is always better than nothing.  But don't go eat a big burger and fries for dinner right after, thinking you've "earned it."  Be reasonable!  Another method is the perceived effort test, which I don't fully understand.  Basically, you figure, on a scale from 1-10 (or whatever scale you want), if 1 is no exertion and 10 is I'm gonna die if I don't stop, how hard do you perceive your current effort to be?  I think it sounds weird and subjective, but hey, it's all about what works for you.

If you’re interested in reading more than you ever wanted to know about how heart rates are calculated, check out this article. That website is another great resource for people looking to learn more about fitness and general health.

I’ll wrap it up by quickly mentioning that heart rate monitors completely vary both in price and features. You can get fancy ones that compile data from all your workouts that you can upload to your computer and make big nerdy graphs with, or you can get basic ones that do little more than display your current heart rate and the time. Unfortunately, even the basic monitors are on the pricey side. While the higher end models will easily cost you hundreds of dollars, there are several good options out there in the $60-$100 range. So they’re doable. I use my heart monitor every time I exercise, so I’ve definitely gotten my money’s worth! The one I use is a few years old now, but it’s pretty similar to this model from Polar.

Have you ever used a heart monitor and did you find it useful? Do you tend to over-work or under-work your love organ when you work out?

I meant your heart, what were you thinking of?


My greatest blog supporter sent me a message yesterday with a link to this article and mentioned it would be a good idea to make reference to some of the health benefits of the delicious, whole foods I’m always yapping on about. What a concept! You’ve probably seen the term “superfood” listed in hundreds of health articles. It’s quite the buzzword at the moment. But it’s a good buzzword! Eating a diet rich in whole foods instead of processed foods means you’re not just eating less calories and cutting out things your body doesn’t need, like preservatives, it also means you’re getting all the vitamins, minerals, and other compounds found in whole foods that are destroyed during processing. The general idea I would take from this list is that it’s important to eat a healthy variety of nuts, beans, lean proteins, and as many colorful fruits and vegetables as you can stomach. Hit up all the food groups, and don’t forget that herbs and spices come from Mother Earth too! Your well-harnessed radicals will thank you.

I will say it was a very timely message, since allllll the way at the bottom of that list is corn. And corn just so happens to be what I’m touting today! It apparently protects against UV damage. As someone as pale as a ghost and susceptible to sunburns faster than Husband can inhale a blueberry muffin, the antioxidants found in corn are for me! 

[And thank you, friend, for providing me a somewhat more graceful segue into today's recipe.  Trying to get from heart monitors to corn was really throwing me for a loop!]

So, it’s corn season! A fact that in past years wouldn’t have excited me in the least. I was just never a corn person. Then one day on a hot July afternoon, Husband grilled some corn, and it’s been a love affair I’ve been relishing ever since. Amazing how that grill, to borrow a phrase, makes my skirt fly up, it’nd it?

Now I’m sure most people have had grilled corn. Go to any place they’re grilling meat, and you’ll see naked ears thrown down and slathered in a ton of butter. That’s not the grilled corn I’m talking about. Oh-ho no. This grilled corn is fat-free. No joke! See, I leave the husks on. When I buy corn at the store I always see a gaggle of people standing around the corn bin, husking their corn and shoving the naked ears into plastic bags. It’s tragic! Corn deserves some dignity, people! By grilling the corn in the husk, the husk dries out over the open flame and gives off this amazing corn aroma that infuses into the kernel. Also, the corn can fully cook without burning because it cooks most of the way through in the husk, where the open flame can’t get it. Then I remove the husks and let the naked corn do its delicious caramelization thing, and voila! Perfectly cooked, sweet corn, plumped and browned kernels, and all with a totally punched up flavor.

You’ll never husk your corn at the store again. Admit it.

Since this amazing discovery - which I hate to admit is, once again, all Husband’s own genius. Darn him. - I have been grilling corn left and right. Grilled corn and edamame miso salad. Grilled corn pesto (this one is in the posting queue as well...*droooool*). And this here grilled corn chowder. I had been ogling corn chowders all summer, and with all the ingredients needed conveniently located in my kitchen, how could I say no?

This chowder was silky. It was sweet, it was spicy enough to make it interesting without making it hot, and it was creamy without being heavy. In a summer chowder it is imperative to be creamy but not heavy. Not only are soups leaden with cream, cheese, and butter generally pretty unhealthy, but they are just about the most unappetizing thing to eat on a hot summer day. So here’s my trick for getting a silky texture in a pureed soup sans dairy - roasted cauliflower. It lends a delicate sweetness that blends seamlessly with any soup, and has a thick, creamy texture that can rival cream without weighing it down. It is my secret weapon! That said, this recipe does actually have a small about of cream and milk. Quite honestly, I added them because I had tiny amounts of each in the fridge and just wanted somewhere to dump them before they spoiled. I think I would keep the milk in, but next time I would nix the cream. It was seriously not needed, and even a little too heavy for my taste. I left them in the recipe, though, because I know most people probably like creamier soups than I do. I’ve been off heavy foods for so long, I’m just uber-sensitive. Heck, you could even add more. Isn’t cooking to your liking, after all, what makes home cooking great?

I’ll also add that I used sherry in this recipe over white wine only because I was too lazy to go open a new bottle of wine when I had an open bottle of sherry sitting right next to me on the counter. All decisions are not taste inspired. I admit it openly! I also added the celery salt because I had just bought it on super clearance at the store and I wanted to try it. Yep, I’ll just air all my dirty laundry here today. But really, I think they both worked in the recipe. If you don’t have celery salt and an open bottle of white wine...well I think you know what to do. As for the rest of the herbs and spices that made this soup what it is...I used the Julie method - pull out the spice drawer in the pantry and just grab what sounds good! They did exactly what I wanted them to, which is add a complexity to the dish without overpowering the star - the corn. So many chowders just rely on the fat from the cream and the sugar from the corn to provide all the flavor. That’s boring! Punching up flavor without adding calories is what good healthy cooking is all about. 

The best thing about this soup was, of course, the corn!  And it was everywhere in this soup because I used every bit of it!  Once I had removed the cooked kernels from the cob, I simmered the empty cobs in the broth.  That's right, no weak corn flavor here!  This way I was able to keep the corn kernels whole and still get the rest of the soup infused with corn flavor.  This soup was sweet but not sugary, rich but not heavy, and rustic but not unsophisticated.  Definitely a permanent addition to my summer soup repertoire!  Take this recipe and make it your own.  Just make sure you grill the corn, you won't regret it!


Grilled Corn Chowder

makes about 8 servings

4 ears of corn (in their husks!)
2 TB olive oil, divided
1 tsp salt, divided
1 large onion, chopped
2 medium shallots, finely chopped
5 cloves garlic, minced
2 jalapenos, seeded and minced
1 large russet potato, diced
1 small head cauliflower, roughly chopped
1/2 tsp ground black pepper
1 1/2 tsp sweet paprika
1 tsp ground coriander
1/2 tsp celery salt (optional)
1/4 tsp cayenne (or more to taste)
2 tsp dried oregano
1 tsp dried tarragon
1/2 tsp cumin
2 cups dry sherry (or white wine)
4-5 cups chicken broth
1/4 cup heavy cream (optional)
1/2 cup whole milk
1/2 cup cilantro, finely chopped

To grill the corn:
  1. Over medium heat, place the corn (in their husks!) on the grill, directly over the heat. Turn the corn every 2-3 minutes, when the husks begin to blacken. The silk or ends of the husks might catch fire as they dry out. I think this adds an amazing smoky flavor to the corn, but if you’re scared (chicken!), just make sure to trim those bits off before you put them on the grill. [Practice proper safety! Always use long tongs when handling the corn, and keep your digits away from the flame.] 
  2. When the husks are good and charred and the kernels are mostly cooked, remove the corn from the grill and place it in a pan or bowl you have standing by until it cools down a bit. Carefully peel back and remove the husks, watching out for any trapped hot steam. Place the naked ears (teehee!) back on the grill and turn every 1-2 minutes, or until as many kernels as possible have browned and caramelized. Brown = sweet flavor! 
  3. Remove the corn from the grill, and when it is cool enough to handle, cut the kernels from the cob. Scrape the back of your knife along the cob to really get all the creamy corn bits out of there. Set the kernels aside, and reserve the empty cobs as well (don’t throw them away!). 
To make the soup:
  1. In a dutch oven or soup pot over medium heat, sauté the onion and shallots in 1 TB of olive oil and 1 tsp of salt until they are soft and starting to brown, about 10 minutes. Add the garlic and jalapeno and cook another 3 minutes, until softened. Add the potato and cook until starting to soften, about 5 minutes. Add the remaining tsp of the salt, pepper, paprika, coriander, celery salt, cayenne, oregano, tarragon, and cumin, stir to coat the vegetables, and let it cook for about a minute, until the spices release their fragrant oils. 
  2. Increase the heat to high and deglaze the pot with the sherry, making sure to scrape up any flavor bits from the bottom. Bring the sherry to a simmer and let it reduce by half, about 1 cup of liquid. Add the chicken broth, and when it has come to a boil add the reserved empty corn ears. Reduce the heat to low, cover the pot and simmer for at least 30 minutes. The longer you let it simmer, the more flavor the soup will have. I would shoot for an hour if you have the time.
  3. While the soup is simmering, preheat the oven to 425 degrees. Spread the chopped cauliflower in a single layer in a roasting pan, and toss with the remaining TB of olive oil. Roast in the oven for about 20-25 minutes, or until the cauliflower is soft and starting to brown around the edges.  Check on it about 10 minutes in and give it a good stir so it browns evenly.
  4. When the soup is simmered to your satisfaction, remove the pot from the heat and let it cool down a little. Remove and discard the ears of corn, and stir in the roasted cauliflower. When it is cool enough, puree the soup using an immersion blender, blender, or food processor. 
  5. Place the soup back over medium-low heat. Add the reserved corn kernels, cream, and milk. Bring the soup to a bare simmer and let it cook for 10 minutes or so, just to let all the flavors come together. 
  6. Stir in the chopped cilantro at the very end and serve. 

Wednesday, August 4, 2010

Life is Liiiiike a Batch of Cupcakes


Recipe below: Strawberry Margarita Surprise Cupcakes

A healthy diet is all about balance. I’m a firm believer in working all the things you love into your life. Let’s be realistic. If you deny yourself something you truly love, how long are you going to be able to do it? And how happy are you going to be? And if you’re unhappy, what’s the point? Better to just figure out a way to work it in and be done with it. We’re not looking for temporary crash dieting here!

If we lived in a perfect world and could eat whatever we wanted with no repercussions, what foods would you ecstatically chow down on that you wouldn’t in this cruel, real world we live in? Me? It’s dessert! Ok technically, that’s not so much a food as a course, but how can you narrow down dessert? It’s one thing to justify high calorie foods that are also high in nutrients, but as much as I love them, desserts tend to be empty calories of processed flour and sugar. But I don’t care! I love to bake, and I love sweets after dinner. So I just find a way to work it in.

A friend asked me, after I told her about these cupcakes I’m about to drone on and on about, how I’m able to eat such things and stay so skinny. I told her I exercise a lot. And I do. But don’t just dismiss it! Getting fit really does just boil down to calories in and calories out. That’s boring, I know, but it’s true. Does that mean you have to meticulously count each calorie you eat and painstakingly track each calorie you burn everyday? Heck no! I mean, you can...but, ick! It’s all about finding what works for you. What’s really important is having a general understanding of what’s going in, and what’s coming out burning off. Some people like keeping a food journal. As much as I love documenting what I eat (via this here bloggy blog), I hate keeping a food journal. Go figure! There are websites to track and calculate exact calories in your meals, but that’s another post. The main idea is to have an idea of how many calories you’re consuming each day. I’m just talking in the general sense, here. Like, you ate a 1/2lb hamburger topped with a hot link and a side of fries vs. you ate a salad with grilled chicken on top.  But all that is another post because today I want to talk about exercise.

Anyone still here? Oh, I think I see someone in the back! You’ll be so glad you stayed.

A lot of us, including myself until very recently, have forgotten how important it is to move around! With everything at our fingertips, we’re lifeless blobs! Convenience is on its way to being a sin, and I’ve already embraced gluttony, so it’s off the table because I think we're only allowed one. Of course, one woman’s sin is another woman’s motivation! See, I love to eat. I don’t just love food (and oh do I ever love food...), I love the act of eating. I chew ridiculous amounts of gum between meals, just to keep my mouth busy...

[insert dirty joke here]

And since I love to eat ever so much, if I want to keep my trim figure up, I’ve got to run, run, run! The hardest part about starting an exercise routine is that starting part. The key here is routine, as in something you do more than once, regularly even! It's easy to try something once or twice, but really sticking with a regular exercise program is by far the hardest part about getting in shape, I think. The good news is, once you commit and keep it up, it becomes a part of your life, and thus, it becomes easier.  There is a light at the end of the tunnel!  It doesn't matter what you do, as long as you’re moving around. Though it does make sense to pick an activity you actually enjoy. Now don’t cop out on me people! I will maintain that anyone can find some activity they can do regularly they don’t completely hate. If you belong to a gym you never go to, chances are the gym maybe isn’t your thing. Try saving some money and finding other modes of movement! I didn’t know until I tried that I actually just preferred walking (and eventually running) around my neighborhood. Have a Wii? Try one of the many fitness games they have (and email me if you want some reviews). Try hiking somewhere scenic in your area, or a lake or forest or the beach! There’s always sports like tennis, basketball, or soccer, but since they require a friend, it’s best to find a lone activity for the everyday. The point is, move around, and do it several times a week. You don’t have to devote hours and hours to every workout. My motto is something is better than nothing. I know everybody’s daily lives are hectic and...well...packed!  It’s hard to imagine working more into your day, but trust me, it's all about baby steps. Once you work in 10 minutes, before you know it, you’ll find yourself extending it to 15. That’s how I started and look at me now! I learned to make exercising a priority in my routine and just...worked it in!  A little bit at a time.

And just one more quick rant: don't cop out on yourself!  Don't be one of those people that tries exercising once, doesn't see results, and then gives up.  It takes time, and you know it.  Don't be one of those people that chooses an activity that doesn't raise their heart rate above what it would take to get off the couch and go to the bathroom.  Exercising burns calories because your heart rate is raised.  Higher heart rate = more calories burned.  And this isn't really wrong, I just think it's silly: don't drive the two blocks to the gym (a ten minute walk, tops), and then walk on a treadmill once you get there!  There are a thousand and one excuses to not work out, and all they do is help you justify skipping something you aren't excited to do.  In the end, it's just a cop out.  Save the excuses.  You're in charge of yourself, and it's far better to just be honest with yourself.  If you don't want to exercise, then don't!  But no cake for you!


Ok, enough about exercise. Let’s talk dessert! I know they’re disgustingly trendy right now, but I’m kind of into cupcakes lately. They’re just so pleasantly pre-proportioned! And cake is so fluffy and sweet! And frosting! I love frosting. I could eat it by the spoonful. And when I say "could", I of course mean I totally have.  When I fill a pastry bag with frosting, I’m tempted to just squeeze it right into my gullet. Just tempted, haven't actually done that one...yet.  And by pastry bag, I mean a ziplock with the bottom corner cut off.  We're fancy at Chez Julie.

And now that my latest deep, dark secrets are out in the open, let’s talk about these cupcakes! They were awesome! The cake was light and fluffy, moist and delicious. It’s the buttermilk. Buttermilk does magical things with baked goods. And full of fruit! You’ll notice from the picture below that my strawberries sank to the bottom, which doesn’t so much matter to the overall flavor, but doesn’t make for such a pretty pic. It’s all about presentation! But fear not, I have a trick! By tossing the strawberries with a little flour, the theory is they stay properly suspended. I had to guess at how much flour to use, since obviously I'm coming up with it after the fact, so more flour might be necessary.  I've heard about this trick many times in the past, but I've never tried it, so you'll be like my guinea pigs!  Naw, it'll work.  If you're worried, you could always puree the strawberries first and just fold them into the batter, but I liked the burst of fresh berry goodness.

Mere cupcakes with frosting are not enough to fully excite me. Oh no. Not anymore.  I need to fill them. Because really, these are margarita cupcakes. Sure, there’s lime in the cupcakes, and lime in the frosting, but it’s just a hint. My cupcakes need that sour bite!  My lime needs to shine! By filling the center with lime curd, it gives the cupcakes a bright burst of citrus flavor. Delicious flavor! I love filling cupcakes. It’s a great way to sneak in another layer of flavor, and you never see it coming!  It's a surprise inside every cupcake.  They should change the saying to "Life is liiiiike a batch of cupcakes..."  See, those crazy post titles explain themselves eventually.

And who doesn’t love lime curd? Ok, probably plenty of people...but they don't exist to me.  Ever made your own citrus curd? It sounds intimidating, doesn't it? It’s actually super easy to make, as long as you keep one thing in mind: don’t leave the stove! It’s easy, but it’s also kind of a pain, unless you want scrambled eggs. But it’s only for a little while, and it only requires you to stir. Buck up and push through!

[Full disclosure: tequila doesn't come through very strong in baked goods.  In future batches, I'm still going to use it, and I still liked it in there.  Just don't expect a punch in the face like you can get with a stronger alcohol, like bourbon.  And if you're really in need of booze with only a little tequila left in the pantry, maybe just leave it out and drink a shot instead.]

This was my first time attempting swiss meringue buttercream, and not only was it a resounding success, it made a believer out of me. It’s light as a cloud and oh so delicate! The strawberry jam adds a refreshing flavor, and it’s nice and light to go with the texture. And delicate.  Just note these cupcakes don’t keep quite as well as a regular buttercream because the meringue hardens a bit in the fridge. But they still stay tasty!  And delicate!  And light!  It's like the strawberry frosting flavor is delivered to your mouth and you just have no idea how it got there.

These cupcakes really came together beautifully. The overall lightness of textures went really great with the more delicate and bright flavors of the fruit. Since it won’t weigh you down, it’s a great sweet treat on a hot summer day! This is a cupcake I will always make room for in my daily calorie bank!


Strawberry Margarita Surprise Cupcakes
(aka: strawberry lime tequila cupcakes with lime curd filling and a strawberry lime tequila swiss meringue buttercream...got that?)
cupcakes adapted from Annie’s Eats
buttercream adapted from Martha Stewart

Makes about 18 cupcakes

For the cupcakes:
2 1/2 cups cake flour
1 tsp baking soda
generous 1/4 tsp kosher salt
1/2 cup (1 stick) unsalted butter, room temperature
1 1/2 cups sugar
2 eggs, room temperature
1/3 cup buttermilk
1/4 cup canola oil
1 tsp vanilla extract
3 TB tequila
1 TB lime zest
2 cups fresh strawberries, chopped into bite-sized pieces
1/4 cup AP flour

  1. Preheat your oven to 350 degrees and line the muffin tins with paper cupcake liners.
  2. In a stand mixer, cream the butter and sugar until pale and fluffy. Add the eggs, one at a time until incorporated, then add the buttermilk, oil, vanilla, and tequila and mix until fully combined.
  3. Sift the cake flour, baking soda, and salt together and stir into the batter until just combined.
  4. In a separate bowl, toss the strawberries with the AP flour and lime zest. Add more flour if it’s not enough to coat the whole batch. Gently fold the strawberries into the batter.
  5. Fill the cupcake liners with the batter, leaving about a 1/2 inch from the top. Bake for 18-20 minutes, or until a cake tester (i.e. toothpick) comes out clean. Cool completely.


For the lime curd:
3 large egg yolks
1/4 cup sugar
1/4 cup fresh lime juice
4 TB unsalted butter, melted

In a small saucepan whisk together the egg yolks, sugar, lime juice, and butter and cook over moderately low heat. Taste the mixture (if you’re comfortable with the raw egg, which I know many people smarter than I are not) and add more sugar if it’s not sweet enough (I don't like it too sweet). Stir constantly until the mixture is thick enough to coat the back of a spoon, about 5 to 7 minutes (that means when you run your finger along the coating on the back of the spoon, it should leave a line rather than running back together). Be sure not to let it boil or sit long enough to curdle. Strain curd through a fine mesh strainer and set aside to cool.

For the buttercream:
1 pound fresh strawberries, finely chopped
1 cup sugar, divided
1/4 cup tequila
1/4 tsp salt
1 TB lime juice
1 tsp lime zest
2 large egg whites
3/4 cup (1 1/2 sticks) unsalted butter, room temperature, cut into pieces
1/2 tsp vanilla extract

(makes about 2 cups)


  1. Set a small pot over medium heat. Add the strawberries, 1/2 cup of sugar, tequila, salt, lime juice, and lime zest and simmer gently until a thickened syrup forms, about 15 minutes. Set aside to cool completely.  Once cooled, you can either puree the mixture or leave it in chunks.  I left mine chunky.
  2. Set a bowl over a pot of gently simmering water. Add the egg whites and the remaining 1/2 cup of sugar and whisk constantly over the heat until the sugar is fully dissolved and the mixture is warm when you stick your finger in it (about 160 degrees).
  3. Pour the egg mixture into the bowl of a stand mixer and using the whisk attachment, beat on high speed until stiff peaks form (not too dry though). Test this by removing the whisk attachment, swirling it around the mixture, and pulling it straight up and turning it rightside-up to face you. If they are properly whipped up, a small droopy peak should stick up on the very tip of the whisk.
  4. Switch to the paddle attachment on the stand mixer, and beat the butter into the egg mixture on a medium-low speed, a few tablespoons at a time. Make sure the butter is fully incorporated before adding the next batch. If mixture separates after all the butter is mixed in, beat at a medium-high speed for a few minutes until it comes back together. Add the vanilla, beating it at medium-low speed, then turn the speed all the way down to low and mix for a couple of minutes to remove any extra air.
  5. Gently fold in the strawberry jam mixture with a rubber spatula and stir until the buttercream is smooth.

Note: Feel free to use store-bought strawberry jam instead of basically making your own, and just cook it on the stove with the other ingredients for a few minutes until it comes together.

To assemble the cupcakes:

  1. Using a pairing knife inserted at an angle, cut out a small cone-shaped chunk, about a 1 inch circle from the top of each cupcake. Fill the hole with the lime curd, about 1 teaspoon worth. You can either replace the chunk you removed, or eat it! leave it off.
  2. Fill a pastry bag (or ziplock with the bottom corner cut off) with the frosting and go to town on your cupcakes. Or, you know, just use a spatula.

Monday, June 28, 2010

Cinnfully Delicious

Recipe below: Tipsy de Leche Cheesecake Squares

The last P is here! Were you dying in anticipation? I know you were. Even though I already told you it was practicality, and even though that’s pretty darn self explanatory. That said, let me explain to you all about it!

All those instances in the two previous posts where I mentioned being reasonable? That’s where the practicality comes in. Use your judgement! Whatever I tell you, whatever anyone else tells you, it should make sense. Starving Cleansing myself with some nasty lemonade pepper mixture for a week obviously isn’t healthy. Reverting to our hunter/gatherer roots and cutting out all foods that depend on “modern” agriculture is...well probably fine, but weird, and must be a total pain. No wheat! And cutting out entire food groups (i.e. super low-fat, super low-carb), or depending on outside companies to feed you is not a realistic long term solution. What happens when you’re fed up with your diet? You haven’t built any new habits, so you’ll go right back to your old ones. If it doesn’t sound healthy, don’t do it. If it’s a temporary solution, it won’t be a permanent solution, so why do it?

I also thought of some more Ps that have been important to my weight loss.  It's a coincidence, I swear. Patience and persistence. If you’re being healthy, it’s not going to be fast. You’re going to have good days and bad days. It’s all about sticking with it. It’s not about making numbers move on a scale, it’s about feeling good! Change is hard, in any aspect of life. Have the patience to learn what works for you, and have the persistence to see it through.

Being mindful of portion, proportion, practicality, patience, and persistence, these guidelines have really helped when relearning how to feed myself. And it was a learning process. But at the same time, it was actually kind of fun! Every week was a new experiment. I found some recipes that sounded delicious, tried them out, had some hits, had some misses, and then tried a new experiment the next week. I figured out what I was comfortable with, what I enjoyed, and as I cooked more recipes, it got easier and it ended up being a lot of fun! I didn’t set out to develop a serious cooking and baking hobby. It just happened! I just wanted to learn how to cook well enough to feed myself in a healthy way. You don't have to get as involved as I did.  Healthy options can be fast and easy, and even inexpensive!  Give change a chance.


I've always loved cheesecake, but I’ve never owned a springform pan, which kept me from attempting my own all this time. Then I saw this recipe for cheesecake squares, and the heavens parted. Why didn’t I think of this sooner?

I love the combination of graham crackers and cinnamon, so I thought infusing it with a little Goldschlager, which is a cinnamon liquor, would go nicely. And it was awesome! Don’t have Goldschlager on hand? Well I highly recommend it for your liquor cabinet. Ever had a gingerbread martini? It's 2 parts Bailey’s, 1 part butterscotch schnapps, 1 part Goldschlager, shaken over ice. It will change your life. My favorite cocktail to drink around Christmas.

I love the deep, rich sweetness from the dulce de leche, and the Kahlua complimented the flavor subtly, but deliciously. Next time I want to try it with rum just to see if it holds up a bit stronger, but I definitely liked the Kahlua. Do I even need to go on about the flavor of these little gems? The cinnamon graham crust, the creamy, caramel cheesecake, the silky chocolate... They are divine. Heaven in your mouth. Ecstasy!  All the flavors and textures were wonderfully balanced in a perfect bite.

I cut these up super small so I could have just a bite of deliciousness. They are rich and the flavors are bold, so a bite was really a satisfying treat.  Feel free to cut yours a wee bit bigger.

The original recipe called for a 8 inch square baking pan, which I don’t have, and I didn’t modify the recipe to account for that when I made it. I think overall it was fine, but the crust layer was a bit too thin.  I had to really stretch out the crust layer to cover to whole pan. So I tweaked a few of the ingredients in my recipe to account for it.

This recipe, I would guess like many cheesecake recipes, is a bit of a process.  It involves lots of time in the refrigerator to chill and set, so make sure you read through the entire recipe before planning to bake it up an hour before company comes over.  I'm notoriously forgetful of that kind of thing when I bake.


A special thanks to my friend Geri for helping me come up with the name of these beauties!  You gotta have fun with it, right?


Tipsy de Leche Cheesecake Squares
Adapted from Smitten Kitchen

Makes 81 1-inch squares

For the crust:
4oz graham crackers, or enough for 1 1/4 cups of crumbs
2 TB sugar
pinch of salt
1/4 cup unsalted butter (4 TB), melted
2 TB Goldschlager (cinnamon liquor)

For the cake:
1 14oz can sweetened condensed milk (for the dulce de leche)*
1 tsp unflavored gelatin
1/4 cup milk (I used 1%, but whole is probably preferred)
1 8oz package cream cheese, room temperature
2 large eggs, room temperature
1/2 tsp kosher salt
1/4 cup Kahlua (or rum)

For the glaze:
3.5 oz dark chocolate, finely chopped
1/4 cup unsalted butter (4 TB)
2 tsp light corn syrup


For the crust:
  1. Preheat oven to 325 degrees. Line a 9 inch square baking pan with a sheet of aluminum foil, leaving a few inches of overhang on the two opposite sides. Lay another sheet of aluminum foil similarly, covering the other two sides. Spray the pan with baking spray for good measure.
  2. In a food processor, break up the graham crackers and pulse until you have crumbs. Measure out 1 1/4 cups of the crumbs, remove any leftover (and munch while you bake!), and put the measured crumbs back in the bowl of the food processor.
  3. Add the sugar and salt, and with the mixer running, drizzle in the melted butter and then the Goldschlager and blend until it is fully combined.
  4. Press the mixture into the prepared baking pan in an even layer. Bake 10 minutes, then cool in the pan for 5-10 minutes.

For the cake:
  1. To convert the sweetened condensed milk to delicious dulce de leche, pour the can of milk into a bowl (or small pot) set over simmering water. Cover bowl and cook, stirring occasionally, for 40-50 minutes until the milk is thickened and a light caramel color.*
  2. In a small bowl, sprinkle the gelatin over the milk, and let stand for 2 minutes.
  3. In a stand mixer, beat the cream cheese, eggs, salt, Kahlua, and milk mixture at medium speed for a few minutes until fully combined. Add 1 cup of the dulce de leche and mix at low speed until just combined.
  4. Pour the batter over the crust and smooth into an even layer. You're going to bake this in a hot water bath.  To do this, place the baking pan in a larger oven-proof container (I used a large roasting pan), and pour in boiling water until it reaches about halfway up the pan. Carefully move this to the oven and bake at 325 degrees until the center of the cake is set, about 40-45 minutes.
  5. Chill the cake completely in the pan for a few hours, then chill in the refrigerator, covered, for several hours or overnight.

For the glaze:
  1. In a bowl set over a pot of simmering water, combine all the ingredients. Stir until the chocolate is melted, and everything is incorporated and smooth.
  2. Pour mixture over the cheesecake and spread in an even layer. Chill, uncovered until the glaze is set, about 30-40 minutes. Make sure it's not too hard or it will be difficult to cut your squares.

To serve:
  1. Using the overhanging foil, gently pull the cheesecake from the pan and place on a cutting board. Using a thin knife, cut cake into 1 inch squares. To make sure you don’t make a total mess of your beautiful squares, wipe off the knife after each cut.
  2. Store in an airtight container in the refrigerator.
*Note: You can also buy dulce de leche, but I figure why bother?  It costs twice as much, and it's not hard to make.  But if you prefer to save a step over a penny, just measure out 1 cup of the store-bought stuff. 

Tuesday, May 18, 2010

Baking Till You're Skinny


Psych!!!

Sorry to yank your chain, but you won't catch me touting any kind of magic cookie diet here.  Baking generally involves things like flour, butter, oil, sugar, etc.  Nothing evil per se, but a diet high in carbs (especially refined flour like all purpose, which basically just turns to sugar right along with all that sugar already in it) and fat isn't going to lose you any notches on your belt.  Not to make you feel guilty about consuming cakes and cookies and pies and whatever your part of your brain responsible for survival instincts that respond to body fat storing foods heart desires!  On the contrary.  Dessert should be a part of everyone's life!  If dessert is banned from your diet, then it's not a diet (as in, the way you eat...like all the time), it's just a temporary way of eating.

Unless you just don't like desserts, in which case, I don't even want to know you because that is just against nature!  If this were neolithic times you would be dead, and so you're dead to me.  Makes sense, right?

That's all just a wordy way of saying everything in moderation!  Me, wordy?  But you generally don't bake 2 cupcakes or 1 slices of pie, do you?  That's just silly!  So you're faced with eating an entire pie, and if you haven't developed some seriously iron-clad willpower, your entire pie will be gone far sooner than you might hope.

My willpower is more like aluminum foil.

So how do I bake a pie and only manage to eat 2 or 3 small slices?  Ahem, that's over the span of days thankyouverymuch!  I have some tricks up my sleeve.

As I said in my last post, Husband is my first line of defense.  When I bake something he really likes, like say, muffins, they usually don't last long enough for me to really pig out on them.  But what if you're not married?  Or your spouse refuses to help you (how selfish!)?  Or you come to realize it's not really fair to Husband's waistline when you expect him to scarf down everything you take out of the oven so you don't eat it yourself? Or what if Husband expressly asks you to stop baking so much for the love of our scale!

If no one at home will help you out (ugh, selfish!), it's time to become to most popular girl at work!  Most office environments have break rooms of some kind, right?  Share your kitchen triumphs!  Not only will you gain brownie points (Ha!  Get it?), but also it invites co-workers to strike up conversation about your hobby, and who doesn't like being the center of attention chatting about food?  And if you don't work in an office, or you hate your co-workers and don't want to feed those lame losers, how about your neighbors?  Drop off a goody bag to the couple next door.  You have friends, right?  Invite some over to help you eat whatever is looming on your kitchen counter.  It's amazing how much more social I am when I have baked goods around.

The thing with moderation is it's all about portions.  Eating a dessert that is a few bites in size is obviously going to do a lot less damage to your overall calories for the day than eating half a cake.  But when I'm craving sweets, and I'm holding the knife in my hands, I don't always cut the size of slice that I should.  I know this about myself, so I take steps to prevent myself from pigging out.

Yes, one side of my brain plots deviously against the other.  I blame you, sugar!

When I bake up a pan of brownies, and they're all nice and cooled, I cut them into teeny tiny bite-size pieces, rather than the huge bars you might buy at the grocery store.  Then I put them away!  When I want dessert at the end of the day, I grab one of my small brownie squares, rather than trusting my aluminum foil will to cut an appropriate piece.  This works for cakes, bars, and pretty much anything solid baked in a pan.  When I bake muffins and they are particularly huge, I cut them in half before storing them.  When I bake cookies, I make sure to make them as small as possible, so they come out of the oven all nice and portioned for me.

In some cases, you can bake only what you want to eat right then and freeze the rest.  Remember when I said it was silly to only bake a slice of pie?  Well I didn't really mean it.  I like to keep you on your toes.  Slice and bake cookies, scones, and pie dough (for pocket pies!) all work well.  Also, did you know that a full freezer is actually more efficient than an empty one?  Apparently it's easier, from a power consumption perspective, to keep a lot of frozen food frozen than it is to keep an empty space at a freezing temperature.  So really, by freezing your doughs, you're being green.  Good for the environment.  You are welcome planet earth!  I expect some kind of rebate check from the government any day now for my services.


Really what it comes down to is calories, right?  There is no expressly evil food (except margarine.  I hate you, margarine!).  Don't give up chocolate for a year unless someone is paying you to!  If you know you have a slice of pie waiting for you in the kitchen, take a few less bites at dinner.  Don't sacrifice healthy, nutrient-dense foods for what is essentially empty calories.  Just find a good balance.  You'll be happier.  Also, baking rocks!  Total therapy.  Am I right?

[Also, when I know I really want to pig out on something I shouldn't, I just try and work out a little more that day.  Calories in, calories out!  But that's another post...]


Oh, and that muffin up there?  At the tippy tippy top of this monster of a post?  Me wordy?  That recipe is in the queue, but I can tell you there may be fresh blackberries, brandy, and crumb topping involved.