This week’s soap box ramble will focus on shopping, and is brought to you by the letter $. Because you have to buy your food before you can cook it, right?
Facing a drastically lower income 10 months ago, I was forced to reexamine my food spending. I admit, prior to my layoff, I was spoiled. I shopped primarily at Jimbo’s out of loyalty and hoping my weekly spending would do it’s part toward keeping the only Whole Foods-like store in my area open. I loved their local, organic produce, their fresh, organic meats, their wide array of whole grain dried goods, and their minimally processed packaged food selection. I also shopped for convenience, valuing my time saved by shopping at just one or two stores a week, rather than hunting down the deals at several stores to save a few bucks. When suddenly faced with an excess of time and a deficit of money, old habits went out the window and I took the opportunity to pick up some new smart-shopper skills. I figure I can pass on a few tips I picked up while tightening the belt - not just how I saved a buck, but how I turned that into an opportunity for eating healthier foods. But first I want to preface this list by saying the very first step is to evaluate the value of your time vs. the money you could save with thriftier shopping. Obviously, if you really take the time to research the price of each product and each store to compare, are willing to hit up five or six grocery stores as opposed to just one or two, and basically able to spend hours a week being the thriftiest shopper you could be, you could save what ends up being oodles of money! But if you’re, say, juggling being a mom, working full time, and a flourishing social life, you’re probably less inclined to care if your bath tissue is 10 cents cheaper at the store across town. There’s nothing wrong with either scenario. The right thing for you is the right thing. Either way, here are some things I picked up along my miserly way that I intend to remember, no matter my food budget situation:
- Learn all of the grocers in your neighborhood, not just the big names, and decide at which stores you are willing to shop - In my neighborhood I have Ralph’s, Vons, Albertsons, Stater Bros, Barons, Jimbo’s, Fresh and Easy, Trader Joe’s, Sprouts, Henry’s, and Costco. That’s too many stores, even for me, so I decided Stater Bros and Barons I was just going to ignore because they don’t offer anything particularly different from the others. Fresh and Easy isn’t actually open yet, so I have yet to evaluate it. Jimbo’s is out of my price range. Costco is a separate beast I’ll get to later. I treat Ralph’s, Vons, and Albertsons as one store (The Megamart, I dub thee). So that leaves Trader Joe’s, Sprouts, and Henry’s as my main stores (Love them!).
- Stop throwing away those weekly ad circulars - I used to curse the grocery stores clogging up my mail box with ads. It was such a waste, since I would throw them directly into the recycling, and I often wished for a way to opt out of having them sent. But they have become the highlight of my Monday evening. Pathetic, but true. First I check Sprouts and Henry’s. They often have similar foods on sale, but always slightly different, or one store will be slightly cheaper than the other. So I make a list of which store is carrying sale items I’m interested in. I made the mistake of not making a list in the beginning and often overpaid because I would forget the cheap apples were at Henry’s while shopping at Sprouts. Then I check The Megamart ads and pick out any extra special deals, whether $.77/lb chicken thighs at Vons, or $2 off Peet’s coffee at Ralph’s, whichever store has the deals I’m interested most in, and that’s which one I end up patronizing that week. It sounds like a big time commitment, but I actually peruse the ads while watching tv after dinner. I’m just sitting around anyway, right?
- Be flexible with your menu - One of the reasons I never bothered checking the ads before was because I didn't much care what was on sale. I knew what I wanted to make, and I was going to make it, sale or no. Now I plan my weekly menu around the ads. I’ll often turn to Husband and say “Cauliflower, eggplant, and zucchini is on sale. I’m thinking a vegetable lasagna with a side of roasted cauliflower, does that sound tasty?” Or usually it goes more like, “Broccoli is on sale again, and I already did roasted broccoli 3 weeks in a row. I’m thinking I’ll make a white bean, broccoli, cheddar soup to spice things up.” I admit that I totally plan my meals around what produce is on sale. Hey, it works for me! If you were planning to do pulled pork and chicken is on super sale, maybe you could substitute.
- Meat is expensive - And by meat I mean meat, poultry, and seafood. Especially seafood. I nice fillet of salmon hasn't been in my budget for a long time. But even when it’s just a couple of pounds of chicken thighs or some cheap ground beef, meat easily ends up making up half of the total cost on the receipt. If environmental and health reasons weren't enough to practice a meat-lite lifestyle, cost definitely is. I’m not suggesting conversion to vegetarianism or replacing your burger patty with a tofurky substitute. You know me better than that! I’m merely suggesting buying less. Eating less. And learning how to incorporate meat as a flavor rather than the main event of the plate. Remember, it’s not the only form of protein out there.
- Produce is cheap - I can buy two overflowing bags of produce for under $20. How much would the equal amount of meat set you back? Hundreds? The trick is to buy what’s in season and buy what’s on sale, though that usually means the same thing. When a crop is in season, the stores get an overflow and they sell it cheap to get rid of it before it spoils. So in summer it’s zucchini and berries, in fall it’s squash and apples, in winter it’s cruciferous vegetables (i.e. broccoli and cauliflower), etc. Some produce always costs more - asparagus, winter greens, persimmons, eggplant. Some produce is always reasonably priced - celery, carrots, onions, bananas, potatoes. But even the “expensive stuff” still only sets you back a few bucks.
- The bulk bins are your friend - Don’t fear the bulk bins! Sure, you’re forced to come up with your own air-tight packaging when you get it home, but it’s called $.99 tupperware, and it’s your friend. Dried beans, split peas, lentils, rice, quinoa, millet, almonds, pecans, peanuts, etc. These items are great because, aside from the nuts, which tend to be pricier (but worth it because you don’t typically use more than a cup or so at a time at most), they are dirt cheap and amazingly healthy. You can buy a pound of dried black beans for about a buck. That’s the equivalent of I don’t even know how many cans once they’re cooked. A ton! The trade-off is the time you take into account for soaking and cooking the beans (neither activity requires much active participation from you, it’s more a planning issue). Lentils and quinoa are two bulk bin items I’m never without because they are so fantastic in every way. They are high in protein and fiber, give you the satisfaction you get from eating carbs, but are still low in the glycemic index. They are very budget-friendly, cook up in about 20 minutes, and are very versatile for a number of varying applications. Win, win, win! My Megamart, tragically, doesn’t have bulk bins worth acknowledging, so that’s another reason to scope out the alternative markets in your area, if need be.
- Packaged foods often make you pay more for less - There’s two main points here. First, the more hands your food passes through before it gets to you, the less fresh it’s going to be, the more stuff they’re going to add to it to keep it a viable product, the more you have to pay to recoup those costs. You’re not only paying more, but you’re also eating all the preservatives and additives they add to the food to keep it shelf-worthy for all those years. Second, all the pretty packaging itself boosts the cost. That little 2 serving box of cous cous or quinoa is probably something you could get in the bulk bin for a fraction of the cost.
- Find the ethnic markets - Once every 2-3 months I have a list saved up of all the ingredients I need to stock up on at my local Asian market. It usually has some combination of soy sauce, rice wine, chili oil, sesame oil, seaweed, green tea, and brown rice. I can buy every one of those items at The Megamart, but for several times the cost, and without the option of selection. The soy sauce aisle at the Asian market? Dizzying. I still have it on my to-do list to find an Indian market in the hopes they have a vast and reasonably priced spice section. Sure, it’s a special trip where you’ll only pick up a few items, but that’s why you go just every once in a while. Treat it like a special occasion.
- Join Costco - You might say you don’t need a Costco membership, you’re fine without a 5lb jar or mayonnaise. I would agree, but there is a lot more to Costco than that nowadays. When it comes to certain items, pricing at Costco just can’t be beat. A bag of fresh frozen 4oz. mahi mahi fillets for $4.99/lb - pre-portioned, convenient, and actually very delicious! I go through vanilla extract like crazy, so the huge bottle is actually totally worth it, and it’s such a deal. It’s a great place to buy pantry staples - hot sauce, green chiles, tuna, diced tomatoes, tomato paste. Sure, you’ll take awhile to go through them, but it’s canned, it’ll keep. Their prices on dairy and meats is great, though you have to evaluate your consumption needs. I can’t drink 2 gallons of milk before it spoils, so I don’t bother. But I’ll pick up a whole pork loin, portion it into 1-2lb portions when I get it home, and freeze them for easy use later. And if you’re a booze hound like my, their prices on beer, wine, and hard liquor, if you can find what you want, can’t be beat. You might even be able to share your membership. When I joined in college they let Husband (who was then merely Boyfriend) join my account, even though we weren’t related or married, so we were able to split the cost of the membership. One section to stay away from, however, is the produce section. Their prices can be confusing because they post prices by the package, but if you look in the corner of the price tag you’ll see the price per pound, and it’s generally higher than even The Megamart. And since the quality of their produce tends to be more miss than hit for me, why pay more for it?
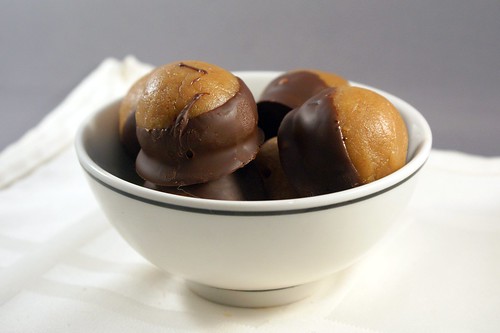
Now that we’ve shopped, let’s eat! These little bundles of joy combine three of my favorite flavors - chocolate, peanut butter, and bourbon. Each flavor really stands outs and brings its own personality to the party. The dark chocolate shell gives you that hit of rich cocoa right off the bat, and the bit of crunch is the perfect contrast to the soft, boozy, peanut buttery goodness in the middle. Oh the middle... I don’t know how to describe it, except to say that I really love the balance of ingredients. The cream cheese and graham crackers make it creamy yet substantive. I love the sweet yet salty compliment from the sugar, salt, and peanut butter. And the bourbon rounds everything out nicely, as bourbon always does. It really tastes like you’re eating a bourbon ball, but the peanut butter by no means plays second fiddle. It’s everything that makes Reese’s Peanut Butter Cups so great, but a thousand times tastier. No joke. The first time I made these was Halloween weekend - the one time of year Husband gets to eat his favorite store-bought candy. He actually jokingly chided me for ruining the moment for him, since compared to these peanut butter balls, the Reese’s just didn’t measure up. Sorry Husband. Next year I will steer clear of making these, so you can enjoy your Reese’s in peace.
Something tells me that’s not going to fly...
These make a great party dessert. Like, say, your Superbowl party next weekend. For instance. You can make them in advance, and they’ll even do better with a night in the fridge, where the flavors can introduce themselves to each other. They are easy to serve, whether plopped onto a plate or heaped in a bowl. They are finger-friendly, no utensils or plates needed, and I guarantee your friends will not be able to eat just one, so I doubt you’ll be dealing with leftovers. Plus, what is a better way to nosh during the second half than with chocolate, peanut butter, and bourbon?
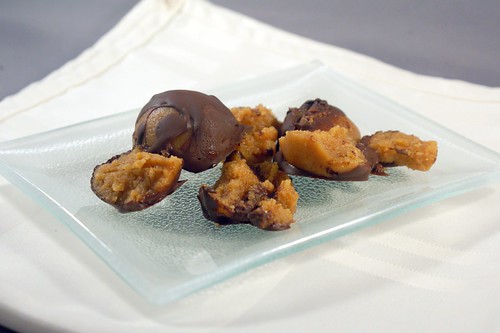
These balls come together wonderfully fast and easy right up until it’s time to coat them in chocolate. I won’t lie, that part was tricky. A total pain in the butt, even. There were casualties. Some balls just weren’t destined to make it through the molten swamp of chocolate to reach their resting place of my tupperware container. Where some balls managed to keep it together, others were made of lesser stuff and fell apart. My heart went out to them. But worry not, it doesn’t mean the balls you will inevitably lose will be ruined. I called those little mishaps “happy accidents” and promptly ate them before Husband could see what a failure I was. The things Ieat do for ego’s-sake! It does mean that if you plan on a specific number, you’ll definitely want to make some extra. The first few will be the baker’s treat, and once you get the hang of it, you’ll be fine.
Besides my structural issues, I also struggled with what to call these. I couldn’t exactly walk around asking people if they wanted to try my balls, now could I? Chocolate covered pb bourbon balls is what they are. It’s descriptive. But it’s also cumbersome! See how I was too lazy to spell out peanut butter? The recipe I adapted these from were called buckeyes because they are reminiscent of the nuts that grow on the buckeye tree. Since I’m not familiar with buckeyes, and since I think that’s kind of lame, and since these have bourbon, and thus are way better, I think they deserve their own distinction. But they do kind of look like eyes, especially if you aim your skewer right through the center.
Chocolate covered peanut butter bourbon balls, you shall henceforth be known as Bourbon Blinders.
Is that stupid? It’s a little stupid. But don’t hate on my Blinders until you’ve tried one. Because then you won’t care what I call it, as long as you get to eat it. Mwhaha!
Are you planning any fun finger foods for the Superbowl next weekend? Have a better suggestion for what to call my balls? Any thrifty shopping tips my list is lacking? Send it all my way!
PS: I feel comfortable asking you to name my balls, knowing that I have just the edible kind at my disposal. Otherwise, I might be opening myself up for teasing. Thank goodness that’s not the case.
Bourbon Blinders
AKA: Chocolate Covered Peanut Butter Bourbon Balls
Adapted from Smitten Kitchen
makes about 2 dozen
1 oz. cream cheese (I used neufatel or lowfat), at room temperature
¾ cup smooth peanut butter
½ cup graham cracker crumbs
¼ tsp sea salt (or substitute kosher salt)
1 ½ cups powdered sugar
4 TB unsalted butter, melted
3 TB bourbon
1 tsp vanilla
8 oz. dark chocolate, chopped (I used 72% chocolate chips)
Something tells me that’s not going to fly...
These make a great party dessert. Like, say, your Superbowl party next weekend. For instance. You can make them in advance, and they’ll even do better with a night in the fridge, where the flavors can introduce themselves to each other. They are easy to serve, whether plopped onto a plate or heaped in a bowl. They are finger-friendly, no utensils or plates needed, and I guarantee your friends will not be able to eat just one, so I doubt you’ll be dealing with leftovers. Plus, what is a better way to nosh during the second half than with chocolate, peanut butter, and bourbon?
These balls come together wonderfully fast and easy right up until it’s time to coat them in chocolate. I won’t lie, that part was tricky. A total pain in the butt, even. There were casualties. Some balls just weren’t destined to make it through the molten swamp of chocolate to reach their resting place of my tupperware container. Where some balls managed to keep it together, others were made of lesser stuff and fell apart. My heart went out to them. But worry not, it doesn’t mean the balls you will inevitably lose will be ruined. I called those little mishaps “happy accidents” and promptly ate them before Husband could see what a failure I was. The things I
Happy Accident!
Besides my structural issues, I also struggled with what to call these. I couldn’t exactly walk around asking people if they wanted to try my balls, now could I? Chocolate covered pb bourbon balls is what they are. It’s descriptive. But it’s also cumbersome! See how I was too lazy to spell out peanut butter? The recipe I adapted these from were called buckeyes because they are reminiscent of the nuts that grow on the buckeye tree. Since I’m not familiar with buckeyes, and since I think that’s kind of lame, and since these have bourbon, and thus are way better, I think they deserve their own distinction. But they do kind of look like eyes, especially if you aim your skewer right through the center.
Chocolate covered peanut butter bourbon balls, you shall henceforth be known as Bourbon Blinders.
Is that stupid? It’s a little stupid. But don’t hate on my Blinders until you’ve tried one. Because then you won’t care what I call it, as long as you get to eat it. Mwhaha!
Are you planning any fun finger foods for the Superbowl next weekend? Have a better suggestion for what to call my balls? Any thrifty shopping tips my list is lacking? Send it all my way!
PS: I feel comfortable asking you to name my balls, knowing that I have just the edible kind at my disposal. Otherwise, I might be opening myself up for teasing. Thank goodness that’s not the case.
Bourbon Blinders
AKA: Chocolate Covered Peanut Butter Bourbon Balls
Adapted from Smitten Kitchen
makes about 2 dozen
1 oz. cream cheese (I used neufatel or lowfat), at room temperature
¾ cup smooth peanut butter
½ cup graham cracker crumbs
¼ tsp sea salt (or substitute kosher salt)
1 ½ cups powdered sugar
4 TB unsalted butter, melted
3 TB bourbon
1 tsp vanilla
8 oz. dark chocolate, chopped (I used 72% chocolate chips)
- In a stand mixer fitted with a paddle attachment, beat the cream cheese and peanut butter until they are well combined. Add the graham crackers and mix until combined. Add the butter, sugar, salt, bourbon, and vanilla and mix on low speed until the sugar is incorporated, then increase the speed to medium and mix until the mixture is uniform.
- Line a sheet pan with parchment paper. Using a tablespoon or a 1TB scoop, shape the dough into balls and place them on the sheet pan, leaving enough space that they are not touching. Make sure you use some pressure to make them as dense as possible to avoid fall-aparts later. Place the sheet pan in the freezer for about 15 minutes so the balls will firm up.
- Melt the chocolate in a double boiler. Using a toothpick or thin skewer (the thinner, the better), spear a ball and dip it in the chocolate, rolling it around so it is well coated, and place it back on the parchment. My method was inserting the toothpick into the side of the ball, dunking it in the chocolate at about a 45 degree angle, and swirling it one rotation, all the way around. The more quickly you work, the less time the ball will have to fall apart in the molten chocolate.
- Repeat with the remaining balls, then chill them in the refrigerator to set up, about 30 minutes.


